Job Shop Orders for Bordered Rugs
Creating a Job Shop Order for a Bordered Rug
Job shop orders are used as a work-order for the assembly of an item, in this case a custom rug. A job shop order includes all the components, both inventory and labor items, need to assemble the final item. A job shop order is different than a traditional order in our system which is used as a set of picking and shipping instructions.
The end result of a job shop order is a pick list that includes all the items needed to build a bordered rug.
The cut and binding functionality can be used to facilitate orders for manufactured bordered rugs. The item policy code, S3, for bordered rug items causes the bordered rug script window to appear during the order entry process. The Bordered Rug Script Window allows you to add all the items needed to order a bordered rug in a few easy steps.
Creating a Job Shop Order for a Bordered Rug
- Begin the order entry process via menu option CUS 1.
- Proceed through the Order Header and the Shipto screen. When you get to the Order Detail screen enter the bordered rug item that you want to generate. Press Enter to access the Bordered Rug Script Window. The Bordered Script Window displays when an item identified as a finished good is entered on the Order Detail screen.
-
N indicates this is a regular order and will be allocated by ISO.
-
Y means this is a quote or backorder and no stock is allocated.
-
I - makes a rug from material already in inventory. With this option, a body carpet number is required.
-
E - allows the user to enter the associated items without creatÂing an order line for the body component. One situation where a user would not enter a body item would be where multiple rugs are on an order. One might be a 9 X 12, a second is 4 X 6 and a third is 3 x 5. If a 12 x 11 piece was allocated to make the first rug, there could be a big enough waste piece to make the other rugs on the order. This waste would be used for the other two rugs and the user would specify the E for Material from Extra as opposed to Material from Inventory (option I) which would be used for the 9 X 12 rug.
-
F - Field Balance - This option involves a work flow change. It direct the cut station operator to make all the needed cuts for the body or border while the material is at the cut station. This reduces the movement of inventory into and out of storage. Order line for the body or border item which allocates stock is increased by the amount associated with the 'F' option, while the order line created for that group uses the default body or border item as maintained in the new user or global settings.
-
C - Center Seam
-
S - Side Seam
-
B - Center Breadth
- You can assign unique dimensions to each rug separately. The first set of dimensions is for the body of the rug and the second set is for the border.
- When the entire quantity of rugs to be made is entered on one line the system creates one job group When the quantity is entered on multiple lines the system creates a job group for each order line. When multiple rugs are entered on multiple lines which are the same dimension the system will prompt user with option to bypass ISO and job variance windows.
- Press Enter and then F7 to proceed to the bill of material for the first rug.
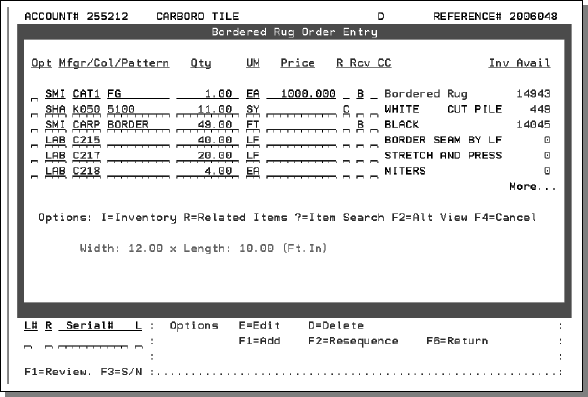
- The Bordered Rug Order Entry Screen works very similar to multi-line order entry allowing you to enter items, quantity, etc. The following options are available:
- I - Check inventory details about a specific item. The inventory window displays availability by serial number within each warehouse.
- Inventory Available (Inv Avail) is defined as: onhand inventory - (allocated + held inventory), excluding back orders. It is displayed using the native UM.
- R - Shows material that is related to an item. This option can be used to replace items that do not have any inventory on hand.
- ? - To search for and add items enter a ? next to any empty line. The Item Search is disÂplayed. Search for and select an item to include it in the job style order.
- F2 - If you want to display the items differently (expand the description), press F2. The screen shows the full item descriptions.
- The R field indicates a restriction and is used primarily for rolled goods. Some codes include:
- C = cut
- M = mid price
- R = roll
- B = roll balance
- The Rcv setting provides information about how the item is received or handled. Valid codes in this field include:
- Y - Add the quantity back into inventory. Can be used for credits or returns.
- N - Do not adjust inventory
- B - Used for back ordering an item that is not in stock at this time.
- T - Transfer a T in this field. This option prevents warehouse personnel from attempting to pull from stock at your warehouse. They will know to expect a transfer. The T also causes this item to appear on the Transfer List at the warehouse that has this material whose warehouse number you should have entered on this line.
- CC indicates the credit or commission code. This field is primarily used for credits. Each code represents the reason or category of the credit. These codes are user-defined in the Classification Codes File. You may also use this code to identify unusual sales for the sake of adjusting commissions, and for sales analysis. For example, you could define code Z as the blow out price indicator for low or negative gross profit sales. These sales are highlighted on daily registers and can be separately analyzed on many reports and screens. This field is also a Commission Exception File field, which means that the commission system can be set to adjust commission for these lines accordingly. Some example codes are:
- P - Pricing Error
- S - Shipping Error
- Y - Blow Out 3%
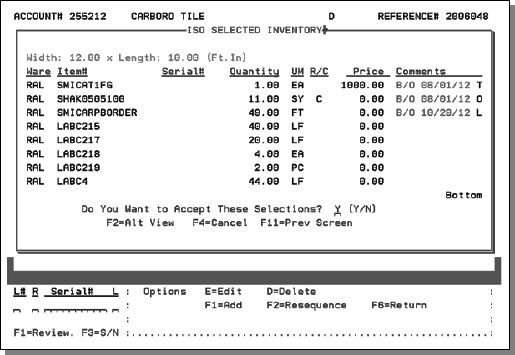
- After entering all the items, press Enter. If you have ISO activated, the next screen presents ISO inventory selections.
- Press Enter to accept ISO's selection and proceed to the Variance window.
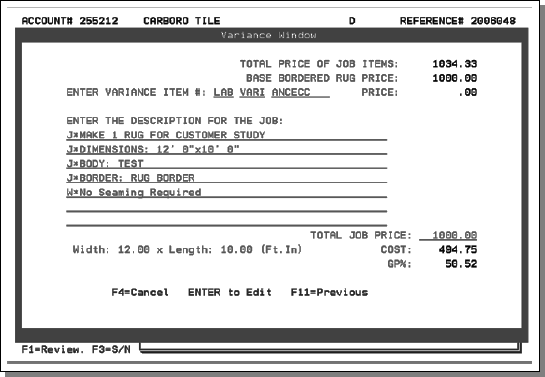
- Use this window to adjust the price of the rug. A valid labor item must be entered into the Enter Variance Item # field.
- Press Enter to access the Bordered Rug Order Entry screen for the second rug. If the second rug line had been identical to the first rug line on the bordered rug order entry window, the user would have been prompted to bypass the ISO and Job Variance windows for the subsequent job groups.
- Press Enter to return to the Order Detail screen where you can press F1 to review the order.
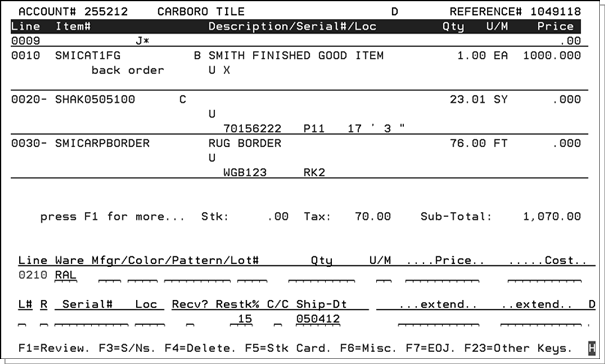
- Notice the J* at the beginning of the order review. This directs the system to only print comÂment lines that begin with J*.
- The component lines are identified with a - after the line number, 0020-, 0030-, 0040-.
- The quantities of the body and border item numbers include the amounts needed for the second rug.
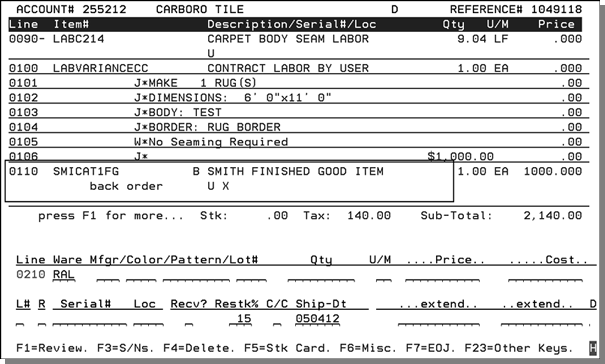
- Press F1 to view more details. The second bordered rug is added to the order at line 110.
- The default item numbers used for the second rug are on the order at lines 120 and 130.
- Press F1 to access the rest of the order review lines and the price of the assembled rug.
- Press F7 to process the order and print a pick list.
- The next step is to use the Light Manufacturing and Assembly application to relieve component inventory and add the finished bordered rug into the system.
The item policy code S3 in the Item File identifies items as finished goods.

|
Setting |
Description |
|
# of Rugs |
The number of rugs of the same size you are making. The default for this setting is 1. The # of Rugs is brought over from order entry. Enter the body and border item numbers. |
|
Body Carpet
Pattern Repeat |
This is the item used to make the body of the rug. The Body Carpet width default comes from the Item Width field of the Item Profile screen. The width is expressed in Ft.In. so 72inches in the Item Width field in the Item file translates to 6.0. Enter a ? to access the Item Keyword Search screen
where you can find items and check inventory levels.
If the body item has its Pattern Repeat information set up in the Item File (FIL 2) that information is imported in. If the pattern repeat is not established in the Item File, the Pattern Repeat fields are left blank. |
|
Border Material |
This is the item used to make the border of the rug. Enter a ? to access the Item Keyword Search screen
where you can find items and check inventory levels.
|
|
Quote/B.O. |
This setting controls whether the items, the body carpet and the border, used to make the bordered rug can be backordered or not. |
|
Width Length |
The overall dimension of the single rug being made (including border). |
|
Material from Inv/Extra |
This setting controls whether the body or border item allocates inventory. |
|
Body Seam Position |
This setting controls where the seam is on the new rug. This position is then used to help calculate item and labor quantities. The options are: |

This field relates only to the price required, except for B which also automatically changes the quantity to be equal to the balance of the serial number selected. A B provides the roll price and takes full remaining quantity of the selected serial number. An R gives the roll price even if the quantity is for a cut. A C gives the cut price. An M gives the mid price.

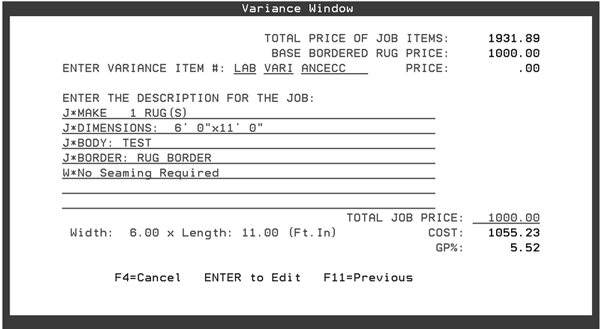
The variance item will be populated based on configuration in the RUGSCRIPT table maintained in SET 5.
Notice that the details from the Bordered Rug Script Window are pulled in as a standardized description for the job. These descriptions can be changed as needed.
On the order, the description lines are seen as J* comment lines. The J* messaging convention prevents any comment lines on orders that are not proceeded with J* from printing on customer facing documents. Detail order lines will not print on orders that use the J* convention.

This part of the documentation describes how the rug script would have worked had user selected either the F or the E option for body and/or border items in the rug script.
Notice the LABDEFAULTSBODY and LABDEFAULTBORDER items. These were set-up as the defaults using SET 2. Neither one of these item numbers allocate inventory. Their inventory allocation is rolled up into the body (SHA K050 5100) and border (SMI CARP BORDER) item number on the first rug.
Notes:
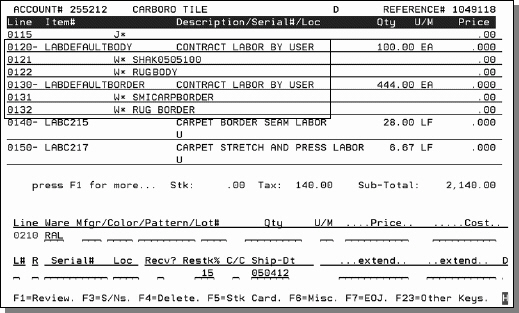
The W* lines signify warehouse comments. The first W* denotes the actual body or border item number to use and the second is the description of the default item.
Pick Label WW2 supports the printing J* comment lines. It also supports sidemarks and W* (warehouse) comments.
Editing Job Shop Orders
- If you are updating an unprocessed Job Shop via menu option CUS 16, when you get to the Order Detail screen the following window appears.
- Enter an E to edit a job group.
- Press Enter to display the ISO selected inventory.
- After accepting the ISO selections, press Enter to access the Variance Window.
- Use the Variance Window to edit job descriptions and total job price.
- Press Enter to return to the Job Shop/Job Style Orders window.
- Press F6 to return to Order Entry.
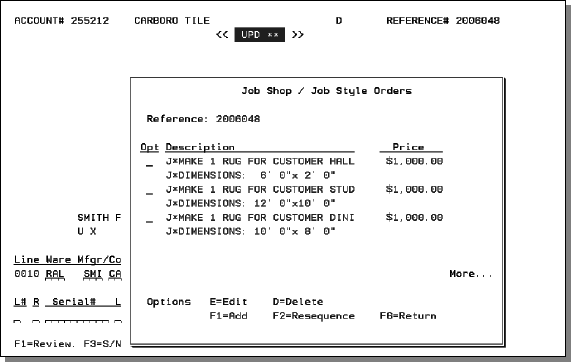

When the group is edited, the multi-line order entry screen appears pre-populated with values from the lines as they appear on the order- not with values from a bill of material. Update the fields as necessary.

Resequencing Jobs
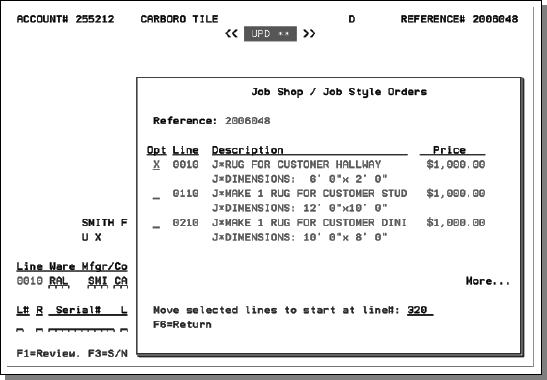
The F2 function allows you to resequence the job shop or job style group lines. After pressing F2, select the lines you want to move and the line number you want the selected lines to begin.
In the example below, line 10 would become line 320. If there were more than one line selected, the next line numbers in the sequence would be 321, 322, and so on.
Associated Files
- User ID Control Panel (SET 2) - The F2 Rug Defaults function allows you to set default body and border items for use when Options E and F are used on the bordered script window. The E and F options direct the system to roll their allocated inventory up to the next rug with an I option. The defaults entered must be valid item numbers with a labor component code (L) assigned in the Item File. Labor items are used so that inventory cannot be allocated against them. These item numbers are essentially placeholders that display on the order line during order entry, but do not allocate inventory.
- Item File Setup (for finished goods):
- The item policy code S3 is assigned to an item via the Policies Field.
- Component Code is set to S
- ISO Table assigned
- Native UM is either PC or EA
- Item File Setup (for Body Items) - The body item is assumed to be a broadloom product and we expect it to be configured as a normal rolled good item:
- Valid Packaging Class
- Component Code of R
- Valid ISO table
- Item width in inches for standard roll size
- Native UM in SY is typical for rolled goods
- Item File Setup (for border item)
- We recommend border items be set up as S (serial number) items.
- If the border material item master is configured with a component code of S the item must have an item policy of S4.
- If setup as 'R' item, set width value as the size of a 'band' not as a roll.
- Valid ISO Table
- Packaging Class conversions for all unit of measures (those in formulas and for which price and cost are maintained)
- Native UM in FT or SY but enter UMs in Packaging File to allow conversion from formulas to price, etc.
UM Conversion for Labor (Stretch and Press)- Labor items such as stretch and press need to have the correct conversions in the packaging file (the packaging file is accessed by pressing F10 on the item profile screen).
Bill-of-Material File - The Bill of Material/Kit File enables you to define the items that relate to, compliment, or go with each other. We refer to the items that relate to an items as its Bill of Materials. A kit is a special item that does not exist on it own, but is comprised of a set of other items. Bills Of Materials can be set up by Product Line and Price Class level (as well as at an item level). This enhancement utilizes the Bill-of-Material entry screen which may be populated with items if the rug being built has a Bill of Material built for it.
- Bill of Material components, to include labor, that are in kit for bordered rugs must have one of the following codes added to the last two positions of the Comment field.
- System Setting Tables
- RUGSCRIPT - The table, RUGSCRIPT, sets the body and border defaults for E and F optioned items at a global level. If the defaults are not found at the user level.
- JBVRINCITM - Use this table to establish a default variance item by user, company, cost center, or by key value. This variance item is used as the default on the Variance Window.
- The From values can be (listed in hierarchical order):
- User ID - The program uses the user ID of the person entering the order.
- Company# - The program uses the company # from the account for which the order is being entered.
- Cost Center - This option establishes the default variance item based on the cost center of the first item in the job style order entry group or based on the finished good item (item with policy S3) in the job shop order entry process.
- Wildcard (***) - The programs uses the literal value entered in the To column as the default variance item.
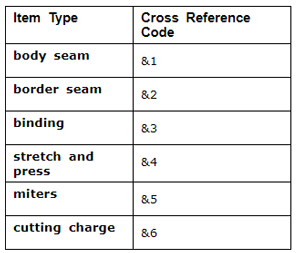
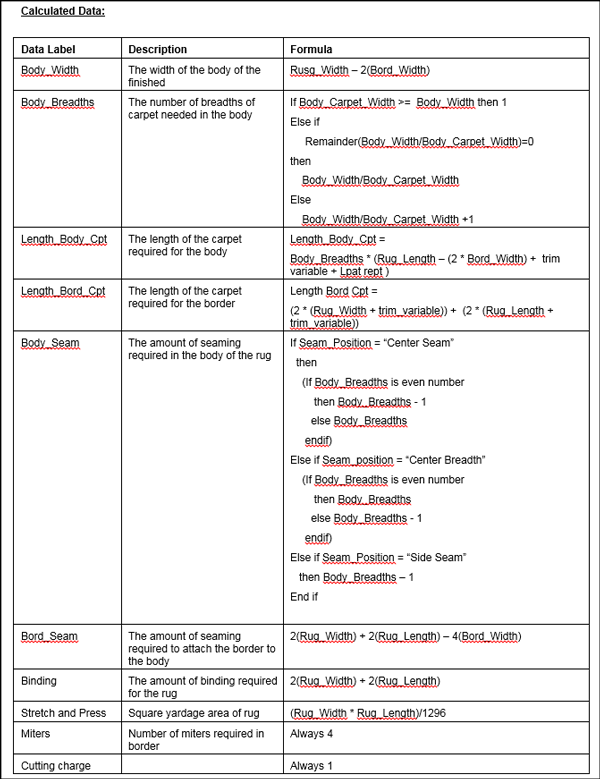
The & codes link the item to a quantity formula to calculate the correct quantities.
Formulas Used
