Inventory Receipts by Item Number - INV 5
Use the Inventory Receipts by Item Number program to enter receipts immediately into stock. This program has no edit list or back order fill option. When item and quantity are entered, they are immediately accessible on all inventory stock screens and reports. You can also use this program to correct previously entered receipts and/or costs regardless of which receiving system was originally used.
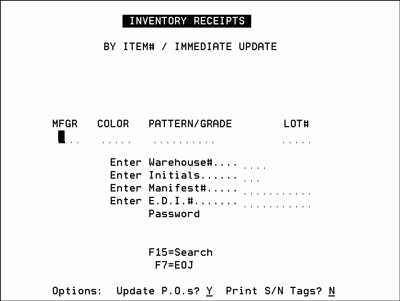
- From the Inventory Menu, enter option 5 - Inventory Receipts By Item# (immediate posting) to access the following screen.
- Enter the item number (and optionally a lot number) that is being received in the fields at the top of the screen.
- Enter the warehouse where the item is going to be received.
- Enter a password if required. You only have to enter a password when first entering the program. You do not have to re-enter it for each item you receive.
- There are two program options at the bottom of the screen. When you first select this program, the default values are shown; change as needed. The defaults are as follows:
- Update P.O.s - This option causes the system to update the purchase orders if you specify a purchase order number while receiving. The updating of the purchase orders occurs after you enter the receipts and press F7.
- Print S/N Tags - a Y in this option causes the system to print a tag for each serial number if rolled goods are received. This option is only applicable to rolled goods. Each serial number tag is printed on a special form in large block letters/numbers. These tags are then attached to rolls for easy reading of serial number at a distance. The printing of serial number tags occurs after you have entered the receipts and press F7.
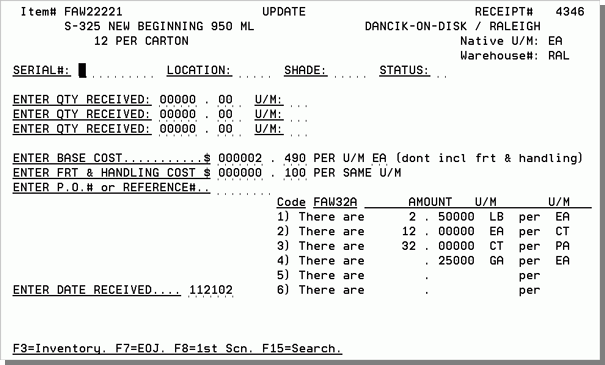
- After making all the necessary entries, press Enter. The update screen appears.
- Use this screen to enter receipts of material including quantities, and costs. If you enter a crossover item, the program starts the receiving process for the parent item, and issues an error message.Three fields are available for entering the received quantity, enabling you to enter multiple units of measure, when applicable. For example, if you received one pallet, 20 cartons and one carton contained two broken pieces, you could enter as follows: 1.00 PA, 20.00 CT, 2.00- PC. Assuming the system has the proper conversion factors, the correct total quantity is received. All conversion factors for the item are shown in the lower right portion of the screen.
-
Reverse the quantity received incorrectly by entering the quantity as a negative by pressing Field Minus after the decimal point, and entering the incorrect costs just as they were originally entered. Press Enter. This removes the quantity received at the wrong cost.
-
Enter the same quantity as above but as a positive number. Enter the correct costs. Press Enter. The last cost and average cost are now corrected, and the cost correction can be audited using Item Audit Trail or Receipts Register reports.
- Press Enter after completing the applicable fields. If the message Entry Accepted is displayed, the receipt has been made.
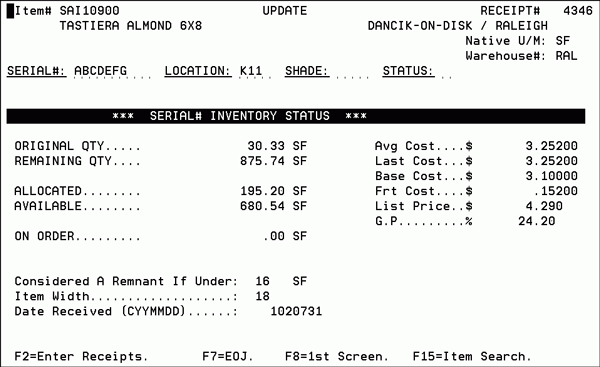
- To view the inventory statistics for a item, press F3.
- Press F8 to enter receipts for another item or F7 to finish. A report is created listing all receipts that were entered. The report is automatically put on hold in the print spool file. You can release it to print or cancel it. You can print a list or register of all receipts for selected items, warehouses, or date spans, by using the Print Inventory Register (RIV 6) or Print Receipt Register (RPO 2) reports at any time.


The screen displayed above is for a serial numbered item. The Update screen for non-serial numbered items varies slightly with the addition of three Warehouse Location fields and a Packaging Override field.
|
Field Name |
Description/Instructions |
|
The first four fields apply only to serial numbered items. |
|
|
Serial# |
Enter the register, serial, or roll number as provided by supplier. Ten character spaces are available. The System-Wide Settings - Part 2 (Green Screen menu option SET 4) activates the automatic assignment of serial numbers in the receiving process. |
|
Location |
Enter codes representing the physical locations; racks, aisles, sections of this item at the specified warehouse. These locations appear on pick lists, physical inventory reports and on the Stock Card Inquiry screen. You may have the same serial number in multiple locations. The system keeps separate quantities for each location as if the serial numbers were different. This makes it easy to manage shipment/pallets of the same serial number that are stored in different locations. |
|
Shade |
Enter the shade/dye lot# as provided by the supplier. If the supplier's number is more than four characters, key only the significant characters. If your supplier has a shade designation but not a serial number, then key the shade in the Serial# field and leave this field blank. |
|
Status |
This is a user-defined code that represents special status. Key only when applicable. For example, D = damaged, O = off-shade, L = lost, M = measured. Your system may be set to automatically assign status codes. System generated codes are always lower case alpha characters or special characters - never capital letters or numbers. |
|
Enter Qty Received |
Enter the exact quantity received for the particular item number. There are three fields for you to enter the quantities for different unit of measure, if applicable. Usually, you will only use the first Quantity field. If you receive one pallet plus five cartons, you can enter l PA in the first quantity and U/M field and 5 CT in the second Quantity and U/M fields. The system converts and totals the quantities. If the amount is to be subtracted, press Field Minus. The decimal place is shown. If you are entering a negative quantity, be sure to use Field Exit to the left of the decimal point and Field Minus to the right of the decimal point. |
|
U/M |
Enter the unit of measure in which the item is received. There are three unit of measure fields, one for each quantity field. |
|
Enter Base Cost |
Enter the new base, not including freight and handling, cost of the item being received. The standard base cost, which appears in the Cost File and/or Item File Screens, appear here. Override this field with the new costs each time you receive and the cost has changed. Entering Cost Corrections (For Serial and Non-Serial Number Items) This procedure should be used
for all cost adjustments. Do not use the Adjustments program
and do not try to correct the cost of inventory by changing
the standard cost in the Item or Cost File. Changing standard
costs does not affect the cost of onhand stock. Using this
method corrects the purchasing figures and inventory valuation
used by the accounting department.
|
|
Per U/M |
Enter the unit of measure in which the base cost is entered. This unit of measure does not have to be the same as the U/M for the quantity nor the normal costing U/M. For example, you can enter 60 CT at $3.00000 per SF, even if you normally stock and sell by EA. The program converts the quantities and the costs into your regular units of measure. |
|
Enter Frt & Handling |
Enter the new freight and handling costs of the item per the same unit of measure. The total of the base cost plus the freight cost is the new last cost of the item. Last cost is synonymous with the term last landed cost as it includes the cost of freight and handling. The standard freight cost which appears in the Cost File and/or the Item File Screens appears here. Override this field with new freight cost per unit, if it has changed. |
|
Enter P.O.# or Reference# |
Enter a purchase order or reference number to which this receipt can be linked. If you have Y in the Update Purchase Orders option on Screen 1 and you enter a purchase order number generated by the system, the system automatically updates the purchase order with the quantity received. |
|
The next two fields apply only to non-serial numbered items. |
|
|
Warehouse Location 1) Warehouse Location 2) Warehouse Location 3) |
These eight-character fields are provided for warehouse locations. They can be changed as part of the receiving process. These codes represent the physical location of this item at this specific warehouse. For example, racks, aisles, and sections. These location codes appear on pick lists, physical inventory reports and on the Stock Card Inquiry Screen. |
|
Packaging Overrides |
Above the two packaging override fields is a recap of the current packaging and conversion factors for this item. If there are any fields you need to update, enter that information in these two fields. Use these fields only when adding or changing packaging information for this specific item/lot/warehouse. For example, if this item usually comes 20 pieces per carton and this lot has a special count of 25 pieces per carton, enter that override here. Only this lot will use the 25 PC/CT. All other lots use the 20 PC/CT which would be in the Packaging or Item File. We recommend that you use this feature only when defining a special lot number to accidentally effecting existing stock at the original conversion factors. Make sure that the packaging overrides do not conflict with unaffected conversion factors. The following example displays a valid and invalid set of entries. Invalid Packaging Override 60 SF per CT 45 PC per CT 2 LB per SF overrides: 50 PC per CT This example is incorrect because 50 PC per CT replaces 45 PC per CT, but the conversion table still contains 60 SF per CT which is no longer possible. Valid Packaging Override 60 SF per CT 45 PC per CT 2 LB per SF 50 PC per CT 67 SF per CT Now all factors that relate to CT have been replaced by the override. No conflicts exist. If you have to update more than two fields, or need to add a new piece of packaging information, use the Packaging or Item File. |

This screen displays the current status and fiscal year statistics for this item at this warehouse. All costs relate to this specific serial number only. The list price comes from the Item Master File, and the gross ratio percentage for a rolled item which automatically displays quantities in feet and inches as well as in its native unit of measure.
The costs shown relate only to this SKU (this item or shade/lot number) at this warehouse. The system maintains separate costs for each item, lot, slab, or serial number, as well as separate costs at each warehouse. The list price comes from the Item Master File, and the gross profit percentage is based on the list price less the average cost. For serial number items, this screen summarizes information for all the serial numbers in the specified item number/lot number/warehouse.
If you did not enter a serial number in the SERIAL# field, the Inventory Statistics screen displays an inventory summary of all the serial numbers for the item number in the specified warehouse.
