Inventory Adjustments
The Inventory Adjustment programs can be used to enter inventory adjustments due to situations such as damage, theft, cycle count variance, samples, write-offs, or measurement variations.
All adjustments immediately affect inventory and add a record to the Inventory Transactions File, which can be viewed on the Stock Card Screen, or printed via the Item Audit Trail (RIV 1), Inventory Registers (RIV 6), or Inventory Audit Reports. When exiting this program, the system automatically creates a report labeled HKAJ or ADJUSTMENT. These reports are held in the Print Spool File. You can print these reports by releasing them from the spool file, view them on screen, or cancel them.
This program can be assigned up to two passwords. Unless one of these passwords is set to blank, you are unable to enter adjustments without a password. Only the high-level password enables you to see and override cost on the Adjustment Screen. See the Special System Maintenance Menus for other adjustment options.
There are three ways to make Inventory Adjustments.
Inventory Adjustments By Item Number - INV 2
Inventory Adjustments By Serial Number - INV 3
Inventory Inquiry and Adjustments By Location - INV 10
You can also adjust inventory during allocation swapping. This feature gives warehouse personnel more control and flexibility when handling inventory problems during the picking and shipping process. This inventory adjustment is made via a menu bar on the Warehouse and Delivery menu.
Inventory Adjustments By Item Number - INV 2
- Access the Inventory Adjustments program by selecting option 2 - Inventory Adjustments on the Inventory menu.
- Press Enter to proceed to the Inventory Adjustment Detail screen.
- Use this screen to enter quantity adjustments and change/add reorder controls. When making adjustments, you only need to enter the serial number, location if locations are used, quantity, and a reason code. Enter the shade and status only if you need to change them. Leaving those fields blank instructs the program to leave them as they are.
-
C - cycle count variance
-
D - damaged
-
M - measurement variation discrepancy between the supplier's measurements and your own.
-
R - item re-manufactured or reclassified as a remnant.
-
S - samples
-
T - theft
-
V - return to vendor/supplier
-
W - write off
-
O - other
-
Inventory Inquiry screen for an individual adjustment
-
Inventory Register Report - for Adjustments (RIV 6)
- To view shade, status, location and other information about a serial number, press F3 to display an Inventory Status screen.
- Review the inventory information and press F2 to return to the Inventory Adjustments Entry Screen.
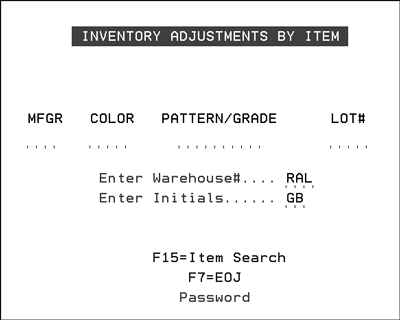
|
Field Name |
Description/Instructions |
|
MFGR |
Enter the three character manufacturer code of the item you are adjusting. |
|
COLOR |
Enter the character color code of the item you are adjusting. |
|
PATTERN/ GRADE |
Enter the character pattern code, if applicable, of the item number you are adjusting. |
|
SHADE/LOT# |
When applicable, also enter the lot number along with entries in the previous fields. A separate Stock Card Screen is created by the system for each lot number. Enter an item number, leave the lot number field blank and press F2 to see all lot numbers for that item. Do not confuse the lot number field with the serial number or with the shade field for serial number items. A lot can include multiple serial numbers. Your company may not utilize all available features. Therefore, make sure you understand from your data processing manager when/if you do use the lot number and/or serial number options. For example, item XYZ123 in warehouse NYC has 3 lots. The blank lot number (no lot number) is for regular saleable material. Lot Number REM is for remnants and off shade material. Lot Number CLM is for returned claims material. If the item number is defined as a serial number item, then each lot will also have its own serial numbers. XYZ123 lot REM will have its own serial number, as will XYZ123 lot CLM. |
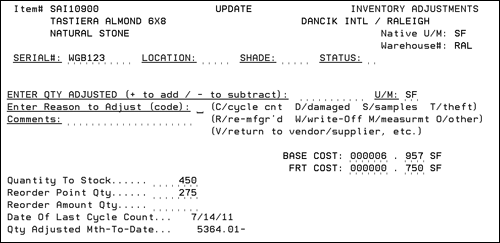
The screen displayed is for a serial numbered item. On the screen for items without serial numbers, the Serial#, Location, Shade, and Status fields do not appear.
Complete all applicable fields and press Enter. The adjustment is made if the message Entry Accepted displays. After the message displays, enter the next serial number and location if you need to change another serial number for the same item number/warehouse. A report is created listing all the adjustments that were entered. The report is automatically put on hold on the print spool. You can release it to print, or cancel it. You can print a list of all adjustments made for selected items, warehouses, dates, or types by using the Print Inventory Registers option on the Inventory Reports Menu (RIV).
Following is a description of the fields on the above screen.
|
Field Name |
Description/Instructions |
|
Serial# |
Enter the serial number you want to adjust. Space is provided for ten characters. |
|
Shade |
Enter a shade, only if you need to change the shade. Otherwise, leave this field blank. Press F3 to see the shade currently assigned. |
|
Location |
Enter the four character location of the serial number you are changing. |
|
Status |
Enter a status code only if you need to change the status. Status codes are user defined. For example, D can indicate damaged, 0 off shade, or M measured. Leave this field blank if you do not want to change the status code. Press F3 to see the status code, if any, currently assigned. |
|
Enter Qty Adjusted |
Enter the amount being adjusted for this particular item number. If the amount is to be added to inventory, press Field Exit. If the amount is to be subtracted from inventory, press Field Minus. If you are entering a negative quantity, be sure to use Field Exit to the left of the decimal point and Field Minus to the right of the decimal point. If quantity does not need to be changed, but you want to let the system know that you performed a cycle count and the quantity in the system was correct, then enter zero quantity, any valid U/M, and a reason code C for cycle count. The last cycle count date is updated. Inventory adjustments greater than 99,999.99 cannot be made for serialized items. Inventory adjustments greater than 9,999,999.99 cannot be made for non-serialized items. This prevents numbers that exceed the field sizes to cause left-most digits to be dropped. To obtain inventory balances greater than these numbers, split the balances into two or more serial number/bin locations. You can only store up to 99,999.99 units in a single serial number/bin location for a single item at a single warehouse. You can only store up to 9,999,999.99 units in total (all serial numbers and bins) for an item at each warehouse. |
|
U/M |
Enter the unit of measure in which the item is being added or subtracted. You can enter adjustments in any unit of measure for which the system has a conversion factor. |
|
Enter Reason to Adjust |
Enter a one-character code as reason for the adjustment. |
|
Comments |
This field can help you expand on the reason for the inventory adjustment. The comment(s) entered are displayed on: For example, if the adjustment code is D (damaged) you can enter the reason for the damage such as damaged in transit or pallet failed. |
|
Base Cost |
This field displays only if a high-level password is entered on the first screen. It is the base material portion of the current average cost for this item/ware/lot/serial number. A cost of more than .001 must be entered. This restriction only occurs if the user can see costs (based on user authority and on password). If the user can NOT see costs, they can not alter the cost. But if the cost was already zero, the user can still process an adjustment to the qty. |
|
Frt Cost |
This field displays only if a high-level password is entered on first screen. It is the freight portion of the current average cost for this item/ware/lot/serial number. |
|
Quantity to Stock |
This field is for purchasing. Enter the optimum quantity to keep onhand of this item at this warehouse. This quantity overrides your entry in the related Product Line File record for this SKU. Leave this field blank unless you want to override the Product Line File entry. This quantity is always expressed in the native unit of measure for this item. |
|
Reorder Point Qty |
This field is for purchasing. Enter the quantity below which a reorder should be generated. This quantity overrides your entry in the related Product Line File record for this SKU. Leave this field blank unless you want to override the Product Line File entry. |
|
Reorder Amount Qty |
This field is for purchasing. Refer
to File Maintenance for further information.
|
|
Date of Last Cycle |
The date on which a cycle count was last taken. This date is updated by the Cycle Count System (menu CYC) and by this program if the C adjustment code is used. |
|
Qty Adjustment Mth-To-Date |
The quantity adjusted month-to-date for this item. |
This screen also shows current status and current fiscal year statistics for this item at this warehouse. The costs shown relate only to this stock keeping unit this item or shade/lot number at this warehouse. The system can maintain separate costs for each item/lot/slab/serial number, as well as separate costs at each warehouse. The list price comes from the Price File (FIL 9) or Item File (FIL 2), and the gross ratio percentage is based on the list price less the average cost. This screen summarizes information for all the serials in the specified item number/lot number/warehouse for serial number items.
The adjustments made here do not affect a crossover item. Crossover items, by definition, should not have any inventory. Only the related parent item contains inventory. The program refers the user to the parent item. This feature is also available in the receiving programs.
Inventory Adjustments By Serial Number - INV 3
This program enables inventory adjustments to be performed by entering only a serial number. If the system determines that the serial number exists in more than one warehouse or bin location, it displays a pop up window from which you can choose the appropriate record to adjust. This window is also displayed if the same serial number is used for more than one item. This program enables you to perform three different types of adjustments.
- Warehouse location changes
- Quantity/size adjustments or verifications
- Cost changes
1. Select option 3 - Inventory Adjustments By Serial# on the Inventory Menu to access the Inventory Adjustments by Serial Number screen.
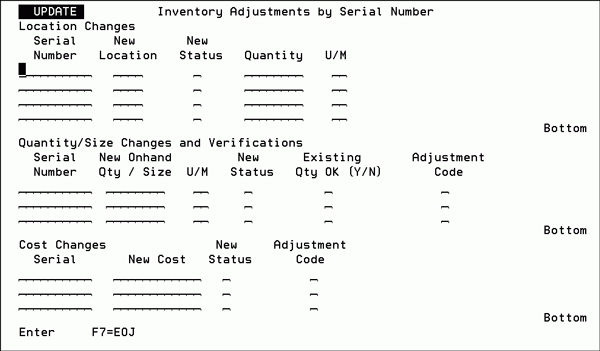
You can enter adjustments directly on this screen or you can enter only a serial number in order to display the Stock Card Window.
|
Field Name |
Description/Instructions |
|
Location Changes |
This section of the screen allows you to perform location changes by serial number. Four lines are available. Press Roll Up to enter location changes on additional lines. |
|
Serial Number |
Enter the serial number. If the serial number is found for more than one item, or at more than one warehouse or location, a selection screen automatically displays. |
|
New Location |
Enter the new location. |
|
New Status |
Optionally, enter a new serial number status code. |
|
Quantity |
Leave this field blank to move the entire available plus held quantity to the new location, or specify the quantity to move. This program will not allow you to move stock that is allocated to customer orders. |
|
U/M |
Enter the unit of measure related to the quantity, if a quantity is entered. |
|
Quantity/ Size Changes and Verifications |
This section of the screen allows you to perform quantity and size adjustments as well as cycle count verifications. A verification simply updates the last cycle count date for the item indicating the correct amount was found. |
|
Serial Number |
Enter the serial number. If the serial number is found for more than one item, or at more than one warehouse or location, a selection screen automatically displays. |
|
New Qty/ Size |
Enter the new quantity or size. Optionally, leave this field blank to display a Stock Card Window that includes multiple adjustment options. If a quantity is entered, it must represent the new onhand quantity. The program calculates the difference. |
|
U/M |
Enter the unit of measure related to the quantity. |
|
New Status |
Optionally, you can enter a new serial number status code such as M to indicate measured balance. |
|
Existing Quantity OK? |
Enter Y in this field to indicate that the existing quantity is correct and leave the Quantity field blank. This option simply updates the Last Cycle Count Date field with the current date. We recommend that you also enter the M status code. |
|
Adjustment Code |
When entering a quantity change, you should also enter an adjustment code. Valid adjustment codes include:
|
|
Cost Changes |
This section of the screen is for quickly changing costs of a serial number. The program automatically creates two entries when a cost is changed. The first entry removes the serial number at the old cost and the second entry reinstates the serial number at the new cost. |
|
Serial |
Enter the serial number. If the serial number is found for more than one item, or at more than one warehouse or location, a selection screen automatically displays. |
|
New Cost |
Enter the new cost, including the decimal point. |
|
New Status |
Optionally, you can enter a serial number status code in this field. |
2. Enter the necessary information in the appropriate area. For example, if you want to change the quantity of an item enter its serial number, new quantity and adjustment code. If you entered a serial number that has more than one item number or more than one warehouse location, the Duplicate Serial Numbers screen appears.
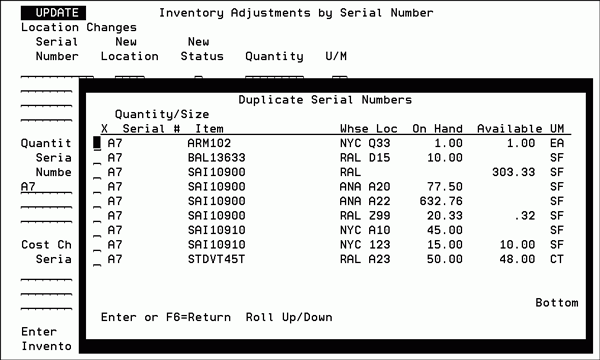
3. Select a record to adjust and press Enter. One of two things will happen:
- If you have already entered the adjustment (location, quantity, cost) on the Inventory Adjustments Screen, you will receive a message at the bottom of the screen informing you that the adjustment has been made.
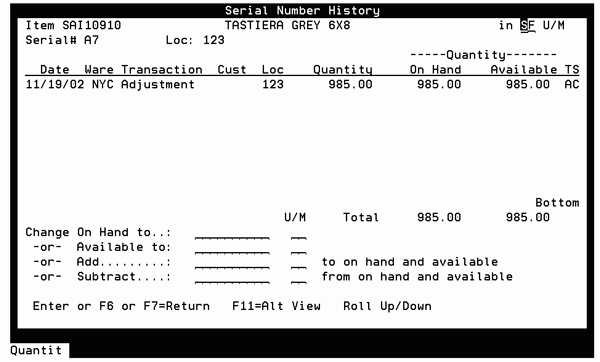
- If you did not enter the adjustment, a Serial Number History screen appears. This screen displays the history and current quantities of a single serial number and location. It enables you to enter a quantity adjustment in four different ways, thereby allowing you to select the easiest path depending on the situation.
|
Field |
Description/Instructions |
|
Date |
The date of the order, purchase order, or inventory transaction. |
|
Whse |
The warehouse code. |
|
Transaction |
The type of transaction. For example, receipt, adjustment, purchase order, transfer, customer order, invoice. |
|
Customer Name |
The first few characters of the customer name. |
|
Loc |
The location or bin number within the warehouse. |
|
Quantity |
The quantity of the inventory transaction or order. The unit of measure displayed is controlled by settings made in the control panel. |
|
On Hand |
The running balance by date of onhand quantity. The unit of measure displayed is controlled by settings made in the control panel. |
|
Quantity Available |
The running balance by date of the available quantity. The unit of measure displayed is controlled by settings made in the control panel. |
|
TS |
Transaction type in addition to the status code. Transaction types are
Status codes relate to the transaction types. For example, status codes for customer orders include code X for picked and code S for shipped. |
|
Total |
The current total available and onhand quantities. |
|
Change Onhand to |
Enter a quantity to which to change the inventory onhand. |
|
-or- Available to |
Enter a quantity to which to change the available quantity. The program figures the quantity to adjust in order to change to the new available quantity. |
|
-or- Add |
Enter a quantity to add to the current onhand and available. |
|
-or- Subtract |
Enter a quantity to subtract from the current onhand and available. |
Inventory Inquiry and Adjustments By Location - INV 10
This program lets you view all items and serial numbers currently in a location, and to process location changes. For example, you can move all of the items and serial numbers in a specific location to a new location.
- Select option 10 - Inventory Inquiry and Adjustments by Location on the Inventory Control Menu to access the first screen of the Location Inquiry And Adjustments Program.
- The default warehouse is displayed, but if you have authorization, it can be changed. Enter into the displayed fields as follows:
- show in CT if item has a CT conversion factor,
- if no CT conversion factor, show in the pick U/M (if other than CT),
- if no pick U/M or pick conversion factor, show in native U/M.
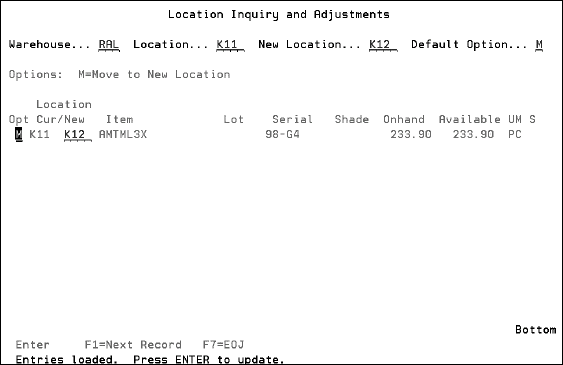
- To view the contents of a location, only fill the warehouse and location fields, and press Enter. The following example shows all of the items and serial numbers in a specific location.
- In instances where the Pick UM is not specified the native UM is used.
- In instances where the Pick UM is equal to EA or PC (as for many SF items), then cartons (CT) will be shown if a valid conversion to CT is found.
- For rolled goods, the native UM is always shown.
- Enter an M or S in the Opt field and a new location in the New field to move any of the inventory records shown.
- If you enter an S to print labels for the inventory being moved, a screen appears that allows you to designate a printer and the number of labels to print.
|
Field |
Description |
|
Warehouse |
The warehouse initially displayed by the program is the default warehouse from the Control Panel. If you have the proper authority, the warehouse can be overridden. This is the warehouse whose locations are to be displayed. |
|
Location |
Enter the bin location whose contents are to be displayed. |
|
New Location |
Enter a new location here if you intend to change the location of all or most of the contents of the location to this new location. When you enter in this field, this new location is repeated next to all records displayed for the location. You can then alter or remove the new location from some of the items shown. |
|
Default Option |
This option applies to all the inventory being moved. Enter an M in this field if you intend to move all or most of the contents of the selected location. Enter an S to print a serial number tag for the items (including slab items) being moved. You can leave this field blank and enter options individually for items. |
Notice that the item being moved has a unit of measure of PCs. The system can convert to the Pick U/M for items (such as SF items) that are normally expected to show in CT, but have no CT factor. The logic for displaying a unit of measure on this screen is:
Conversion factors are maintained in the Packaging File and/or in the Packaging segment (F10) of the Item File. Pick unit of measures are assigned via the Pick field in the Item File.
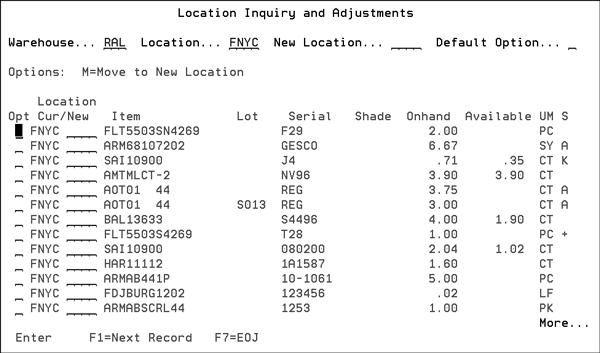
The screen above displays all of the serialized inventory records in location FNYC in warehouse RAL. The unit of measure (UM) displayed is the pick UM from the Item File (FIL 2). This makes this screen easier for warehouse personnel to use. There are certain situations where the pick unit of measure is not shown.
The new location and option fields display only if you have authority to process location changes. When you move the contents of a location, the entire onhand amount is moved. Orders or holds allocated against the inventory being moved are updated with the new location.
