Warehouse Settings File - WM2 1
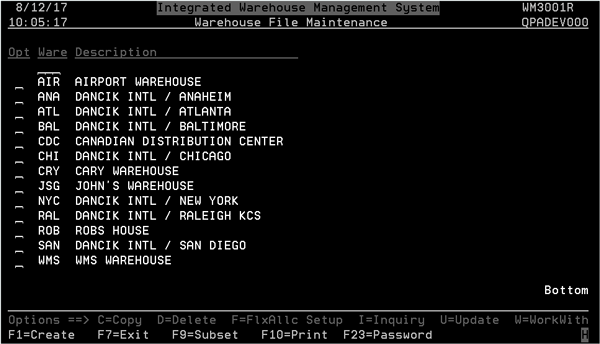
This is the starting point for all file maintenance activity for a warehouse. Each IWMS warehouse needs to be set up in this file. Once you have this file populated, you must have the location file filled in with data, or the scanning may result in stopping the operator from performing warehouse operations due to invalid locations.
1. This file is accessed via option 1- Warehouse Settings on the IWMS System Settings File (WM2).
2. When this option is selected, the first screen shows the established warehouses for access to their settings.
3. Enter a U to update, or an I to inquire into, a warehouse.
RF Inventory Adjustment and RF Replenishment Options
Automatic IWMS Flex Allocation Upon Pick Release Options
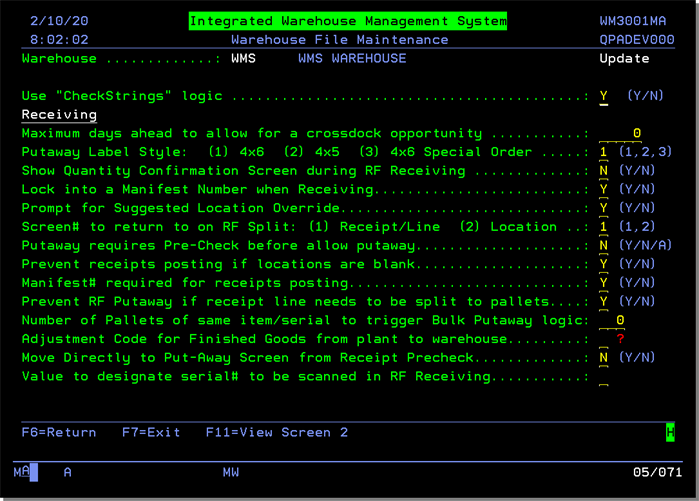
Receiving Options
| Field | Description |
| Use CheckStrings logic |
If this setting is activated, anytime the prompt is displayed on a RF screen to validate a location, the field is in a non-display mode. This means the operator cannot see the actual value of the field as it is entered or scanned. The value of the entry is then cross referenced to the Extended Location field of the IWMS Location Master to use the Location ID field of the IWMS Location Master as the validated location. To optimally use this feature, the values in the IWMS Location Master for Location ID and Extended Location should not be the same value. The value of the Location ID would be the 4 character human readable text, while the value of the Extended Location would be up to an 8 character value which is what is encoded into the actual barcode of the location racking. |
| Receiving Options | |
| Maximum days ahead to allow for a crossdock opportunity |
Crossdock opportunities allow you to unload material off a truck and take it directly to a shipping dock to fill a back order that needs the inventory. To move inventory in a cross dock opportunity the quantities of the incoming and outgoing must be exactly the same.
Enter the number of days you want the system to check for cross dock opportunities. The ship date on the back order must be within this number of days for cross docking to work. |
| Putaway Label Style |
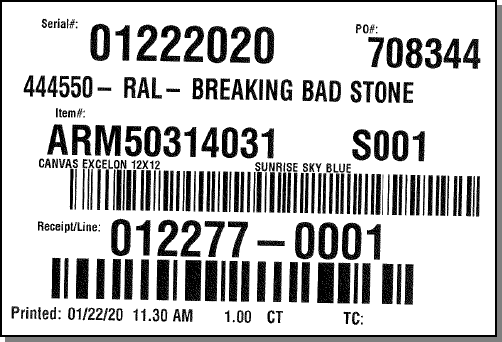
The putaway labels print in a landscape format on a 4x6 label.
|
| Show Quantity Confirmation Screen during RF Receiving |
When receiving on the RF, the application will process several different screen flows. Setting this flag determines the screen flow for the receiving putaway process. If this flag is a 'Y' the putaway process generally takes three screens, if it is a N, the putaway process generally takes two screens.
Even if this screen is set to N the operator can perform a split because the 2nd screen has an F3 available which show the quantity screen. |
| Lock into a Manifest Number when Receiving |
Setting this flag to Y prompts the operator when they are not receiving against the same manifest as the previous line they received. They may select the option to acknowledge that they are aware of this and continue on with their receiving process, or back out and receive a new line. |
| Prompt for Suggested Location Override |
When the directed putaway process suggests a location, the operator is directed to take the receipt to that location. If this flag is set to a Y, and the operator scans a location different than the suggested location, a confirmation screen will appear, requiring them to answer Y to continue. The suggested location and actual putaway location are stored in the IWMS Task History log, regardless of the setting of this flag. |
| Screen# to return to on RF Split |
When a receipt line is split on the RF unit, you have the choice of setting the screen you wish to return to once the split putaway is complete. When you split a receipt line, the quantity put away is added to the end of the receipt, while the quantity remaining is left on the original receipt line.
|
| Putaway requires Pre-Check before allow putaway |
Activating this field directs the system to require an inventory pre-check against the receipt before actually putting the inventory into a location. Pre-receipt checks are performed via option 1 on the IWMS RF menu (WM5). |
| Prevent receipts posting if locations are blank |
This setting prevents posting inventory into your system if no location was scanned or entered when the inventory was stored in your warehouse. This can help keep track of your inventory by ensuring that all inventory has a system recognized location. To use this feature you must also select a Y for Manifest# required for receipts posting.
|
| Manifest# required for receipts posting | If set to Y, a manifest number is required before posting inventory receipts into your system via option 5 - Post Receipts, Update Back Orders, & Print Pick Lists on the Inventory Receipts & Back Order Fill Menu (INB). |
| Prevent RF Putaway if receipt line needs to be split to pallets |
Enter a Y to stop the receiving process if a line needs to be split to pallet level. |
| Number of Pallets for same product to trigger Bulk putaway logic |
This logic determines if bulk putaway should be used. If a number is entered into this setting, IWMS looks for locations that can store all the pallets together. For example, if this field to 10:
|
| Adjustment Code for Finished Goods from plant to warehouse |
This setting is intended for IWMS customers who manufacture their own products and then move it into one of their own warehouses. This adjustment code is assigned to inventory that is moved out of a location in the manufacturing plant to one in the warehouse. Reports can be run against this adjustment code to see the value of manufactured inventory that is stored in the warehouse. |
| Move Directly to Put-Away Screen from Receipt Precheck | This setting makes the IWMS RF Put-Away Process one step easier. If the setting is activated, the user can go directly from the RF Pre-Check option (option 1 on RF menu) into the RF Putaway screen (option 2 on RF menu). |
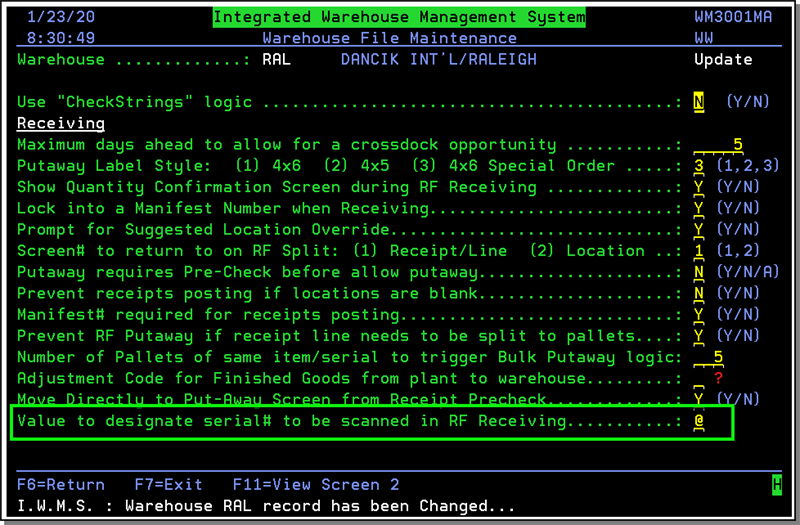
| Value to designate serial# to be scanned in RF Receiving |
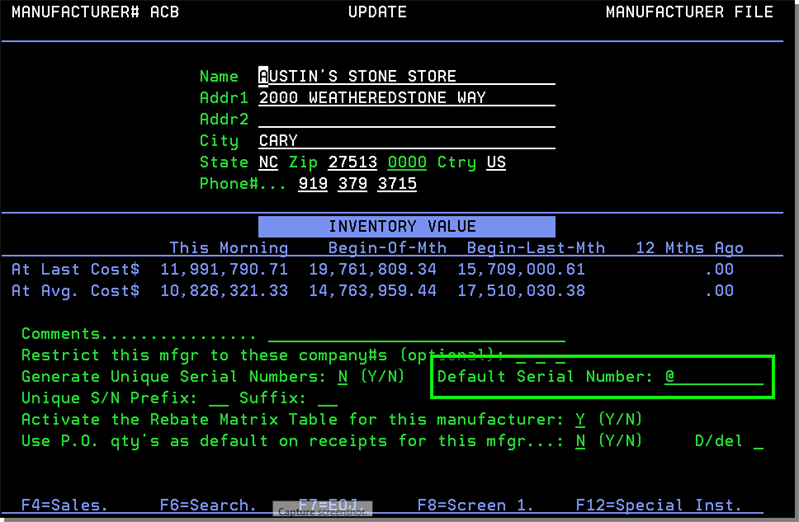
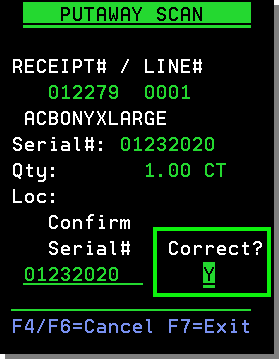
Enter a single character, such as @, which allows the scanning of a serial number on the RF Putaway Scan. The same character, @, has to entered in the Manufacturer File.
How it works Enter a @here...
...and in the Default Serial Number setting in the Manufacturer File (FIL 4).
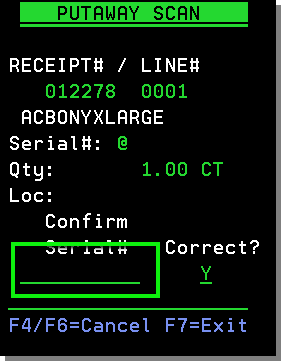
This allows the warehouse personnel to scan in the serial number on the received items on the Putaway Scan.
If this feature is not activated, by entering a @ in WM2 1 and FIL 4, the serial number is automatically populated and can only be changed by entering an N in the Correct? setting.
|
Picking Options
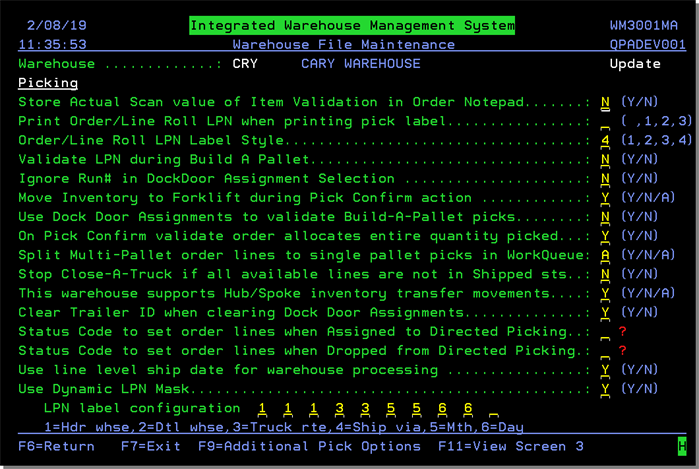
The F9=Additional Pick Options allows you to include or omit items at specific status codes from being moved.
| Field | Description |
| Store Actual Scan value of Item Validation in Order Notepad |
When scanning to validate that the correct item is being picked, the operator can scan the DES Item number or a UPC code, suppliers item number, or a receipt line number. The application will use cross references to match back and determine the DES Item number that the operator scanned. If it matches the order line, the pick may continue. Setting this flag to a Y triggers the picking application to also record the actual barcode value of the scan inside the order notepad for every pick, so if the operator scanned a UPC code, the cross reference will verify the correct DES Item number is picked, and the value of the UPC code will be logged in the notepad. |
| Print Order/Line Roll LPN when printing pick label |
This flag is used to determine if a label which contains a large barcode with the order and line number barcoded should print with the pick label. Valid Codes are:
These labels can be used for inventory movement of rolls within the IWMS application. The order and line number create a unique LPN. These labels can also be configured to print on the Cut Station defaults and generated at the time of the actual cut instead. |
| Order/Line Roll LPN Label Style |
The Order/Line Roll LPN print in a landscape format on a 4x6 or 4x5 label.
|
| Validate LPN during Build A Pallet |
The License Plate Number (LPN) is used to group multiple order lines onto a single pallet, and assign that pallet a unique number. That LPN can be used to move the multiple order lines throughout the IWMS application by scanning the single LPN. When the Build-A-Pallet process is started, the operator must first designate the LPN they are going to add the lines onto. Setting this flag to a Y forces the application to validate the LPN against the labels which have been generated using the IWMS function to print LPN's. LPN's are printed in IWMS by going to the warehouse menu, and using Option 9 Print Warehouse Labels. Then select option 8, Print a LPN Label. LPNs which are created from an outside label vendor or outside of the IWMS application cannot be validated. |
| Ignore Run# in DockDoor Assignment Selection | If this flag is set to Y, run numbers must be manually entered when assigning dock door assignments. If this setting is not activated, then only the truck route numbers need to be entered. |
| Move Inventory to Forklift during Pick Confirm action |
If set to Y, during the pick confirm process, you are required to scan the location as the fork-lift, to indicate the material is now located on that fork-lift. If set to N the material you have loaded on the fork-lift will appear to reside in the location you picked it from until it is moved from the fork-lift to the next location. Setting this option to an A for the advanced move, does the following:
|
| Use Dock Door Assignments to validate Build-A-Pallet picks |
If set to Y, this setting uses the truck route information from the order and validates it against the truck routes you have assigned to the dock door that is receiving the material. Example: If the order for the material you are moving to Dock Door 01 is assigned to be shipped on Truck Route A, Dock Door 01 must have Truck Route A assigned as a valid route for shipments being loaded and transported from that Dock Door 01 location. Note: See Menu WM1 Option 8 for Dock Door Assignments. |
| On Pick Confirm validate order allocates entire quantity picked |
If set to Y, once you have picked the items for an order, the last pick confirm will trigger the allocation for all items picked on the order. If set to N (the default), the allocations are not made until the orders are posted. |
| Split Multi-Pallet order lines to single picks in a WorkQueue |
Activating this option splits order lines that contain multiple pallets into an order line for each pallet. For example, if an order contains five pallets when it is assigned to someone to be picked the system creates four new order lines which relate to four new pallets. This ensures that each pallet gets a label and also helps to validate that each pallet was picked. Activating this option to an A works with Bulk Logic and splitting of multipallet order lines into single pallet picks in the work queue. Using option A enhances the process more if a single order line is for multiple pallets plus a quantity less than a pallet. An order line is for 2 pallets and 10 pcs could be used as an example. When you are in directed picking and this task is assigned to an operator the system splits the order into 3 lines, 2 lines for each pallet and the 3rd line for the 10 pcs. When the splitting occurs, the system recognizes that the 10 pcs are less than a pallet so Flexible Allocation runs and allocates the 10 pcs to a pickface. Now have the 2 pallet lines allocated to bulk and the line that is less than a pallet allocated to a pickface. This prevents you from having to break a full pallet in a bulk location to pick 10 pcs. |
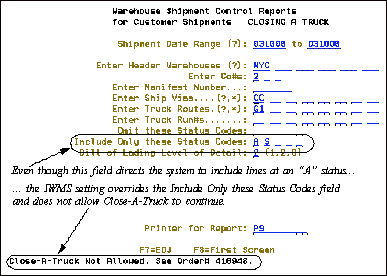
| Stop Close-A-Truck if all available lines are not in Shipped sts |
If this setting is activated, the Close-A-Truck function, accessed in the core system via option 8 on the Warehouse (WAR) menu, cannot be completed until all lines on a manifest are at an S status. An S status indicates that the items are on the truck and ready to ship. By placing a hard stop on the Close-A-Truck process, you can confirm order shipment and be assured that all the items on the manifest were included.
|
| This warehouse supports Hub/Spoke inventory transfer movements |
Activate this field to utilize IWMS' hub/spoke inventory transfer features such as: Transfers can be cross docked at an unlimited number of intermediary warehouses between the originating and destination warehouses. By scanning a transferred pallet and a location in the intermediary warehouse, the inventory is moved to that location, and all related orders are updated accordingly. Customer service representatives can see exactly where every order is as it travels between warehouses. The A option allows a hub warehouse to also be a delivering warehouse. It also allows customers to check order and inventory status of material in transit regardless of the warehouse entered on the order. Option A also allows for the update of transfer order lines, both customer and stock to stock, from the user control panel regardless of the order entry warehouse. |
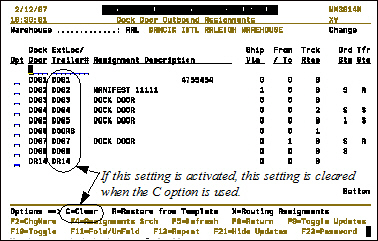
| Clear Trailer ID when clearing Dock Door Assignments |
This option adds the flexibility to clear or not clear the barcode value on dockdoor assignments when clearing the assignments to the dock door via WM1 8 - Dock Door Outbound Assignment. If this setting is activated, when the C option is used to clear the dock door assignments on WM1 8, it also clears the trailer ID. If you are scanning the inside of a trailer as the last step in shipping you probably want to activate this setting. If you have the actual dock doors barcoded, and they do not change, you should probably not activate this field (this is the default). Not activating this setting keeps the trailer ID and dock door values intact on the Dock Door Outbound Assignments screen even when the assignments are cleared.
|
|
Status Code to set order lines when Assigned to Directed Picking Status Code to set order lines when Dropped from Directed Picking |
These codes are selected from the Order Status Code Selection screen and are placed on orders when assigned or dropped within Directed Picking. Blanks are a valid code. If there are values in these fields, then the order status is assigned when the order is assigned to a picker or when the picker drops the task. |
| Use line level ship date for warehouse processing |
This setting allows you to use order line ship dates. Prior to the introduction of this setting in 2016, the order header request date was used for shipping purposes. Using the order line ship date provides warehouse personnel more control over what gets shipped and when. Activate the option to start using the order line level ship date throughout IWMS. Behind the scenes and inside the code, there are two date fields in the Bar Code Label Print Pool (BCLPOOL). One of them, which is used for a lot of the shipping calculations, is BQSHDT (order header request date). If the new setting Use line level ship date for warehouse processing is activated the order line ship date replaces the order header request date in the BQSHDT field. The following parts of the system can be affected:
IWMS Browser - The Task Queue Manager and Dock Door Graph, when run by production date, will use the line level ship date. If the Dock Door Graph is run by ship date, the order header date is used. |
|
Use Dynamic LPN Mask LPN label configuration |
When the Use Dynamic LPN Mask setting is set to Y the LPN label configuration setting must contain at least 1 complete variable (i.e., 111 for a header warehouse). The LPN label configuration setting has 10 configuration blanks to enter variables into. In the example shown above (111335566):
Associated File Automate License Plate Number on Directed Picking Build a Pallet |
F9=Additional Pick Options
This function, accessed from screen three of the Warehouse Settings (WM2 1), allows you to control the movement of inventory by its assigned status code, and assign include or omits to certain email triggers.
Option 1: Status Code control for Move and Status Change - You must decide to include or omit status codes from consideration. You can only select one option. If you choose to include status codes, only those status codes are affected. If you choose to omit status codes, all status codes except the ones you enter are affected. If you have already set up Includes/Omits, you will not see this screen.
Make a selection by clicking on it. In this example, we are including status codes to be affected by the Move and Status Change program.
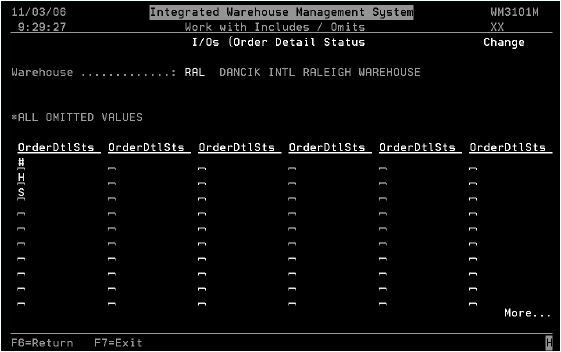
If inventory assigned to a status code of #, H, and S (Closed, Temporary Hold, and Shipped) is scanned for moving (via option 7 on the RF menu), an error message appears alerting the operator that the material should not be moved.
Option 2: Adjustment code selection for E-mail - This option is specific to the event trigger, BIGINVADJ, that alerts personnel to an inventory adjustment. This option provides the ability to include or omit inventory from being considered from the email via inventory status code. If you include codes, only those codes are considered. If you omit codes, all codes except those omitted are considered.
RF Inventory Adjustment and RF Replenishment Options
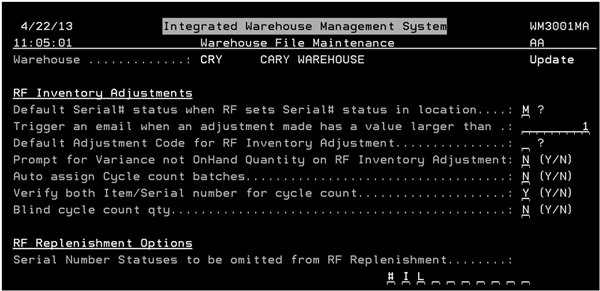
| Field | Description |
| Inventory Adjustments | |
| Default Serial# status when RF sets Serial# status in location |
The status code entered here is default serial# status code assigned when the serial# or all the serial#'s in a location are flagged using the RF function to perform the that task. A single serial# or all the serial#'s in a location can be flagged by press F9 twice from any RF application screen. This value may be overridden by the operator at the time of updating the serial# status. |
|
Trigger an email when an adjustment made has a value larger than |
Enter a dollar amount that is to be analyzed on all IWMS Inventory Adjustments. If the value of the adjustment is larger than the value entered here, an email will be sent to the configured email addresses. The email address for this event trigger are configured using menu WM8 option 20. |
| Default Adjustment Code for RF Inventory Adjustment |
The status code entered here is default serial# adjustment code assigned the inventory adjustment is made using the RF Inventory Adjustment function. This value may be overridden by the operator at the time of performing the inventory adjustment. |
| Prompt for Variance not OnHand Quantity on RF Inventory Adjustment |
This setting applies to Inventory Adjustments. Enter a Y to direct the system to ask for the difference in what it shows is on hand as opposed to what is actually in a location. For example, if the system is showing a quantity of 10 in a location, but there is really only a quantity 8, the user would enter 2 (the variance). Entering a N, directs the system to prompt for the actual quantity in the location. Using the example above, the user would enter 8. |
| Auto assign Cycle count batches |
Activating this setting directs the system to automatically assign a cycle count batch to an operator. The cycle count batches are assigned in numerical order (i.e. batch 100 is assigned before batch 200). If N is entered in this setting, operators can pick and choose the batches they want to work with. |
| Verify both Item/Serial number for cycle count |
Activating this setting ensures that both the Item number and serial number must be entered for all inventory except ROLL goods. For roll goods (items with an R component code in the Item File (FIL 2)) only the serial number is required; even if this setting is activated. |
| Blind cycle count qty | This setting gives you the option of displaying quantities on the RF cycle count screens. |
| Allow adding inventory using Item Avg Costing | Average item costing is the application of the average cost of a group of assets to each asset within that group. For example, if there are three widgets having individual costs of $10, $12, and $14, average costing would dictate that the cost of all three widgets be treated as though they were $12 each, which is the average cost of the three items. |
| Replenishment Options | |
| Serial Number Statuses to be omitted from RF Replenishment |
This setting allows you to designate up to seven serial number statuses to exclude from RF replenishments. The serial number statuses are automatically defaulted in:
Enter a ? in one of the 10 serial status code fields and press Enter to access a listing of all the available serial status codes. Associated Files
|
RF Menu Options

| Field | Description |
| Starting Character for Control Panel to designate RF Job Types |
Enter a special character in this field to designate a RF only control station. The core system does not recognize special characters such as @. Using special characters allows you to bypass an operators regular workstation settings. For example, if an operator is loading a truck, he can use Option 50 - Assign Job on his RF device to select the job control panel @Loading. This control panel, used only by RF devices, can have its printer set up to print packing labels at the shipping dock. Using this feature also allows an operator to perform several jobs without having to sign off and then sign on based on the job. Control Panels are created/updated via Menu option Set 1 on the System Administration Menu. |
| RF Label Print menu option 9 uses the Warehouse Label Print Menu |
This allows you to use all the labels included in the Warehouse Print Label File (option 9 on menu WAR). Keep in mind, that all the options on the Warehouse Print Label File do not appear on the RF menu. If you plan on using this feature, you should know which label option you want to use. If you enter an N, the only label that appears on the RF device is the LPN Manifest Label. |
| Move inventory to Forklift during RF change location |
If set to Y you are required to scan the location as the forklift, to indicate the material is now located on that forklift. If set to N the material you have loaded on the forklift appears to reside in the location you moved it from until it is moved from the forklift to the next location. |
| Prompt for Equipment ID during RF options 11 and 12 |
Enter a Y to require the user to scan the equipment ID (usually a forklift) when moving inventory via RF menu options:
|
| Allow Credit Held Orders to be moved in Move and Status Change |
Enter a Y to allow inventory on credit held orders to be moved via RF option 7 - Move / Sts Chg.
|
| Show Warehouse Messages, W*, on RF guns during Picking | Using option 'Y' will show the miscellaneous order lines that start wih a W* on the RF gun. These messages appear on the pick labels, but if you are in directed picking, you do not have a label yet to see the messages, so this allows them to show in the RF. |
Automatic IWMS Flex Allocation Upon Pick Release Options
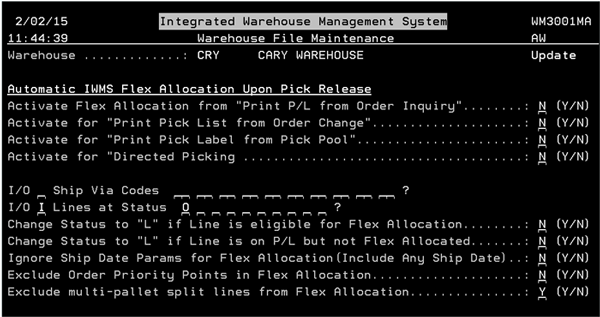
| Setting | Field Description |
|
Activate Flex Allocation from Print P/L from Order Inquiry Activate for Print Pick List from Order Change Activate for Print Pick Label from Pick Pool |
Enter a Y to activate Flexible Allocation from these parts of the system. The paths to these parts of the system are shown below:
|
| Activate for Directed Picking | This setting works in conjunction with running Flexible Allocation (FA) by Order (introduced in 2008). Essentially running FA by order means that FA can be run on demand against every item on an order. Enter a Y to activate this FA functionality when working in Directed Picking. |
|
I/O Ship Via Codes I/O Lines at Status |
Enter shipvia or status codes to include or omit for flexible allocation consideration. In the example shown below, only orders with will call (WC) shipvia codes are considered for this new flexible allocation functionality. Furthermore, order lines that are picked or cut (X), staged or assembled (A), and shipped (S) are omitted.
|
|
Change Status to L if Line is eligible for Flex Allocation Change Status to L if Line is on P/L but not Flex Allocated |
If the option Change Status to L if Line is Eligible for Flex Allocation is on, and the item is eligible for Flexible Allocation, then update the line status to L (released). If the option Change Status to L if Line is on P/L but not Flex Allocated is on, and the item appears on the pick list, but was NOT reallocated by Flexible Allocation, then still update the line status to L. This is the recommended option. These settings allow you to choose whether L serves to highlight what was flex allocated, or whether L simply indicates released for picking. The L status code is normally associated with releasing picks from the pick pool, either via option WAR 11 or via RF picking. These options enable you to consistently mark the status of released orders as L, even when released outside of the IWMS and pick label pool systems. |
| Ignore Ship Date Tests for Flex Allocation (Include Any Ship Date) |
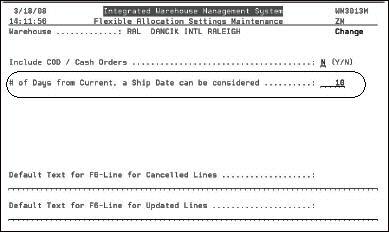
If this setting is activated, the Flexible Allocation ship date settings made within the Warehouse Settings File (WM2 1) are ignored. A warehouse's flexible allocation settings are accessed by entering an F in the Opt field for a warehouse on the initial screen when WM2 1 is selected. An example of these settings is shown below.
In this example, if this field were not activated, flexible allocation would not include cash or COD orders and on orders ten days out from shipping. By activating this setting, you allow flexible allocation to ignore the number of days setting. This is essential in a will call situation, when the customer's initial ship date is just an estimate, or when ship dates such as 2/22/22 are used. |
| Exclude Order Priority Points in Flex Allocation |
Order priority points work like THE Inventory Selection Optimizer (ISO) for sorting pick tasks and labels. Points are assigned to categories (e.g., branches, accounts, item class) and totaled. When labels are put into the label pool, it looks at each of the categories in the Order Priority screen and adds up the points assigned to the value that matches the category. The labels that have the highest point total are assigned or printed first. |
| Exclude multi-pallet split lines from Flex Allocation |
If this setting is set to a Y, when a line on an order is more than a pallet quantity and is split into more than one pallet level during directed picking, or IWMS browser assignment to an operator, the line(s) will not be valid for Flexible Allocation processing. |
Shipping Settings
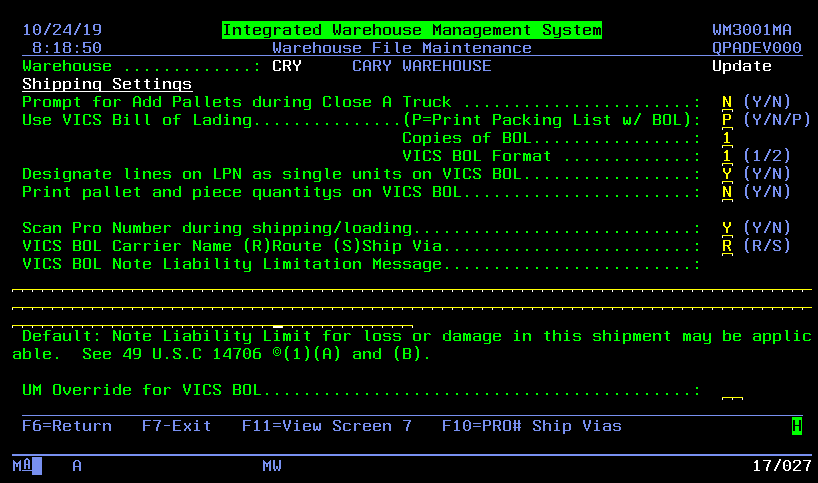
| Field | Description |
| Prompt for Add Pallets during Close A Truck | Activating this option allows you to add pallets, via a pop up screen, during the Close-A-Truck process. This not only lets you account for and recoup pallet costs, but it provides a cross check to make sure the number of pallets actually loaded matches what the system says should be loaded. |
| Use VICS Bill of Lading |
The system supports the Voluntary Interindustry Commerce Standards (VICS) for Bills of Lading (BOLs). The objective of standardizing the Bill of Lading is to ensure that the shipper, the carrier, and the customer (the consignee) are all receiving the information they need for the processing of the goods through the supply chain. The standard VICS BOL is intended for U.S. Less Than Truck Load (LTL) and Truck Load (TL) ground transport. Included with the standard Bill of Lading form is a standard Bill of Lading number. The standard Bill of Lading form and number ensure that all key data elements are present and documented in a uniform manner. Use of this standard Bill of Lading will result in:
|
| VICS BOL Format | 1 - is the default which is the existing format. 2 - When the selected format is 2 the VICS BOL prints the carrier information as follows.
|
| Designate lines on LPN as single units on VICS BOL |
This setting modifies the VICS Bill to allow items from different freight classes to be combined onto a single pallet (LPN). The designation for the combined pallet will show on the VICS Bill of Lading under the freight class of the first item found on the pallet. This functionality gives the warehouse personnel complete control of how the BOLs list contents, based on how they palletize the goods. It also corrects a situation where multiple rolls of pad or carpet were combined on a LPN, but were listed as individual rolls on the Bill of Lading. If the setting is not activated, single rolls print individually as single units on the Bill of Lading. |
| Print pallet and piece quantities on VICS BOL |
Activate this setting to ensure pallet and piece quantities are inlcuded on the VICS BOL. This setting allows you to scan a PRO number on demand. |
| Scan Pro Number during shipping/loading |
If activated and the ship via being used for the order is listed here, then the PRO number is mandatory. If the setting is set to N, a message displays letting the user know that the PRO number is not required. RF menu option 83 allows you to scan Pro numbers on demand.
|
| VICS BOL Carrier Name (R)Route (S)Ship Via | |
| VICS BOL Note Liability Limitation Message |
Enter a new Liability Limitation Message. If left blank the default is used.
|
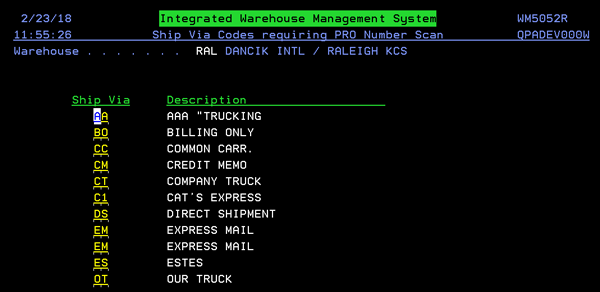
F10 - PRO# Ship Vias
This function allows you to enter the ship vias that require a PRO number to be entered.
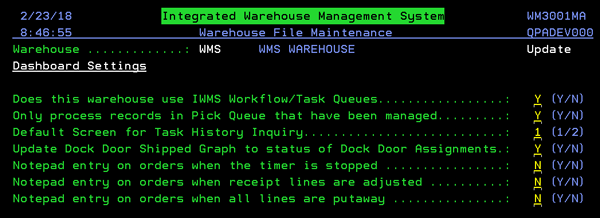
Dashboard Settings
| Field | Description |
| Does this warehouse use IWMS Workflow/Task Queues |
Entering an N in this field directs the system to remove order lines from the bar code pool as soon as they are printed. Enter a Y to keep the order lines in the bar code pool until they are invoiced. This enables you to access information and construct searches for order lines that have been picked but not invoiced via IWMS's Task Queue panel. |
| Only process records in Pick Queue that have been managed |
System directed picking only looks at orders where the production (picking day) has been manually overridden. This setting is for customers wo prefer to manually assign orders to be assigned via directed picking. If you flag this as N, system directed picking will only process orders that have the current production date (today's date). When flagged to Y, system directed picking only processes orders that have been manually overridden. |
| Default Screen for Task History Inquiry | View 1 starts the Task History log off with the order and line number, whereas view 2 begins the entries with the LPN number. View 2 also shows the eight character warehouse location. |
| Update Dock Door Shipped Graph to status of Dock Door Assignments |
Links the Shipped bar on the web based portion of the Dock Door Graph to any status code changes made via WM1 8 (Dock Door Outbound Assignments). This helps to keep the shipping information current. |
|
Notepad entry on orders when the timer is stopped Notepad entry on orders when receipt lines are adjusted Notepad entry on orders when all lines are putaway .... |
Inserts a comment intro the order's notepad when the applicable action is taken. |
Zero Pick Options
Zero Pick is a function of IWMS that allows users to tell the system they cannot fill an order line because there may not be enough material in the location, material is broken, etc. The system then sends out an email letting the appropriate people know that the order cannot be filled from the current location.

| Field | Description |
| Status Code for order line when Zero Pick cannot substitute pick |
Zero Picking is an option on the RF menu that allows an operator to flag an order line as not being able to be filled at the specified location. The status entered in this field is the status assigned to an order line where a pick cannot be replaced. |
| Is the same Serial# required when performing ISO on Zero Picks |
Zero picks occur when inventory is not present in a location and the pick cannot be completed. Flagging this setting to Y directs ISO to only use the same serial number when the inventory is assigned for picking again. Entering an N allows ISO to use any serial number assigned to the item number. |
| Serial# status code assigned to inventory being Zero Picked | Enter the status code that will be assigned to the inventory that caused a zero pick. A code like D (damaged) or L (Lost) lets the system know that there is a problem with the inventory in that location and therefore no more allocations are made against it. |
| Show Zero Pick Reason on Event Triggers |
This setting gives the operator a way to choose the reason the order could not be filled from the current location as well as adding that reason to the email event triggers. Zero pick reason codes are created via the Zero Pick Reason Codes Table (menu option WM8 108).
These are the reason codes that are included on the zero pick triggered emails. |
Miscellaneous Options

| Field | Description |
| Does this warehouse use a 12MM Zebra barcode printer |
Does this warehouse use a 12MM Zebra barcode printer
Associated Files
|
| Update Productivity Data in Batch Job |
Jobs can be stamped in three ways: in real time, as a batch job, or on demand. Real time stamping is the standard and does not require any additional set-up; whenever the RF gun is used, the job code is stamped and information such as start and stop times are recorded. Batch stamping can be run for historical stamping or to update records to a new standard. This flag controls whether log records for this warehouse are updated during batch stamping. |
| Maximum number of days to retain in the IWMS Transaction Log File |
Enter the number of days you want records to remain in the Task History Log. Any task history log files older than the specified number of days are automatically deleted. IWMS records almost all functions (i.e., changing locations, changing quantities, receiving orders) onto a tack history log. This provides you with a history of your warehouse activities. Notes about this feature:
|
| Use Badge# for logging, not user ID |
This option ensures that when a cut station operator scans their badge at the cut station the user ID at the cut station is changed to match the badge ID. This helps to produce accurate Productivity Analysis records for each operator's time. If this option is not activated a generic user ID (EX. Carpet#1) is used. Most users would just use the sign on of whoever was logged in at the time. It is time consuming to log in and out all day. However, problems can result when different people make cuts during the day, but all of the cuts are logged under a generic ID, such as Carpet#1, instead of the actual user making the cut. By recording time by badge ID, time is accurately recorded against the operator making the cut. Associated File
|
| Process component S items through cut station workflow |
This setting directs the IWMS cut station process to handle items which have been setup with an item component code of S. This allows for the handling and movement of serial numbered items from the Pre-Cut location to the Balance and Post-Cut locations. It also allows for the printing of balance and cut labels. Prior to the introduction of this setting in 2014, the IWMS cut station programs and processes were designed to handle only rolled goods (Component code R). This setting allows current cut stations that use menu option WAR 005 to process component code items R and S to operate as they exist today. The Cutting Station Program is automatically displayed from the Order/Shipping Status Update Program if the following conditions are true: The workstation Control Panel is defined as a cutting station. (To define a workstation as a cutting station, enter C as the workstation type in the Control Panel.) The item being updated has a component code of R or S. |

