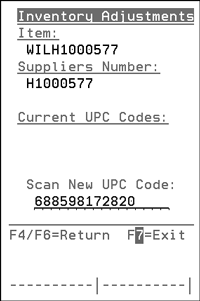
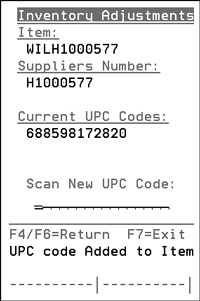
RF Menu - WM5
Contains the options that allow you to use an RF device to: receive, putaway, pick, stage, consolidate, and load inventory. There are also options for cycle counts, printing labels, assigning work and equipment.
The requirements for RF are:
- It must support 5250 terminal emulation.
- The screens are optimized for a 16 rows by 21 column display (Some vendors have 20 columns, some 22, those would work) Basically, we do not want the RF units that are wide-screen, they tend to be only 8 rows and 40 columns.
Validates putaway labels to the material on the pallet. Scan the putaway label first and then scan the product's barcode.
This option offers a scripted sequence for receiving, including provisions for splitting receipts into multiple bin locations, and provisions for sub-serial numbers.
This screen also supports, via an F11 function key, the receiving of a whole pallet into inventory. When F11 is pressed, the RF screen changes to allow the scanning of a pallet ID. This allows you to track/store a whole pallet as opposed to the individual items that make up the pallet.
After scanning the pallet number, you are prompted to scan the drop location.
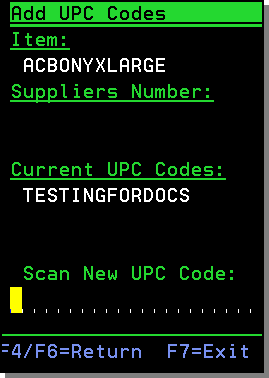
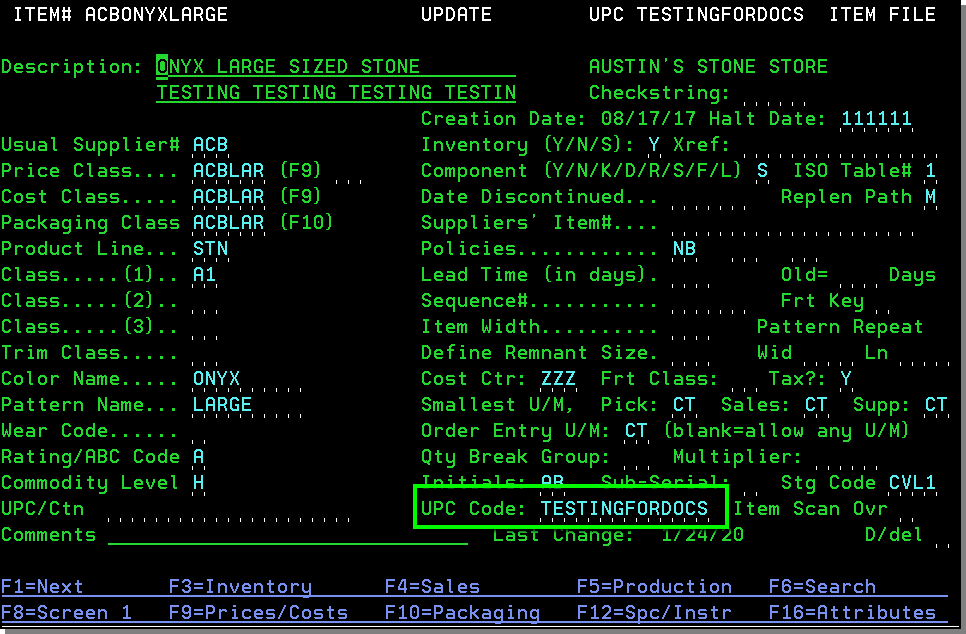
Adding UPC during RF Putaway
Before this functionality was added, the only way to add a UPC number during receiving was option 1; which was rarely used.
Now it is available in option 2 of the RF scanner, when receiving goods.
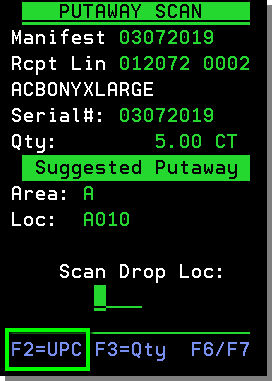
Enter a UPC label.
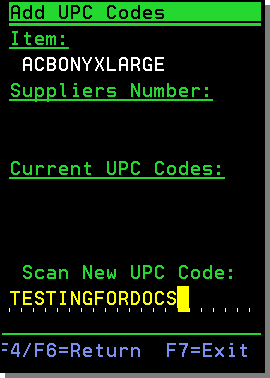
When you press Enter the UPC code shows up on the RF device AND in the item file.
Associated Files:
- Warehouse Settings (WM2 1) - The Receiving Options settings contains the option Move Directly to Put-Away Screen from Receipt Precheck that makes the IWMS RF Put-Away Process one step easier. If the setting is activated, the user can go directly from the RF Pre-Check option (option 1 on RF menu) into the RF Putaway screen (option 2 on RF menu).
- Dock Door Assignments in IWMS - The F3 function key allows you to adjust inventory as it is received. For more information, refer to IWMS.
This option lets you make real time inventory adjustments.
Allows the warehouse operator to assign one or many order lines to a single pallet, and give this pallet a unique number, known as a License Plate Number (LPN). Build a pallet is also referred to as BAP.
The manifest number displays on the IWMS RF menu picking screens when building a pallet if you are picking for a truck by manifest number. The truck route and stop are also displayed.
Manifests numbers are assigned during the Transportation Planning or Build-A-Truck process. When material is scanned for picking, the system cross references the manifest number back to an order number for validation. If the material is not correct for the order, an error message appears on the RF screen.
Printing an LPN on Demand
Prior to the addition of this function key (F8), LPNs had to be printed ahead of the picking process from via the menu option WAR 9 opt 8. With this functionality LPNs can be printed on demand on an as needed basis.
1 The F8 - New LPN Label appears first in the picking process. It appears at the bottom of the Build-A-Pallet screen.
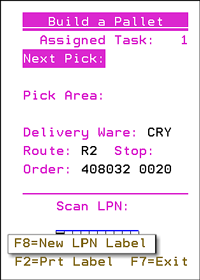
2. Press F8 and then select a LPN template on the next screen. If only one template exists you will not be prompted.
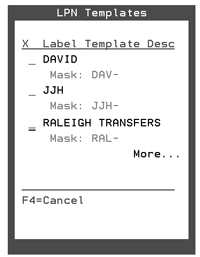
LPN label templates are created via menu option WAR 9 opt 8. Once in that application, enter the necessary information and then press F2 to save the record as a template.
3. Select a template to use. The template screen will open. You can change the number of labels and printer ID as necessary.
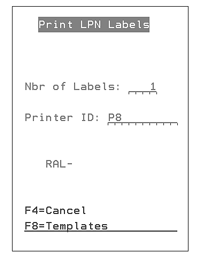
When a template is used the Edit Mask is also used. The Edit Mask is used to overlay the label number. This is done to provide the user the ability to simplify the label number. Since the lifecycle of the LPN is the duration of moving the pallet through the picking process and shipping the pallet, the unique number may wrap from time to time, and still not inhibit functionality within the warehouse. It can also be useful as a grouping mechanism.
Associated Files:
- IWMS
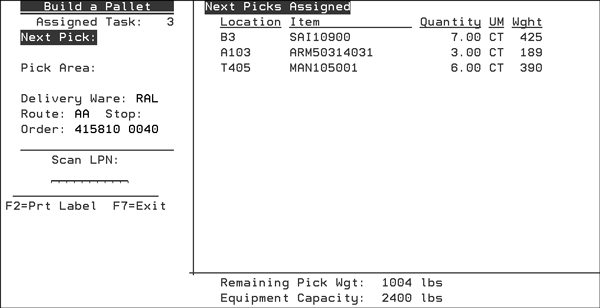
- Control Panel File Maintenance (SET 1) - The RF screen can be configured to a wide screen version. These large screen RF displays can be categorized as Vehicle Mounted. Because these devices can show the equivalent of a full regular screen, our RF screens can utilize the added space. For pickers, up to the next 10 picks display on the right side of the screen.
-
This option can be set up to work with Directed Picking to ensure pickface locations are automatically replenished from bulk locations when they get below a certain inventory level. When the quantity in a location falls below a percentage established in the location file, a work queue task is created to refill the location. This essentially automates an otherwise manual task.
Set-up
The files that need to be set-up on the Location Template File (WM1 6) and/or the Locations File (WM1 7) are:
- The Replenish this Location and Replenish From this Loc fields on Screen 2.
- Replenishment% field on Screen 1
Replenishments on the RF Screen
- On the RF menu, select option 5 - Replenishment.
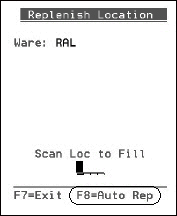
- If there are locations that the system has automatically picked up as needing replenishment, the F8 = Auto Rep function appears at the bottom of the screen.
- Press F8 to access the locations needing replenishment.
- There is no replenishable inventory in other locations.
- No matching serial number are found and the location has the serial number matching functionality activated. Serial matching functionality is controlled by settings on screen 2 of the Locations File (WM1 7)
- The location record has been changed informally (i.e., warehouse personnel put inventory into a location that does not match what is supposed to go there).
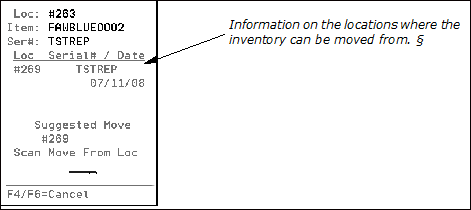
- Select a location to advance to the next screen which shows possible locations to pull inventory from.
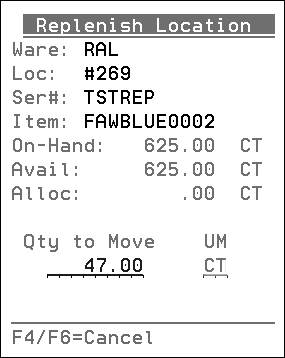
- Enter the location in the Move From Loc field and press Enter. The next screen allows you to enter the quantity to move.
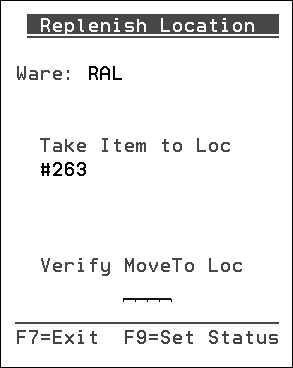
- Verify the move by entering the Moveto location.
- The next replenishment location appears.
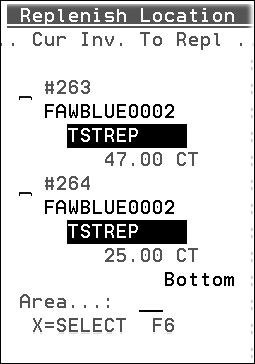
Use the Area field, at the bottom of the screen, to limit the locations to a specific area.
Locations will not display, even if they need replenishment, under the following conditions:
Note: If a location does not have enough inventory to fill the replenishment location, the operator can adjust the inventory via option RF 3 - Inventory Adjustment.
All replenishment location changes are logged into the Task History Log screen (WM3 6).
This option is an RF version of the Update Order Status Program. It enables all picking, staging, and shipping status updates to be performed on hand held or vehicle mounted devices.
When an LPN or order/line number is scanned, any stop or drop associated with the order appears.
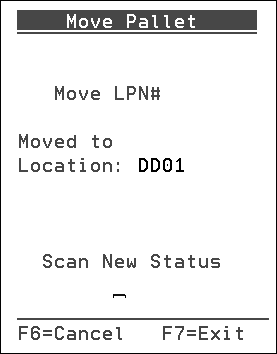
This function adds efficiency to the truck loading process by tracking the inventory movement of multiple orders lines with one physical task in the warehouse. When the pallet is moved, the system ask for a new status for the pallet after the move.
Set-up
Prior to using this feature, the following needs to be done:
- (Optional but Recommended) Establish Dock Door Assignments (via menu WMI option 8). This allows the IWMS to ensure the orders being placed on a trailer are being put onto the correct trailer.
- If you use the dock door functionality, dock doors must be assigned in the IWMS Locations Master File and flagged as a dock door. For more information, refer to Locations File.
- Establish labeling in the staging areas and on the dock doors or trailers for operators to scan.
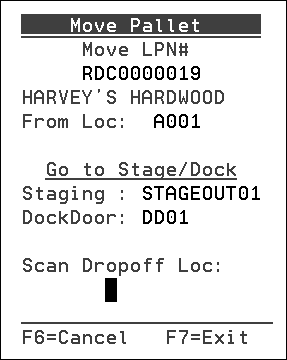
- Select option 7 - Move / Sts Chg from the RF menu. The system prompts you for the LPN or Order/Line# that needs to be moved.
- Scan the LPN# or Order Number. The screen refreshes to suggest possible move locations.
- When the material is dropped off, scan the drop-off location. Depending on the drop-off location you may also have to enter a new status code.
- If you are using this function for loading trucks, this is a good opportunity to update all the lines to a shipped status (S). All of the orders lines on the pallet or the entire roll will now be in the location with the new status.
- The picker takes the pallet to the dock door and scans the barcode for the dock door or trailer. He also scans the location label where they are dropping the pallet.
- The operator is then prompted for the next item to load on the truck. Anytime a move is made an entry is made into the Task History Log.
Screen 4 of the Location Master File Maintenance (WM1 7) contains several settings pertaining to how status codes are assigned. Some of the options are: maintain the current status code, always change it to a status code set-up in the Location Master File Maintenance, or give the operator the ability to change the code via the RF gun.
Printing a Label
The F2 function on the initial Move and Status Change screen allows you to quickly and easily print a manifest label for the material being moved.
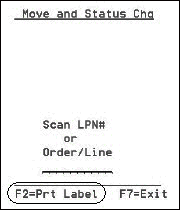
The setting Does this Location trigger Print of LPN Manifest Label on screen 3 of the Location Master File Maintenance (WM1 7) allows for manifest labels to be automatically printed for certain locations (i.e. wrapping stations).
Allows the warehouse operator to combine contents of two pallets created using the BAP function. This consolidation is usually performed in the staging area.
Associated Files:
- Location Template File - WM1 6 - Contains the setting This location removes order lines from LPN in Move and Status Change. This setting designates that when a pallet is dropped into this location all the order lines are release from the LPN.
This option lets you scan products to include on packing labels.
Associated Files:
- Warehouse Settings File (WM2 1) - RF Menu Options - Contains the setting RF Label Print menu option 9 uses the Warehouse Label Print Menu allows you to use all the labels included in the Warehouse Print Label File (option 9 on menu WAR). Keep in mind, that all the options on the Warehouse Print Label File do not appear on the RF menu. If you plan on using this feature, you should know which label option you want to use.
This option should not be used. Use Update Order Status (WAR 5).
This allows the warehouse operator to move inventory from one location to another. This option prompts for the location, then the items within the location. All orders allocated to the material moved are adjusted in real time.
This option only allows you to move all the inventory. It does not allow you to split an order.
- To change locations for items that are not assigned a serial number, use option 11 - Chgloc by Loc on the RF menu.
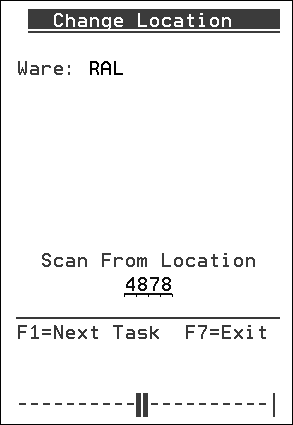
- Scan the rack location barcode for the location you are moving From.
- You are prompted to scan Package Barcode. This is to identify the item you are moving.
- Press F2 to display inventory currently in the location.
- The following cross references are searched to determine the item/serial# you are moving. The program continues prompting you until it knows the exact Item/Serial#/Location record you are moving
- Item
- UPC#
- Serial#
- Carton ID
- Receipt/Line#
- Suppliers Item#
- Scan the Rack Label of the Location you are moving the inventory To.
- The inventory record on-hand and allocated quantities are relocated to its new location.
- Any orders allocated to the Item/Serial#/Location are updated to reflect the changes to the new location.
- A transaction record is written to the Task History Log
- You are returned to the Scan Rack Location prompt.
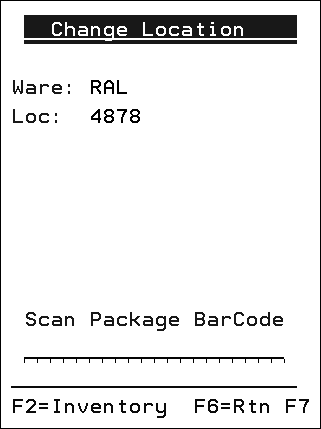
The program only allows you to move all of the inventory or a quantity up to what is available, it will not allow you to split an allocation to an order.
You may use this function to move inventory from a Post-Cut location to staging by scanning the Order/Line barcode when prompted for the package barcode.
This option, designed for rolled goods, allows a warehouse operator to move inventory from one location to another. It prompts for the serial number first. All orders allocated to the material moved are adjusted in real time.
This option only allows you to move all the inventory. It does not allow you to split an order.
- To move rolled goods, use option 12 - ChgLoc by Serial on the RF menu.
- Scan the Serial# barcode of the item you are moving.
- If the serial number is only in one location, you will be prompted for the To location. (Cut Station Post cut locations are excluded if they have a location type of T)
- If the serial number is in multiple locations, you will be prompted to scan the location barcode.
- Item
- UPC#
- Serial#
- Carton ID
- Receipt/Line#
- Suppliers Item#
- Scan the rack label of the location you are moving the inventory To.
- The inventory record on-hand and allocated quantities are relocated to its new location.
- Any orders allocated to the Item/Serial#/Location are updated to reflect the changes to the new location.
- A transaction record is written to the Task History Log
- You are returned to the Scan Rack Location prompt.
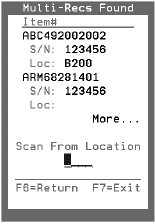
The Multiple Location screen allows you to verify the item you are trying to move.
The following cross references are searched to determine the item/serial# you are moving. If for some reason the same serial# is in the same location for multiple items (which should rarely happen) the program will continue prompting you until it knows the exact Item/Serial#/Location record you are moving
The program only allows you to move all of the inventory or a quantity up to what is available, it will not allow you to split an allocation to an order. Rolled goods require moving the entire roll, so all allocations are always moved.
If you are changing locations on a rolled item that has multiple cuts assigned to it, a * appears on the RF screen. This can alert a cut station operator that the roll has multiple cuts and should not be moved to far away from the cutting machine.
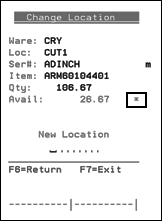
With this option cycle counts can be assigned to counters through their RF units. The inventory counts can then be entered into the RF units instead of having to record them on paper and then entering them into a terminal.
Cycle count ticket batches can be assigned to individual or multiple operators. Multiple users can access the same batch, but not the same ticket.
Using this functionality the cycle count process can be:
- Cycle count tickets are created using option 2 - Create Cycle Count Tickets & Run Report on the Cycle Count Menu (CYC 2).
- Arrange the cycle count tickets into batches using option 11 - Assign Batch#s to a Cycle Count Ticket Span on the Cycle Count Menu (CYC 11).
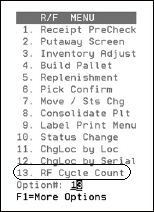
- User will sign in to RF gun and select the Cycle Count Option.
- Based on how a flag in the Warehouse settings is set, either a batch of items is assigned or a menu appears to select batches from.
- Running totals are kept for the active batch, this enables the user to sign off and then pick up the count where he left off.
- If a batch is started and not finished and it has been signed out of, it takes priority at top of the batches for reassignment.
- Based on a Warehouse File setting, the current location quantity displays or doesn't (blind counting.
- Once a batch, or batches, is finished, sign out off the Cycle count menu.
- Use the Cycle Count (CYC) menu on the Core System to post/update the batches that are complete.
Settings on the third page of the Warehouse Settings File (WM2 1) can affect how cycle counts are preformed on a RF device.
Performing a Cycle Count with an RF Device
Cross-reference between UPC codes and item numbers
Ability to Add/Update Cycle Count Tickets via an RF Device
- On the Cycle Count Menu (CYC 2), run option 2 - Create Cycle Count Tickets & Run Report. Use this option to select the items and the locations you want to cycle count. After you go through the screens in this option, the Item Stock Locations List is produced. A part of an Item Stock Locations List is shown below.
- The next step is to assign the tickets to batches. For example, you can put all the tickets for a particular item or area in the warehouse in their own batch.
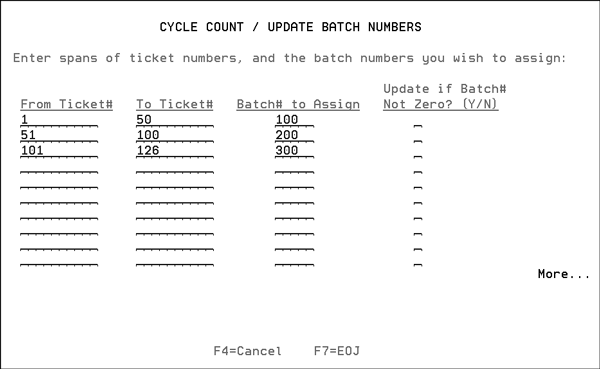
- On the CYC menu select option 11- Assign Batch#s to a Cycle Count Ticket Span.
- Enter the warehouse where the cycle count is taking place.
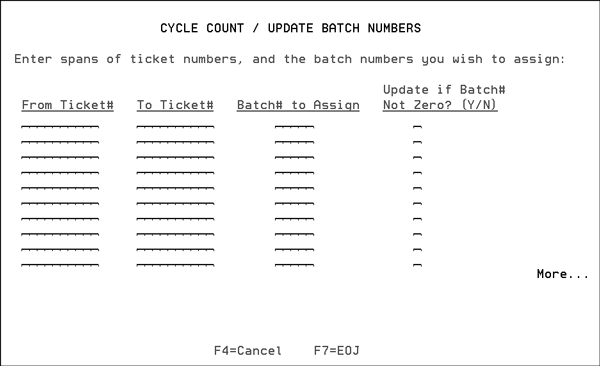
- Press Enter. The next screen is where you assign tickets to batches.
- Enter a ticket span in the From Ticket# to To Ticket# field.
- Assign the batch a number. In this example, there are 126 cycle count tickets broken into three batches.
- Enter Y in the Update If Batch# Not Zero field if you want to override batch numbers that may already be assigned to the selected ticket span. Enter N if you only want to update tickets without an assigned batch number.
- Press Enter.
- When an operator uses his RF device to perform a cycle count (via option 13 on the RF menu), the batches appear.
- Select a batch and press Enter. The first cycle count ticket in the batch appears.
- Scan the item's serial number and item number.
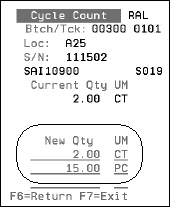
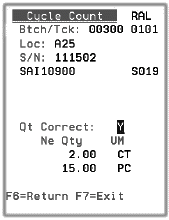
- If the quantity is correct, press Enter. If adjustments need to be made, enter them on the lines following the original quantity.
- Press Enter to accept the changes and proceed to a conformation screen.
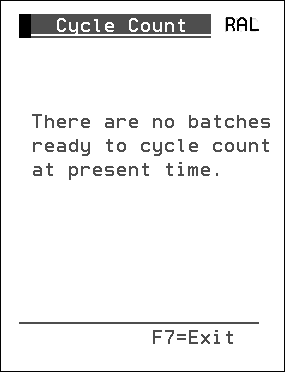
- When all the batches are complete, the following screen appears.
- After the cycle counts are finished, use option 4 - Print Counts (and Variance Reports) on the Cycle Counts menu to produce Reconciliation and Variance reports. These reporting tools let you analyze the information gathered during a cycle count and/or physical inventory.
- The last step is to post the counts. Use Option 5 - Post/Update Counts only when a count for a warehouse has been completely reconciled. This option posts the quantity and value variances to inventory using the adjustment code for cycle count.
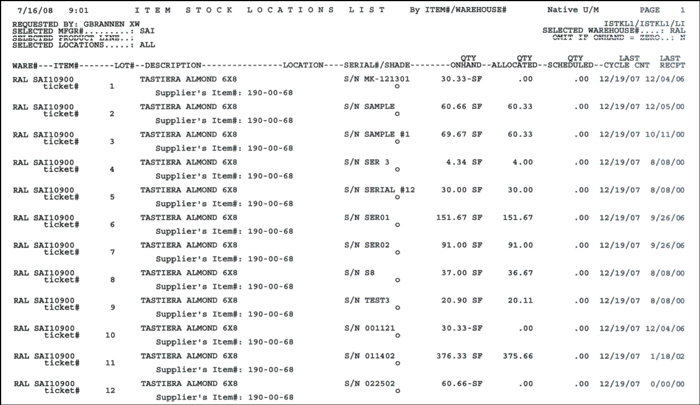
Note: You can us the Item Stock Locations List to get the cycle count ticket numbers.
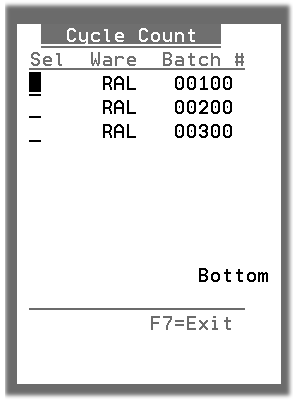
In this example, the operator can pick a batch to work with. If the Warehouse setting Auto assign Cycle count batches was activated, the system would automatically assign the batch.
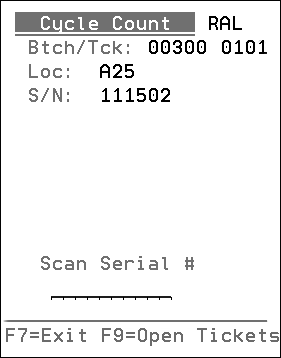
Press F9 to display the open cycle count tickets in this batch. You can then select one of the open tickets to cycle count.
Note: If it is a rolled good, you do not have to scan in the item number. Furthermore, when working with rolled goods the system keeps you in the same location until all the tickets for that location are counted. This helps to avoid unnecessary trips between locations.
The next screen to appear displays the quantity.
Note: If the Warehouse File setting Blind cycle count qty is activated the quantity does not display.
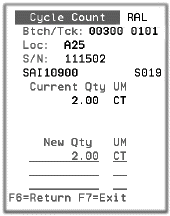
Cross-reference between UPC codes and item numbers
The EDI and Bar Code File Maintenance menu provides a quick and easy way to cross reference UPC and item numbers. This functionality is tied into the RF cycle count system.
Set up
On the EDI and Bar Code Functions Menu (EB), select option 15 - Item X-Ref File Maintenance.
The Maintain Item Cross-Reference screen appears that shows items assigned UPC numbers. UPC codes can be assigned to an item number here or on the via the UPC Code field at the bottom of the Item File Profile screen (FIL 2).
EB15.jpg
The Carton/Pack ID field is another way to cross reference an item. This field is not restricted so you can enter it in any format that your supplier uses. Generally, if a manufacturer uses UPC codes, the UPC codes are printed on each carton and the Carton/Pack ID field is not needed. However, the Carton/Pack ID field is useful for items that have no UPC codes.
- If a cross reference between a UPC code and an item number exists, whenever the UPC code is scanned using an RF device, the item number appears.
- If a cross reference hasn't been established between a UPC code and an item number, an error message appears.
Ability to Add/Update Cycle Count Tickets via an RF Device
This functionality provides the ability to add a cycle count ticket during a cycle count with the RF gun. This can decrease the time it takes to perform a cycle count and increase the percentage of accuracy.
This functionality will be demonstrated through the following scenarios:
- Scenario 1 - A user is in batch 100 and scans a roll that is on a ticket in another batch.
- Scenario 2 - A user scans inventory that exists in the system, but is not attached to any cycle count ticket
- Scenario 3 - A user finds material that does not exist in the inventory system
Scenario 1 - A user is in batch 100 and scans a roll that is on a ticket in another batch.
- Access option 13 - RF Cycle Count on the RF Menu.
- The ticket batches that are available for cycle counting appear. Select one of the batches.
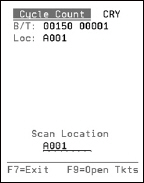
- Scan the location.
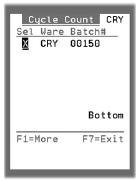
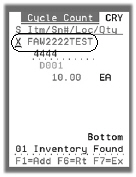
- If the serial number was not included in the current batch of tickets, the correct batch and ticket number are displayed, as shown below.
- To move this ticket from its originally assigned batch to the one you are working with, enter an X next to the ticket. The screen refreshes showing the ticket added to the current batch.
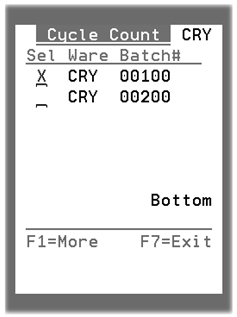
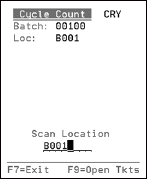
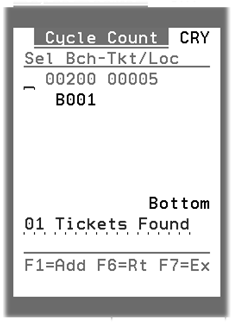
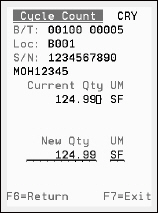
Ticket #0005 was moved from batch 200 to the current user's batch 100.
Scenario 2 - A user scans inventory that exists in the system, but is not attached to any cycle count ticket
- After selection option 13 - RF Cycle Count on the RF menu, select a batch to work with.
- Start scanning locations.
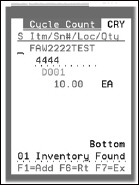
- If the serial number scanned doesn't match what is supposed to be in the location...
- If the item and serial combination exist in the inventory, the program shows you where it is in the system and gives you the option to select it as shown below.
- Select the material.
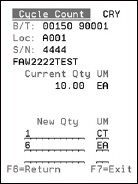
- Add the quantity of the item you found in the location.
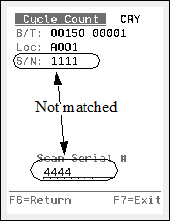
...if the scanned serial number is accepted, it replaces the existing one. Notice how it has a different color background. The background is black on the figure below, but on the RF screen it is white.
If you scan a serial number that is not on the ticket, the system then asks you for an item number.
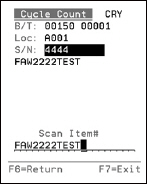
Scenario 3 - A user finds material that does not exist in the inventory system
- Scan a serial number not identified in the system.
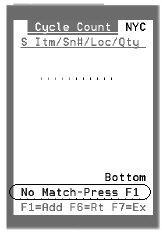
- If the system cannot find a match for the inventory, a message appears at the bottom of the RF screen.
- Press F1 to add the item to the batch. The batch number stays the same, but a 90000 number is assigned to the ticket, in this example the number is 90001.
- Even if the batch is finished and the message shown below is displayed....
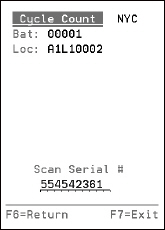
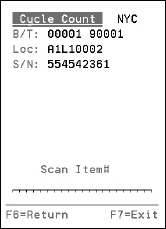
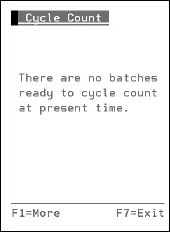
....a ticket can be added by pressing F1. Notice that a new batch number and 9000 level number is assigned. This functionally can be useful when an operator finishes all the tickets in a batch and gets out of the cycle count program. Only to discover more material in the area that needs to be counted.
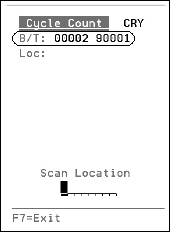
The ticket shown above was created automatically based on the found inventory.
Assigning Jobs on an RF Device
Option 50 - Assign Jobs on the RF menu allows you to change control panel assignments easily without having to signoff and then sign back onto the system. This feature also supports the copying of cut station defaults if there is a cut station setup matching the job ID. Essentially what this option does is allow an operator on the warehouse floor to use the settings from control panels from the core system. These control panels can be set up for specific functions such as building a pallet, loading or unloading, and cut stations.
Set-up
Before using this feature, you must set up the following three parts of the system.
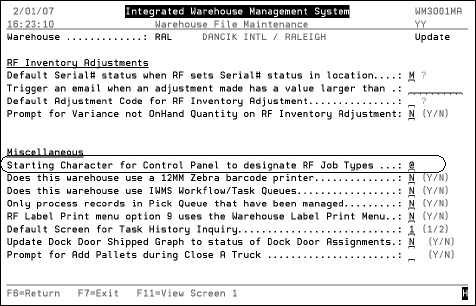
- IWMS Warehouse Settings (WM2 001) - There must be a value in the Starting Character for Control Panel to designate RF Job Types field. In the example shown below we used a @. When option 50 - Assign Job ID on the RF menu is selected, only these job types will appear.
- Control Panel Settings (SET 001) - Setup the values in the Control Panel settings (SET 001). You can establish settings for various functions such as building a pallet, loading, or cut station processes. These settings ensure the RF device uses the same settings as a normal work station or cutting station.
- Cut Station Defaults (WM2 008) - This only needs to be done if copying over cut station control panels.
Using RF 50 to Assign Jobs
The first screen in the process, as in all RF operations, requires you to scan the equipment being used for the operation.
When this option is selected, a screen similar to the one shown below appears.
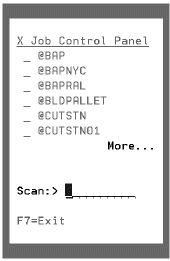
Notice that each of the control panels has a @ in front of it. This special character is established via the IWMS Warehouse Settings (WM2 001). It allows a control panel to bypass the core system, since the core system does not recognize special characters, and apply only to warehouse operations.
These control panel descriptions could be mounted somewhere on a forklift for easy access. Using the example above, if an operator changes functions (goes from building a pallet to loading) they would go to option 50 (on the RF menu) and change their control panel from @BLDPALLET to @LOADING.
You may want to create a barcode with the name of your new cut station jobs, so if you have multiple cut stations, the operator can just scan in the window below instead of having to page down to see the cut station.
After you scan or enter the desired job, the control panel and the work station/cut station defaults copy to the current session.
The operator uses this to scan the equipment he is going to be working with. For example, assigning a forklift to an operator.
This option is used to assign a trailer to a dock door.
This option assigns the operator to the work queue for directed picking. They scan their equipment into the system and based on the location/area the equipment is assigned to, the operator is directed to tasks related to the area they will be working in.
Two settings on the screen 2 of the Warehouse Settings File (WM2 1) allow you to assign status codes when an order line pick is assigned via directed picking and if directed picks are dropped.
Using this functionality, the status of an order line is automatically changed if it is assigned to be picked through directed picking. This alerts customer service personnel that the line is being picked and to not to change it until they contact the appropriate warehouse personnel.
Furthermore, the event trigger, DRPDIRPCK, can send an email whenever a pick/task is dropped. Refer to Event Triggers.
This option assigns the operator to the work queue for directed picking. They scan their equipment into the system and based on the location/area the equipment is assigned to, the operator is directed to tasks related to the area they will be working in.
This option can work in conjunction with the warehouse settings and event triggers to change order status codes and then generate an event email. As an example of how this functionality works, consider the following scenario:
- A customer calls in to cancel part of an order.
- The order desk/customer service clerk checks on the order and sees that the soon to be cancelled order line is at a picking status.
- He/she can contact the warehouse to let them know that the line has been cancelled. Thereby, saving time and effort.
- The warehouse picker drops the task.
- An email is sent to specific recipients alerting them to the dropped task.
In order for the status codes to change, the user must have his/her User Control Panel (SET 2) set to allow for updating status codes. On page 2 of the User Control Panel the field User Can't Change Status on Orders with these Status Codes controls the status codes the user cannot update or change.
Directed Picking and the RF Menu
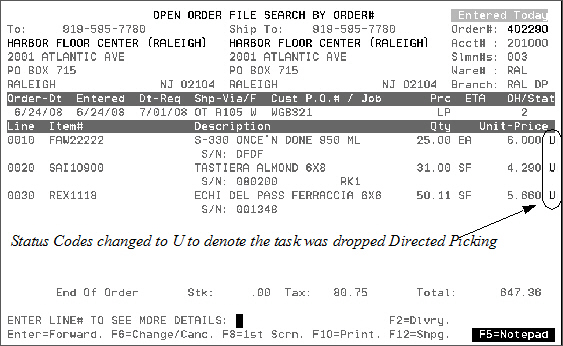
In this example, we are going to use the following order. Notice that the status for each line is O (open).
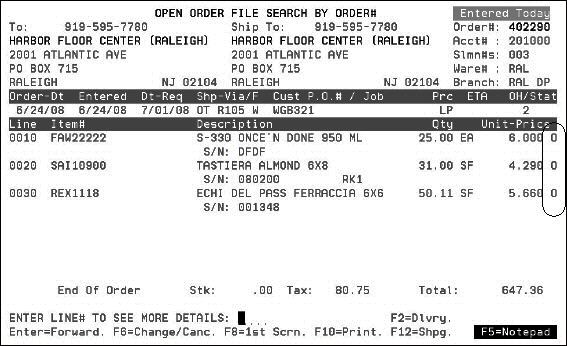
Another thing to note is that when using directed picking order lines translate to tasks. Which means in this example, directed picking will assign the picker three tasks for the three order lines on the order.
- Access the RF menu via menu WM5 option 1.
- When the RF menu appears, press F1 to access more options and then select option 53 - Pick Work Queue. Select the appropriate work queue.
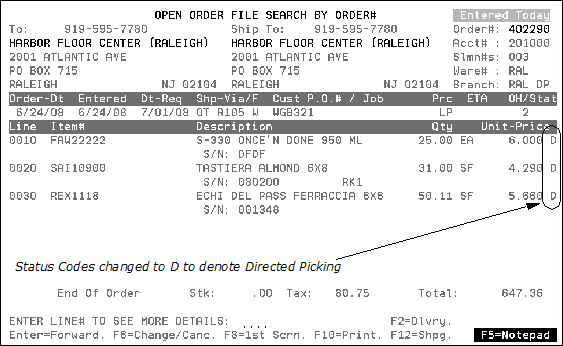
- The system automatically changes the order statuses to D to denote the lines are being picked.
- If tasks are dropped, Option 54 on the RF menu, the status codes changed to U.
This option works in conjunction with Directed Picking. If you cannot finish all the picks assigned to you by directed picking, this option allows you to drop picks.
It is very important to drop unpicked tasks. If these tasks remain open in the pick queue, errors such as inventory not being put on trucks can happen.
Associated Files:
This option is designed for manufacturers who produce their own bar codes. It allows them to scan inventory into a distribution center prior to shipment to a customer.
This option is not tied into the Purchase Order system so it should not be used by non-manufacturer related warehouses to receive inventory.
- After taking Option 60, the first screen prompts for the adjustment code to add the inventory.
- The next screen prompts the operator to scan the Item Barcode and enter a the quantity. When the material is delivered to its new location, the operator can then scan in that location.
- Press F5 to add the item, quantity, and location into inventory. After the inventory has been accepted and added, the screen show above is displayed for the next item, quantity, and location. This eliminates the need to have to re-enter the adjustment code each time, since it would be the same for all items being received.
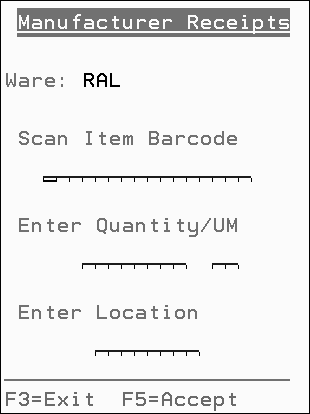
This option is intended for customers who manufacture their own products and then move it into one of their own warehouses.
Steps performed at the Manufacturing Plant
- The first screen starts the loading of the truck. Enter the warehouse getting the truck load, and press F1 to start a new manifest. It uses the receiving warehouse, plus the next number in a number wheel to create the manifest number. F2 is used to pick from previous manifest which have not been closed.
- After pressing F1, enter the From location where the pallet is being picked from.
- The next prompt is for the barcode of the product being loaded, IWMS uses the barcode along with the item and serial cross reference to get the item and serial number being moved.
- The next prompt is for the trailer. Use the F6 key to change the quantity if needed.
- The operator is returned to the prompt to scan the location to pick the next pallet.
- Once all the pallets have been picked, press F3 to close the manifest. A confirmation screen appears.
- At this point the work in process receipt is put into the actual pre-receipts file.
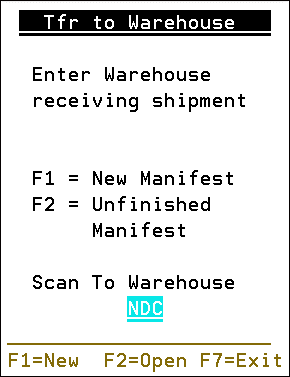
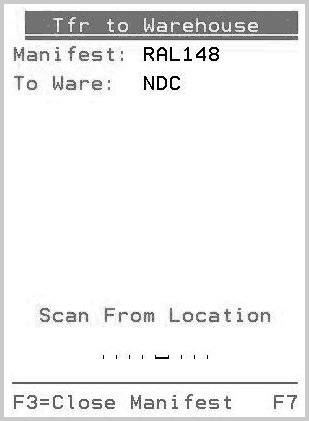
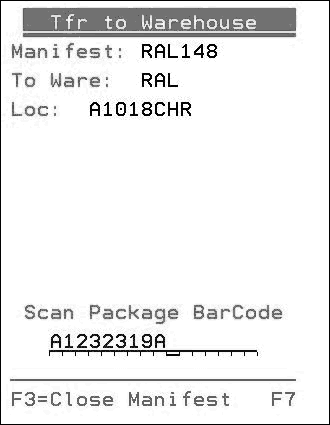
This location needs to be within the IWMS location for the plant warehouse. Though the inventory isn't moved there it is a confirmation that they are at the trailer.
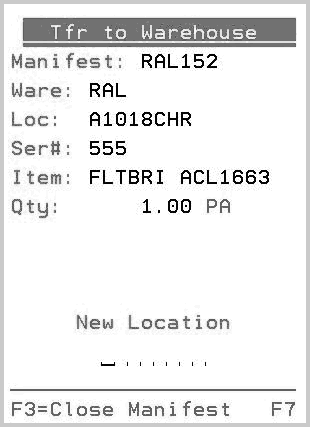
At this point, the inventory is removed from the plant warehouse.
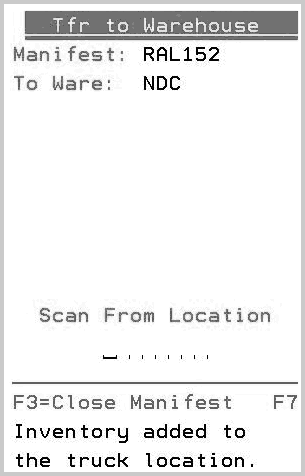
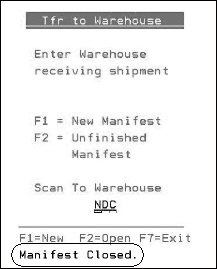
Steps Performed at the Receiving Warehouse
The inventory scanned in at the manufacturing plant is available in the pre-receipts file (INB 1).
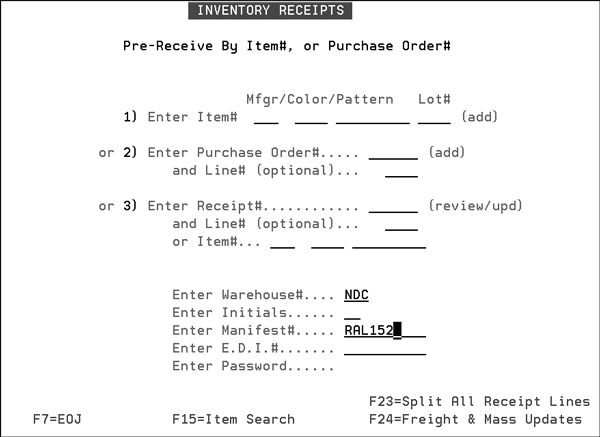
From the pre-receipts file, you can process the inventory, print a receipt list, etc.
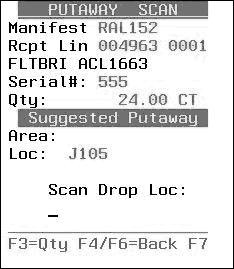
The receipt is now available for putaway when the truck arrives at the warehouse.
The Slab Re-Sizer includes a consistent way of adjusting slab inventory. It operates much the same way as other inventory adjustments for other products, but optimized for the special aspects of slabs.
The RF version of the Slab Re-Sizer provides the following:
- A display of the current status of a slab item which includes:
- Number of pieces
- Length and width
- Ability to resize one slab or all slabs in a bundle.
- Ability to resize a selected slab before, during, or after Order Entry.
- Automatic calculation and adjustment of available and onhand square footage based on new dimensions.
When an operator scans a slab serial number they can enter in the new dimensions if the slab needs to be resized. This replaces the practice of having to write down the sizes and then going to a land terminal to enter the dimensions. This functionality, accessed via option 70, allows you to resize slabs directly from the RF screen.
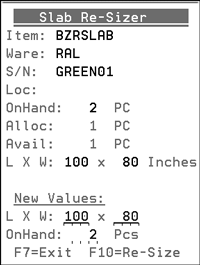
Notes about the initial Slab Re-Sizer Screen
- This screen displays the current values of the slab record.
- The PCs and length and width fields are editable. You can change the values.
- The system automatically updates the square foot (SF) quantity based on the most current information.
- Interacts with other parts of the software to:
- update the quantity and extended prices of holds and orders against an adjusted slab
- updates any allocated quantities and costs of orders
- The entry in the PCs field cannot be below the amount shown in the Available field.
- The Allocated field includes orders and holds.
- Only users that are authorized to adjust quantities may use the update features of the Slab-Resizer.
- The length and width fields as well as the Onhand field can all be protected by settings in the Operator File (WM2 3).
To adjust a single slab within a bundle, press F10. This function is only available if the number of pieces is greater than one. The Single Slab Re-Sizer screen appears. Enter a serial number for the new slab that you are separating out of the bundle.
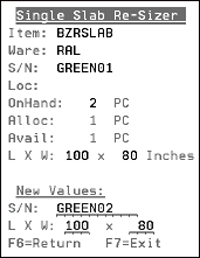
To make the necessary adjustments, enter a new serial number in the S/N field. This causes a new record to be created.
After you give the slab a new serial number (GREEN02), press Enter. The original slab record (GREEN01) is adjusted to show the change in inventory. The total number of slabs is unchanged, but you have now split the bundle so that you can adjust one of the slabs.
If you are using a vehicle mounted RF units, your Slab Resizer screen will appear in full mode, as shown below.
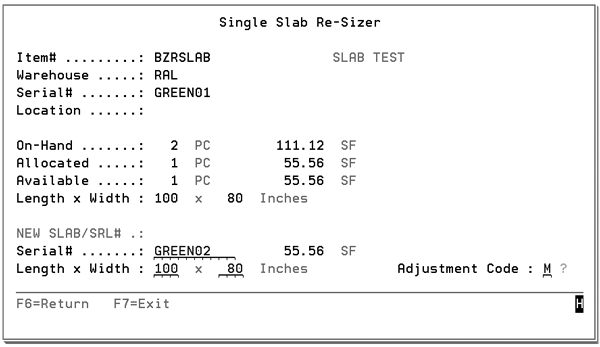
Since there is more room to work with, more information is shown.
If you enter an Adjustment Code, this provides an explanation for the change in inventory status. The M adjustment code in this example means the inventory change came about because of a change in measurements. Another example is to use the cycle count adjustment code C to correct an onhand balance.
Allows you to view available inventory and allocations against a slab serial number.
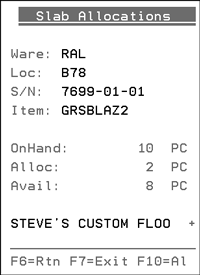
The + sign to the right of the customer's name indicates there are more allocations or held inventory for this slab number. In the example above, 2 of 10 slabs are allocated.
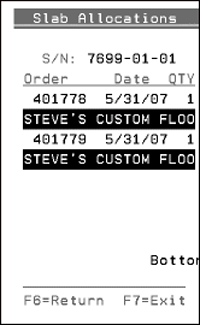
Press F10 to see all allocations against the slab or bundle. F10 is only available if more than one allocation exists.
This option allows you to capture tasks that are not in a regular job task queue. These tasks can be analyzed as part of the IWMS Productivity Analysis system.
Operator activity data is recorded from the RF unit into the IWMS system where it can be used to determine Operator Productivity. The information can also be downloaded to a Microsoft Excel spreadsheet for further analysis and manipulation.
Option 74 on the IWMS RF menu allows you to either continue an order that was started on a workstation or create a new order on an RF device.
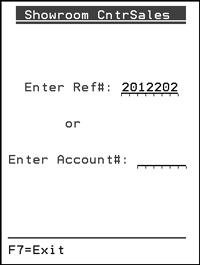
- Select option 74 - Showroom OE on the RF menu.
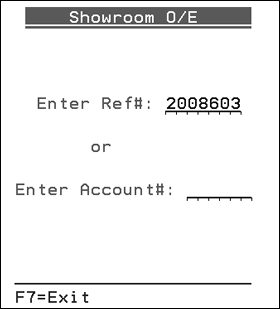
- You are presented with two options:
- Enter a Reference Number - Use this option to access an unprocessed order that was started on a workstation.
- Enter an Account Number - This option allows you to create a new order directly from the RF device.
- If an account number is entered, the purchase order will need to be entered. The warehouse field is populated with the default warehouse assigned in the Billto File for the account.
- If a reference number is entered, as shown above, the warehouse and purchase order information is pulled in from the existing order.
- Enter either a reference or account number. The RF Header screen appears.
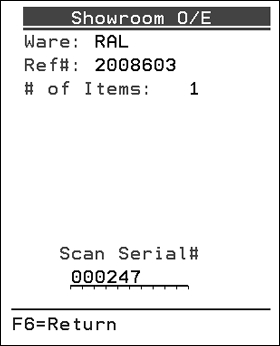
- Press Enter to begin adding serial numbers to the order.
- Scan/enter items onto as needed. The application keeps track of the number of items added to the order.
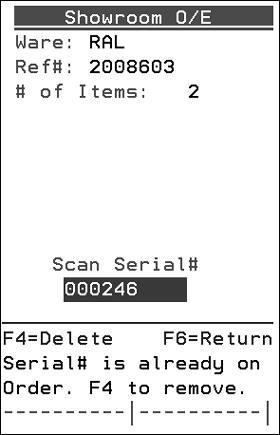
- If an item that is already on the order is entered, you can press F4 to remove the serial number.
- Press F6 to return to the order header.
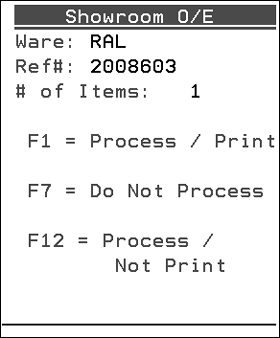
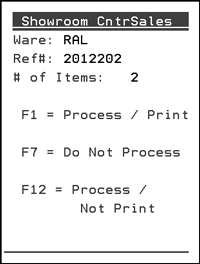
- Press F7. The system validates the order by ensuring there are items on it. If there are you are presented with the following options.
- F1 - Processes and prints the order
- F7 - leaves the order as unprocessed. These orders can be accessed on the system through menu option CUS 16 - Search Unprocessed Orders, Holds, and Quotations.
- F12 - processes the order but doesn't print it. Processed orders can be accessed on the system through menu option CUS 10 - Open Order File Inquiry/Search.
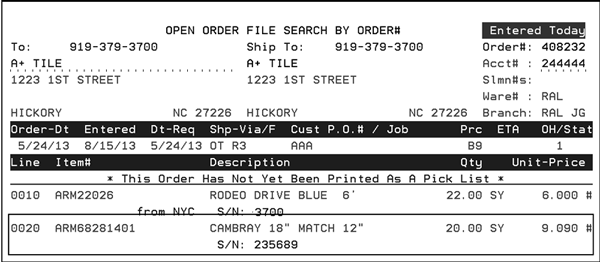
- When the order is accessed, either via menu options CUS 10 or CUS 16, the item(s) added are on the order.
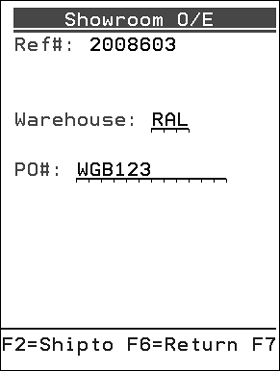
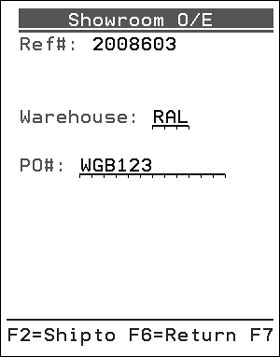
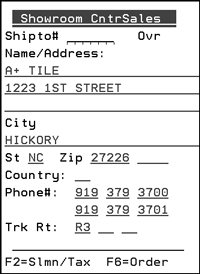
The F2 = Shipto Function allows you to manage the Shipto information for the order. The default address from the Shipto File is used but it can be overridden. A Y displays in the Ovr field if the default shipto address is overridden.
This option allows users to add lines to order by scanning serial numbers.
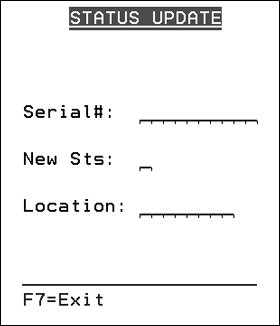
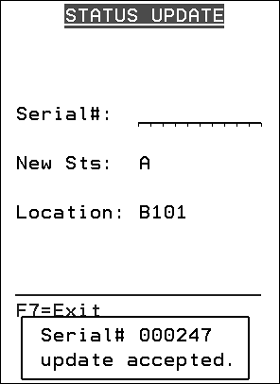
- On the RF, menu select option 76 (IWMS). The Status Update screen appears.
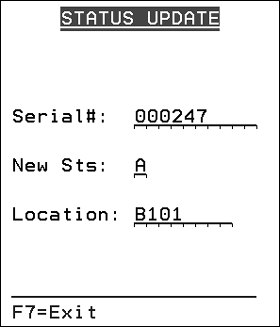
- Scan a serial number and location.
- Press Enter to update the serial number status. If the status is updated the system displays the following message.
- Scan the next serial number or press F7 to return to the RF menu.
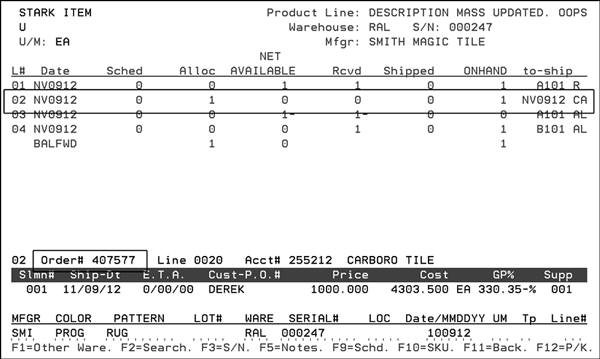
- To review the status update and how it affected inventory, go into Inventory Inquiry (menu option INV 1). Enter the serial number and warehouse and press Enter.
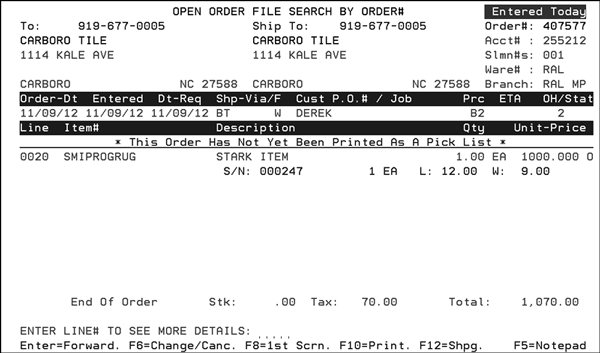
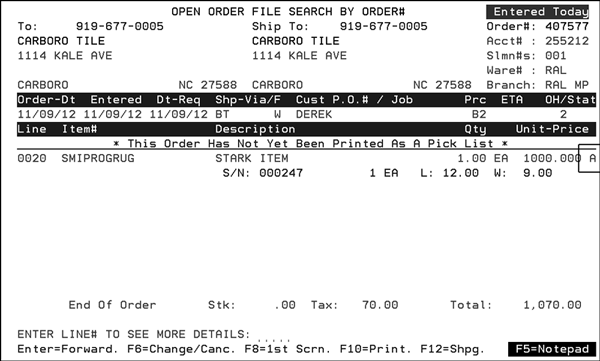
- The new status is also noted on the order (407577).
- As well as on the order notepad; accessed by pressing F5 on the order.
In the example below, notice the CA code at the end of the serial number information. The C signifies a customer order and the A is the status that the serial number was changed to.
To get more information on the serial number, such as the order it is tied to, enter its line number in the Line# field.

Associated File - System Wide Setting - Activate Serial Number Price, Dimension and Additional Features
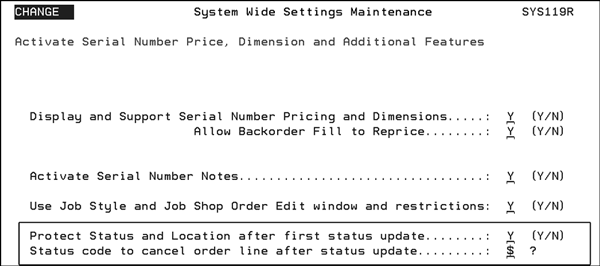
- Protect Status and Location after first status update - Entering a Y will leave only the serial number field open after the first status or location update is performed. After the first change, the New Sts and Location fields on the RF device are automatically populated with the information from the first entry. This facilitates an increase in order entry speed.
- To unprotect the New Sts and Location fields, exit the option and then reenter it.
- Status code to cancel order line after status update - Enter the status used to cancel the order line after the status update which moves the rug to a new location. Any status other than the one on this field will leave the order line active.
This option allows for the creation of a new order via RF or for adding additional items to an existing unprocessed order via an RF device. A typical use of this new option would be when a customer is at the counter and wants to add items or supplies to the unprocessed order. Normally the order would be started at the counter and then the RF option items would be scanned (instead of keyed) onto the order. You may also start the order from the RF device if you know the account number.
A typical use of this option would be when a customer is at the counter and wants to add items or supplies to the unprocessed order.
- Access the RF menu via menu options WM5 1 (IWMS) or WAR 21.
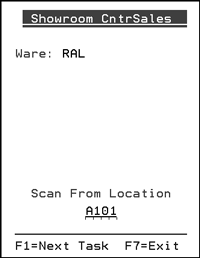
- Press F1 a couple of times to display the option 81 - RF Counter Sale.
- Select option 81 and on the screen that appears enter a reference number or an account number.
- Press Enter to access the next screen.
- The warehouse and branch are defaulted in from the control panel.
- Press F2 to access the shipto information.
- Ensure the information is correct. If not make corrections. Press F2 to enter salesperson and/or tax information.
- Press Enter and on then scan the location for the item being added to the order.
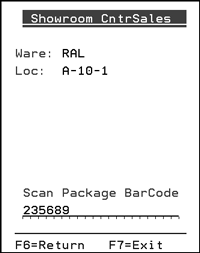
- Next scan the barcode on the item being purchased.
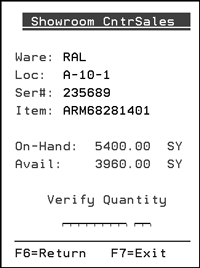
- The RF screen refreshes to show the onhand and available quantities. Enter the quantity needed.
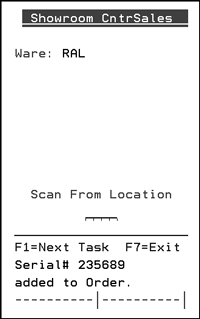
- The new item is added to the order.
- Press F7 to access the end of order options.
- An inquiry into the order shows the new item added.
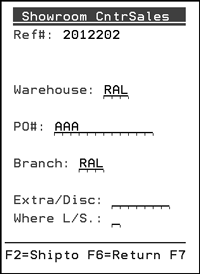
If need an Extra charge needs to be added or a discount taken off, enter the amount in the Extra/Disc field. Use the L/S setting to determine where to apply the charge; at the line or summary level.
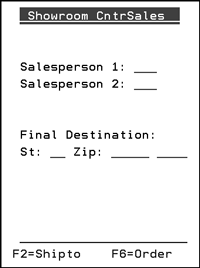
Use the field Final Destination - St___ Zip___ to have the system calculate the tax based upon the final destination state and zip code rather than the zip code of the shipto address. This applies in situations where the shipto represents an intermediary point such as a fabricator, work room, or consolidation center. If the Tax by Zip Code Table is not activated, these entries are informational only.
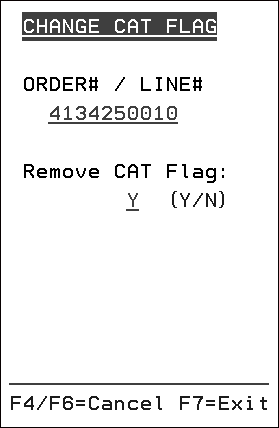
This option allows you to reserve a Y setting for Close-A-Truck (CAT). This allows an order that has gone through the Close-A-Truck process to be reprocessed as needed.
- The RF menu is accessed either through menu option WAR 21 or WM5 1 (for IWMS users).
- Access the RF menu and press F1 to access the third screen of settings; which is where the new option is.
- Select option 82 and on the screen that appears enter the order and line number that you want to remove the Close-A-Truck flag on.
- Press Enter and then enter a Y in the setting Remove CAT Flag.
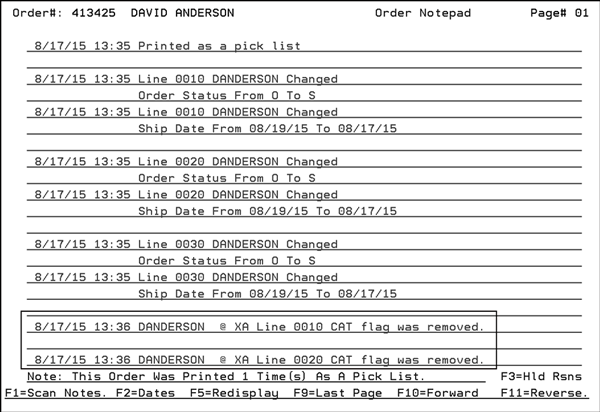
- To make sure the CAT flag was removed, go into the order's notepad.
This option allows you to scan a PRO number on demand.
This RF function, 83 - Scan Pro Number, allows you to scan a PRO number on demand.
Scanning a PRO number On Demand with an RF device
Scanning a PRO Number During Other RF Operations
Set-up
Warehouse Settings (Menu option WM2 1)
The setting Scan Pro Number during shipping/loading activates this functionality.
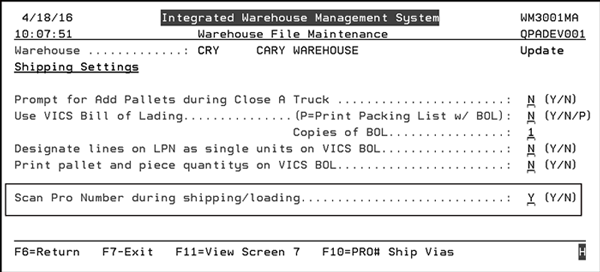
Notice the F10 - PRO# Ship Vias function at the bottom of the screen. This function allows you to enter the ship vias that require a PRO number to be entered.
If the setting Scan Pro Number during Shipping/Loading is activated and the ship via being used for the order is listed here, then the PRO number is mandatory.
If the setting is set to N, a message displays letting the user know that the PRO number is not required.
Scanning a PRO number On Demand with an RF device
- Access the RF menu either through menu option WAR 21 (for non IWMS users) or WM5 1 (for IWMS).
- Press F1 a couple of times to get to the end of the RF options. That's where you will find option 83.
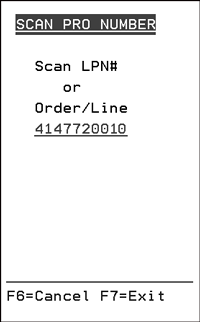
- This option allows you to scan a PRO number on demand; if the order and LPN are valid and a valid combination. In the example shown below, an order and line number were scanned.
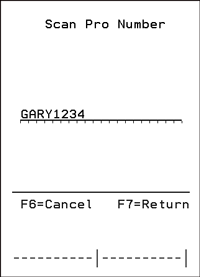
- The next screen allows you to scan the PRO number.
- If the PRO number was entered for an order, the PRO number is inserted in the order's notepad.
- The PRO number is also displayed as a miscellaneous comment line on the order.
- If the PRO number was added at the LPN level, the PRO number is added to the notepad of every order on the LPN.
Scanning a PRO Number During Other RF Operations
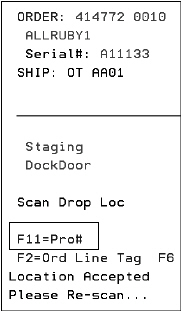
An F11 function key has been added to RF menu options 4 - Build Pallet and 6 - Pick Confirm. This function allows you to scan the PRO number. The example shown below is from RF 6 - Pick Confirm.
Starts and stops a clock which allows you to monitor load and unload times.

RF 86 gives you the ability to check what is inside an LPN or order by just scanning the LPN or order #.
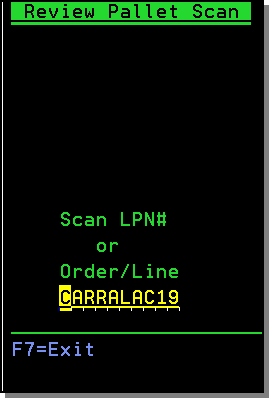
It pulls up all the data that is associated with the LPN.
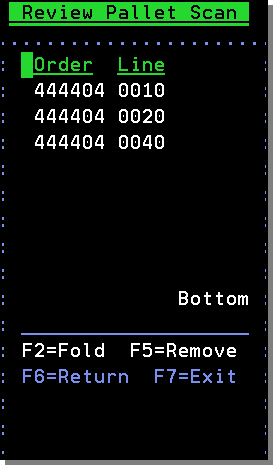
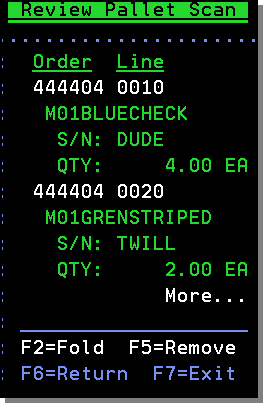
Press F2 to unfold it to see what items are on associated with each order line.
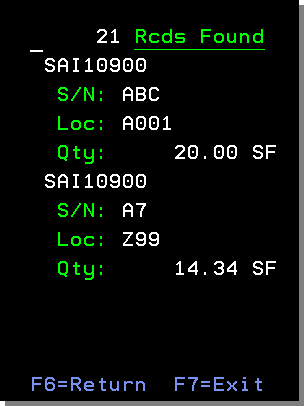
This option shows locations in warehouse where an item is located.
This option brings the inventory inquiry functionality to the RF scanner. It shows all the locations where that inventory is and how much.
IWMS enables the system to verify item information via a scan of the UPC code or carton/pack ID number. The Item Cross Reference File supports cross references to any UPC code, supplier's item number, and/or carton/pack ID number, and is used by the RF Order Status Change programs and RF receiving programs. This enables suppliers that use UPC codes, or other types of product labeling, to easily cross reference information back to an item number.
Set-up
- On the EDI and Bar Code Functions Menu (EB), select option 15 - Item X-Ref File Maintenance. The Item Number Cross Reference File screen appears.
- Enter UPC Codes and Carton/Pack ID#s for each item number.
- You can search any of the fields by entering your search criteria directly below the column heading and pressing Enter. The screen re-positions to show the results of your search.
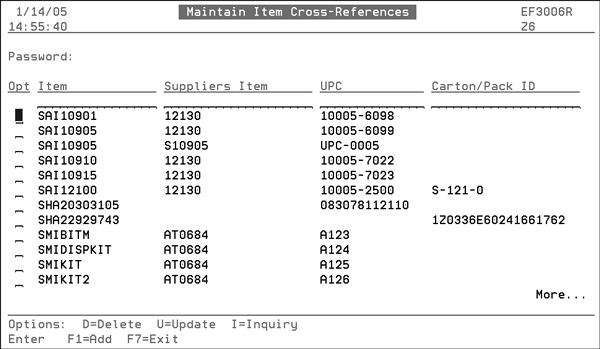
The item numbers and supplier's item number are obtained from the existing Item File. Items that have an entry in the Xref field of their Item Master screen will not be listed in the Item Number Cross Reference File.
Prior to the introduction of this functionality in 2013, shipping labels had to be printed using the Print Warehouse Labels menu (WAR 9). With this functionality, shipping labels can be printed as needed from the RF device.
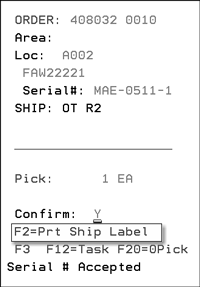
The F2=Print Ship Label function appears on two RF screens.
The first one is during the picking process.
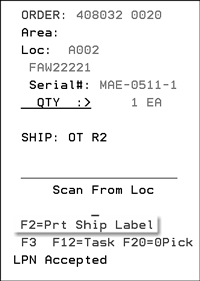
It also appears on the Pick Confirmation screen.
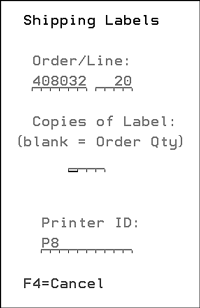
When F2 is pressed, you are prompted to enter a quantity and printer.
Set-up for Scanning UPC Numbers
UPC Code Scanning Modifications
Set-up for Scanning UPC Numbers
Updating the Control Panel and User Settings to use the UPC scanning features
- On the System Settings Menu (SET), select option 1 - Work Station Control Panel File and press Enter.
- Tab to the workstation you want to update.
- Enter U to update and press Enter.
- Press F11 to go to the next page.
- Press F11 again. The Control Panel File Maintenance screen appears showing the UPC modification fields.
- Enter Y or N in each of the fields circled. If, as shown above, all the fields are set to Y an order will not be updated until all five (Item#, S/N#, BadgeID, To Loc, and From Loc) of the applicable components have been scanned.
- From Loc
- Item#
- Serial#
- Badge#
- Status
- Location
- If the Badge ID scan field is set to Y, the Notepad for a scanned order automatically updates to show the name on the identification badge. To use the UPC/Carton ID feature, the Item # field must be set to Y on the Control Panel.
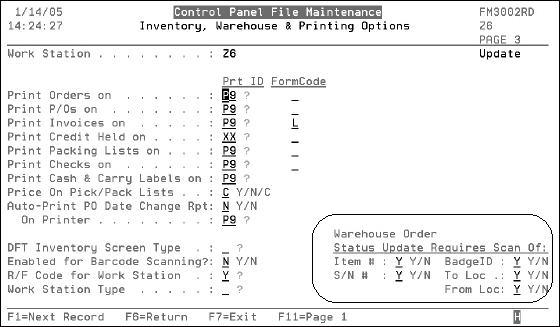
Note: To get full descriptions of these fields, you can use the field help feature.
The scanning sequence of the fields is as follows:
If a field is invalid, does not match the order, an error message appears, and the scanning process stops until the error is corrected.
For example, the system prompts you to scan the item number, and then validates the item number. If the item number scanned matches the item number on the order, the system then prompts you to scan the serial number. Once again, the system ensures that the serial number scanned matches the one on the order. If the serial numbers match, the system prompts you to scan the next enabled scan field.
UPC Code Scanning Modifications
These instructions detail how to configure the barcodes that you will be scanning.
To configure barcodes for security badges
Barcodes for security badges use a maximum of ten characters.
1. Access option 9 - Print Warehouse Labels on the WAR menu.
2. Select option 3- To print miscellaneous bar code labels.
3. Enter option 2 - to print 10 char. bar code security badge labels.
To configure barcodes for locations
Barcodes for locations use a maximum of eight characters.
1. Access option 9 - Print Warehouse Labels on the WAR menu.
2. Enter option 3- To print miscellaneous bar code labels.
3. Enter option 5 - to print 8 char. miscellaneous bar code labels.
To configure barcodes for status code labels
Status code labels use a one-character barcode.
1. Access option 9 - Print Warehouse Labels on the WAR menu.
2. Enter option 3- To print miscellaneous bar code labels.
3. Enter option 1 - to print 1 char. bar code labels (cut/picked/shipped codes).
Scanning UPC Codes
Important: Your RF or hand-held (wedge attached) scanner must be set to pass a (CR) Enter with each successful scan.
- On the Warehouse Functions Menu, select option 21 - R/F Menu.
- Enter option 6 - Pick Confirm.
- Location
- Verify Location
- Item number
- Serial Number
- Badge Number
- Status
- New location
- Scan the inventory location.
- Verify the item's location.
- Scan the item's barcode.
- Information on the item appears.
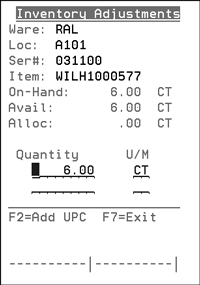
- Press F2 to add a UPC cross reference to the item. The screen refreshes as shown below.
- Scan the new UPC code into the system.
- In the future, when this item is scanned, the system cross references the item number against its UPC barcode.
Depending on your control panel settings, the sequence of scanning screens are as follows:
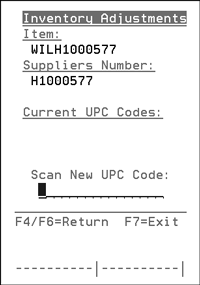
If the item already has a UPC code it is displayed under Current UPC Codes. If there isn't a UPC code for the item, as in this case, this area is empty.
