Productivity Analysis
Productivity Analysis - Set-up and Related Files
Exporting the Productivity Analysis Summary Data into a Spreadsheet
Productivity Analysis Examples
This IWMS feature enables you to thoroughly analyze IWMS data. User configured Job Filters are used to select and summarize Task Transaction Log data. The data can be summarized by operator and date, and compared to user-provided job standards (time, count and weight) from the Job Definition file.
The RF menu option, Miscellaneous Tasks allows you to capture tasks that are not in a regular job task queue. These tasks can be analyzed as part of the new IWMS Productivity Analysis system.
Operator activity data is recorded from the RF unit into the IWMS system where it can be used to determine Operator Productivity. The information can also be downloaded to a Microsoft Excel spreadsheet for further analysis and manipulation.
Productivity Analysis - Set-up and Related Files
Operator File Maintenance (WM2 3)
Work With Task Type Cross References (WM8 40)
Work With Job Code Definition File (WM8 41)
Operator File Maintenance (WM2 3)
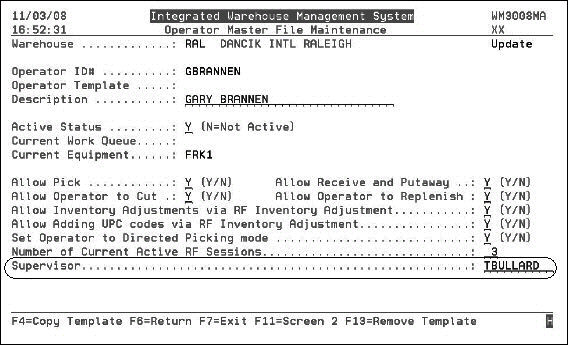
The field Supervisor can be used for sorting/grouping purposes within the web application and when exporting to spreadsheet.
1. Access the Operator File Maintenance program (WM2 3).
2. A list of the established operators, appears. Select one to update by placing a U in the appropriate Opt field. The Supervisor field is at the bottom of the screen.
Work With Task Type Cross References (WM8 40)
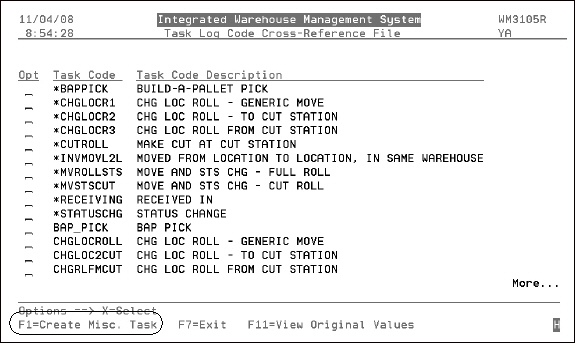
This file cross references system generated task codes, some of which may not be obvious to understand on the Task History log, to a description that you create. If a system generated task code is cross referenced, the customer supplied description is used on the Task History Log.
An F1=Create Misc Task function has been added that allows you to create codes for those miscellaneous tasks (i.e., sweeping the floor, meetings) not covered by the system generated codes.
- Access option 40 - Work with Task Type Cross Ref on the IWMS System Utilities Menu (WM8).
- To edit an existing task code, select it with the X option. This option allows you to enter a new task code and description.
- If task codes and descriptions are changed, you can use F11 to view the original task code and descriptions.
- The Customer Task Code is written to the Task History Log and the Description helps to identify the code.
A list of the available task codes appear. Task codes that begin with a * are system generated. The F1=Create Misc. Task function is circled.
If the setting Misc. Task Menu Item is activated, the task appears on the RF gun when option option 72 - Misc. Tasks is selected on the RF menu.
Notice that the screen is essentially the same as when editing an existing tasks with the X option. The difference is the Misc. Task Menu Item field is missing. This field is automatically activated when a new Miscellaneous Task code is created and can be accessed by using the X option.
Warehouse Settings (WM2 1)
Jobs can be stamped in three ways: in real time, as a batch job, or on demand.
Real time stamping is the standard and does not require any additional set-up; whenever the RF gun is used, the job code is stamped and information such as start and stop times are recorded.
Batch Stamping
Batch stamping can be run for historical stamping (stamping existing records that were created prior to this new functionality) or to update records to a new standard.
The setting Update Productivity Data in Batch Job can be found on screen 4 of the Warehouse Settings.
- Access the Warehouse Settings (WM2 1), and select a warehouse.
- Proceed to screen 4 by pressing F11 as needed. The new setting is at the bottom of the screen.
- Scheduling batch updates is a one time set-up.
- Selecting an option on a menu usually results in running a system command. The CALL command allows you to attach a program to a system command which in this case will be to report productivity data. On a command line enter CALL and press Enter.
- Enter wm5070b as the program that will process the data in a batch mode.
- Enter either *begin or *cont as the parameter. The parameter *begin starts stamping log records back to 01/01/2001. A typical use of this parameter would be after a major revision to the job code definitions. *cont tells the batch update to continue from where the batch run ended.
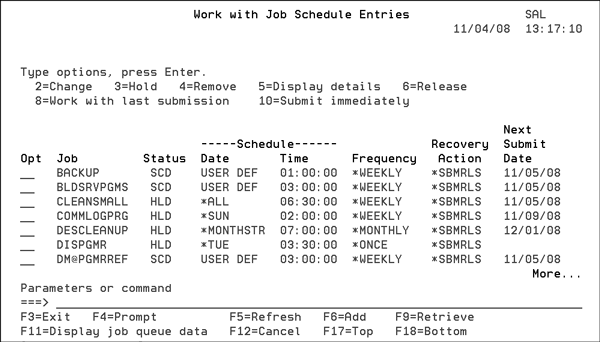
- On a command line, enter WRKJOBSCDE and press Enter. This takes you into the Job Scheduler.
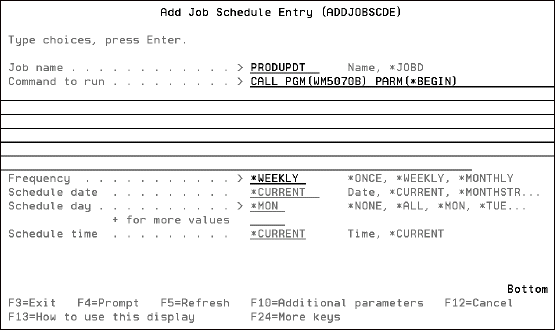
- To add the new productivity batch job, press F6.
- Assign the batch job a name and enter the command/program, WM5070B) that starts it. In this example, the batch job was given the name PRODUPDT (productivity update) and the program involved is WM5070B. For the productivity analysis, there are only two parameters: *BEGIN (rewrites the data) and *CONT.
- Fill in the schedule Frequency, Date, and Time. If you schedule a weekly entry, you need to schedule each day for the job to run. In the example shown above the scheduled day is Monday. If you want it to run on any other day, those days need their own entry.
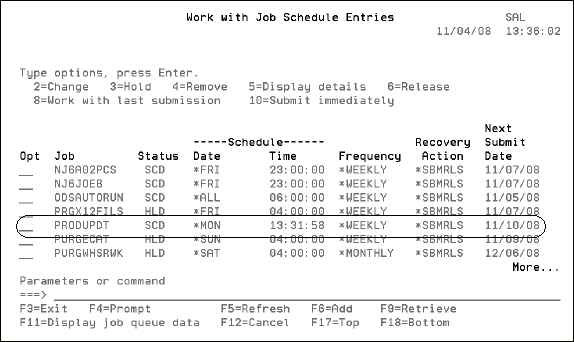
- Press Enter and then F3 to return to the Job Scheduler. The new job is included in the entries.
- These entries ensure IWMS Task Details and task Summary are automatically built.
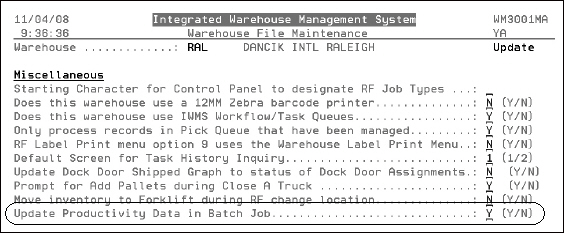
The flag controls whether log records for this warehouse are updated during batch stamping.

On Demand Time Stamping
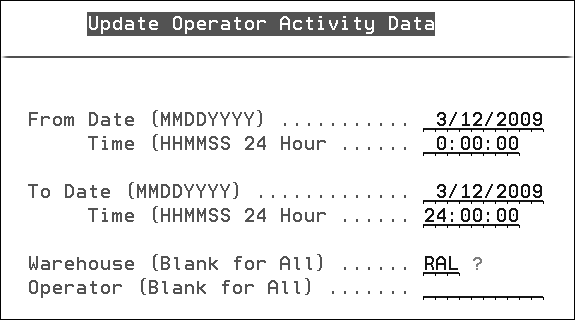
An alternative to processing the productivity data in a batch job is to do it manually (on demand). This is done via option 21 - Operator Activity - Demand Update on the IWMS System Utilities Menu (WM8).
Work With Job Code Definition File (WM8 41)
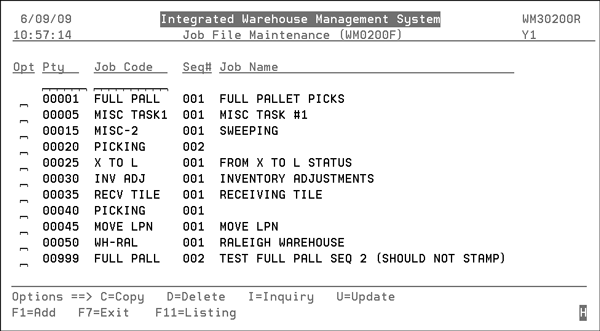
Use this file to describe job codes for stamping to the Task History Log. The information contained in these job codes is summarized in the Productivity Analysis Summary Site. Several filters are provided for narrowing the information sent to the summary report. Job codes are completely user-defined, and enable you to track tasks, based on the types of products, and your specific workflow.
- On the IWMS System Utilities Menu (WM8), select option 41 - Work with Job Code Definition Filter.
- A listing of your available codes appears. These codes are all user-defined.
- To narrow the data considered by the code, enter a U in its OPT field. The first of three Include/Omit screens appear.
- Press F11 to proceed to the screen 2. This screen allows you to include transactions to and from specific areas and locations, and transactions based on changes in status codes.
- For example, if all your dock door locations begin with DK and this job code only relates to transactions going to a dock door, you could enter I (for include), BW (begins with), to location DK.
- Press F11 for screen 3. Notice at the bottom of this screen there are three fields for establishing standards for time, units and weight. These are important for productivity analysis.
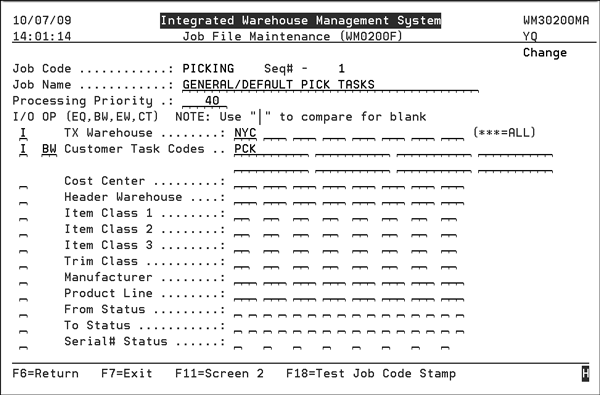
Decide to include or omit parameters. If parameters are included only records meeting those parameters are summarized; if parameters are omitted all records except those that meet the parameters are summarized.
In the example above, only customer task codes for the NYC warehouse that equal PCK are considered.
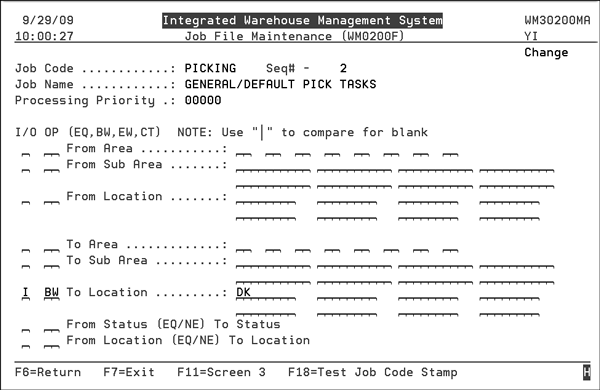
Use the OP field and the operators (EQ = Equal, BW = Begins With, EW = Ends With, and CT = Contains) to refine the selection criteria.
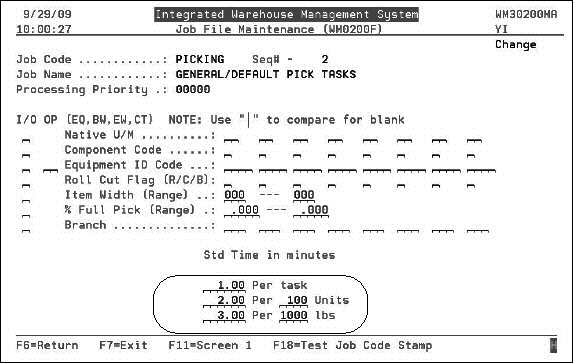
These standard times (in minutes) are added up to total the standard time to perform the tasks. For example, if the operator was moving 500 units at a weight of 7,000 lbs. the standard time would be calculated as follows:
1 minute per task = 1 minutes
(500 units / 100 units) x 2 minutes = 10 minutes
(7,000 lbs / 1,000) x 3 = 21 minutes
Time standard for this task 32 minutes
The Task History Log includes the standard times.
At the time of job code stamping, if standard times are not established and the transaction is for a miscellaneous task, the actual time is used as the standard time.
Fine tuning your Standard Times
The F18 (shift+F6) key allows you to test and fine-tune your job codes. You can test a new job code or changes to an existing one, by pressing F18 and then entering the transaction Key ID you can see how the transaction would be stamped (job code, job sequence, and standard times) without actually updating the transaction log record.
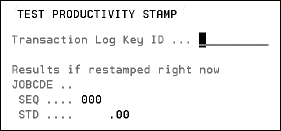
- Press F18 to access the Test Productivity Stamp screen.
- Enter a Key number and the rest of the fields auto-calculate. The Key numbers are found at the far right of the job code drill code on the Productivity Analysis portion of the IWMS web application. Drill down into the times recorded for the job code (Moving an LPN) to access the Key IDs.
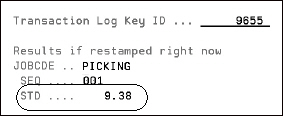
- Enter these Key IDs into the Key field on the Test Productivity Stamp screen to see how the actual time it took for this task compares to your standard time. The actual time it took the task is calculated by subtracting the Start Time from the End Time.

For the picking task shown above (Key ID 9655), the actual time it took to perform the task was 9:48 (16:02:08 - 15:53:20). You can compare the actual time to the standard time.
RF Menu (WM5 1)
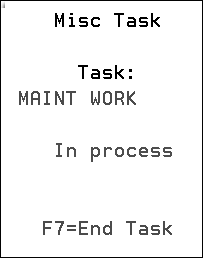
- On the RF menu, press F1 to access more RF options and option 72. The following screen appears.
- Select a task to begin recording time against it.
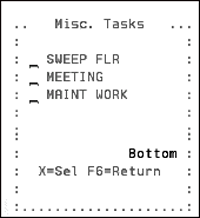
The Misc. task that appear are created via the setting Misc. Task Menu Item on option 40 - Work with Task Type Cross Ref on the IWMS System Utilities Menu (WM8 40).
Exporting the Productivity Analysis Summary Data into a Spreadsheet
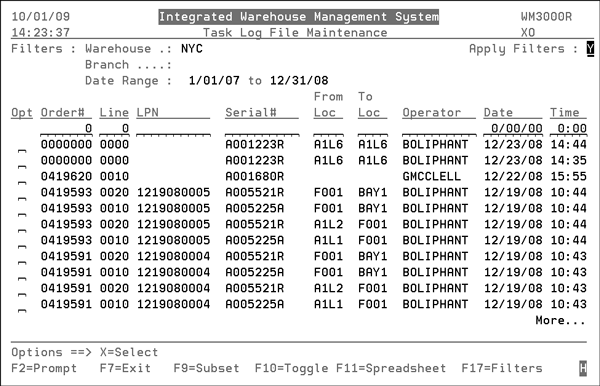
IWMS records all functions (i.e., changing locations, changing quantities, receiving orders) onto a tack history log. This provides you with a history of your warehouse activities. The task log is created by capturing the activity within the warehouse.
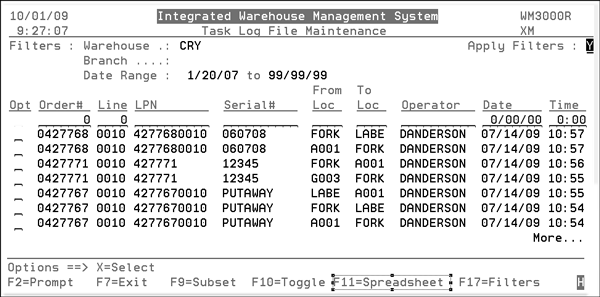
- Select option 6 - Task History File Search on the IWMS Management Screens and Reports (WM3). The Task Log File Maintenance screen appears.
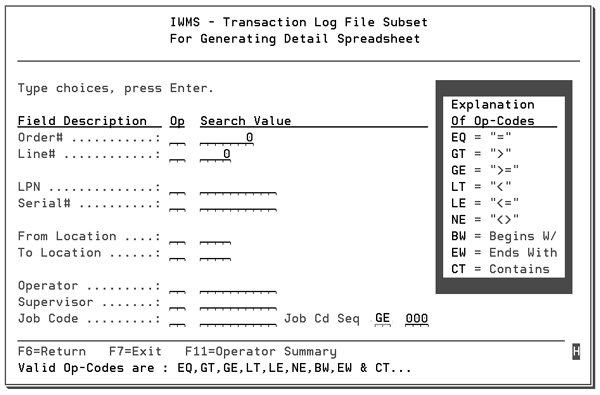
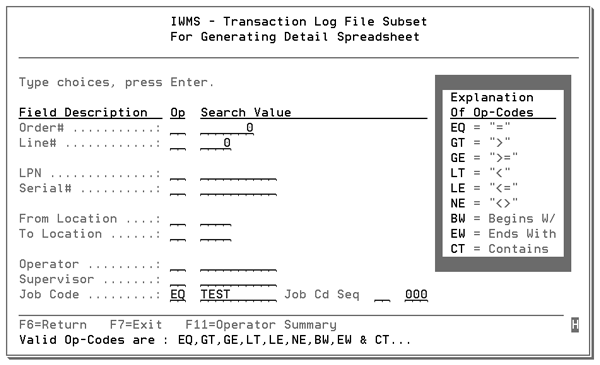
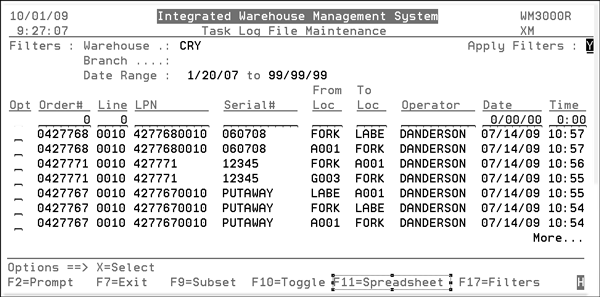
- Press F11= Spreadsheet to download the information to a CSV file for importing into Excel. The first screen in this process is the selection screen for the CSV file extraction. The screen below directs the task manager to search for all tasks that have TEST as a Job Code.
- Press F11 to run an Operator Summary.
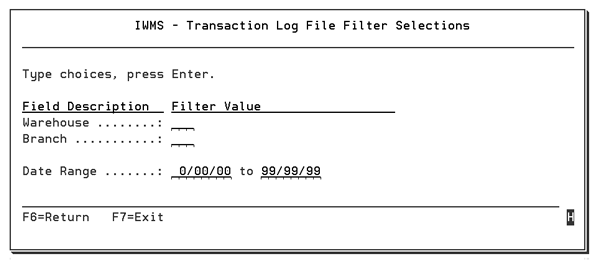
- Press F17 to access the IWMS - Transaction Log File Filter Selections screen. Use this screen to narrow the entries to a specific warehouse, branch, or date range.
Productivity Analysis Examples
This section contains examples to show how Productivity Analysis can be used to see:
Which Warehouse Worker is the most Productive?
Who Does the Most Receipts?
In this example we are researching which worker is receiving the most material. The following steps take you through creating a task for receiving, and then using that task/job code to generate a spreadsheet. With minimal changes, these steps can be used to produce a spreadsheet for other tasks such as picking.
- Select Work with Job Code Definition File on the IWMS System Utilities Menu (WM8 41).
- Select tasks related to receiving.
- Ensure the receiving task code is included in the Customer Task Codes field.
- Use the Task History File Search (WM3 6) to produce a spreadsheet with information concerning receiving. Press F11 to produce a spreadsheet.
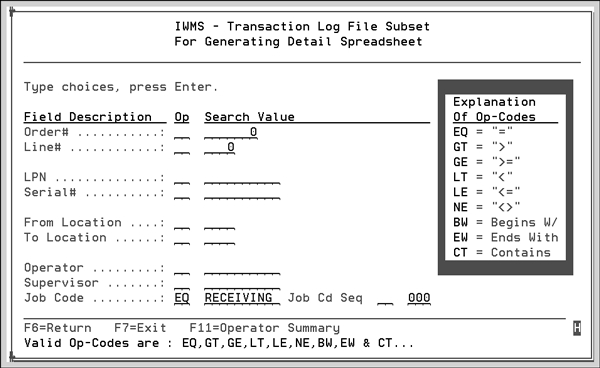
- Make parameter selections similar to the one shown below.
- In the example shown above, all task/transaction log entries with a job code equal (EQ) to RECEIVING will be included.
- Press F11 to proceed to the next screen in generating an operator summary spreadsheet, and then press F17.
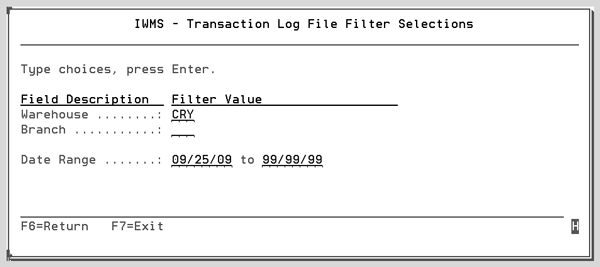
- You can further refine your selection criteria on this screen. Press F17 for additional filters.
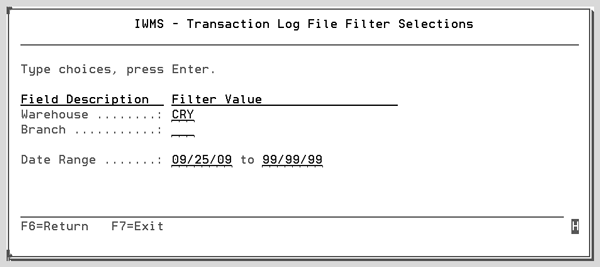
- Enter the parameters, warehouse, branch, and date range, you want to include in the spreadsheet.
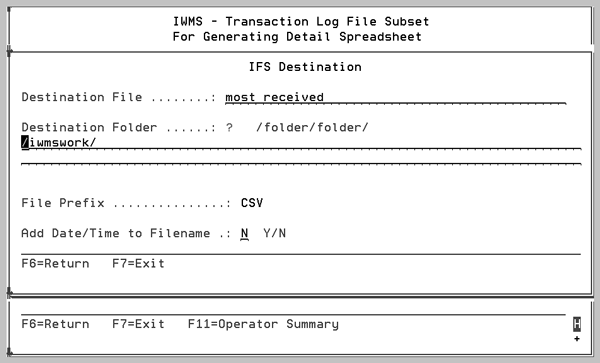
- Press Enter to generate the spreadsheet. The last screen in the process asks you where, on the IFS, you want to place the file.
- The spreadsheet can be manipulated as needed; in this case to show who received the most material.
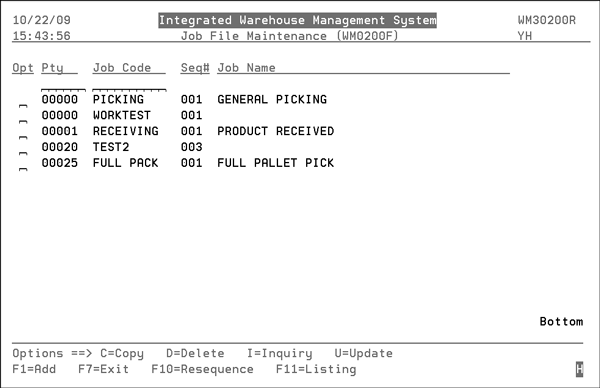
WM8 41 enables users to create simple (easy to remember) job codes that relate to the task codes that are generated by IWMS. For example, IWMS has many task codes related to various aspects of receiving (such as receiving rolls versus cartons), but you may want to combine all of these task codes into one job code. The example below defines a job code for RECEIVING.
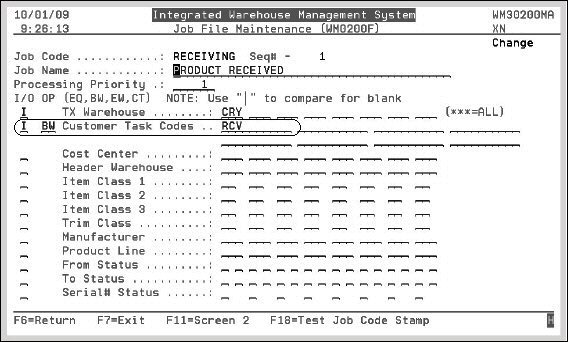
The screen above defines the job code RECEIVING as including all task codes that begin with (BW) RCV.
Note: Refer to option WM8 40 to see all of the system-generated task codes you have used, and optionally rename them.
Who Does the Most Picks?
In this example, we are researching which worker is picking the most material. The following steps take you through creating a task for picking, and then using that task/job code to generate a spreadsheet. To demonstrate that there are several methods for getting results, the process is a little different from the previous one for receiving.
- Select Work with Job Code Definition File on the IWMS System Utilities Menu (WM8 41). WM8 41 enables users to create simple (easy to remember) job codes that relate to the task codes that are generated by IWMS. For example, IWMS has many task codes related to various aspects of picking (such as picking rolls versus cartons), but you may want to combine all of these task codes into one job code, called picking.
- Select tasks related to picking.
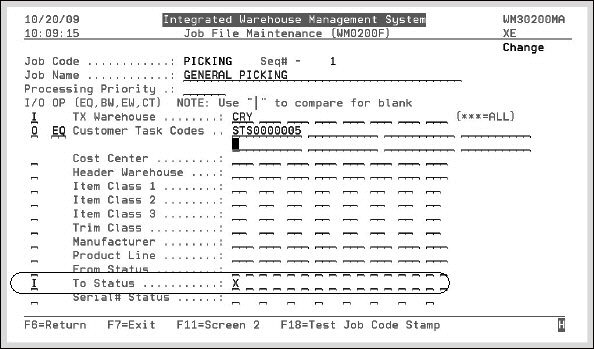
- In this example, we are going to select picking tasks based on status. Since X is the status for completed picking tasks, enter an X in the To Status field. We are also omitting task code STS0000005. These task codes are related to the RF menu accessed from the Warehouse menu (WAR)
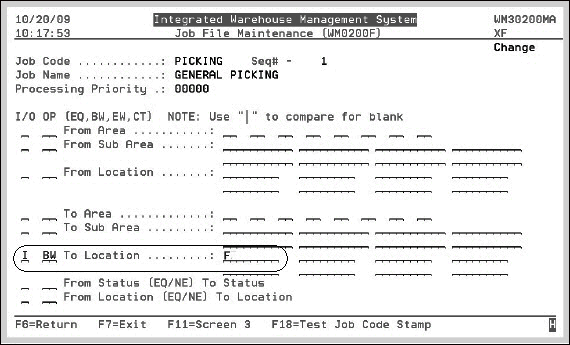
- Press F11 to proceed to screen 2. On this screen, we are going to limit the To Location to only those locations that begin with F. This step narrows the results to forklifts, which are locations that begin with an F in our example. In most situations, when inventory is scanned right after a forklift is scanned it is automatically assigned to an X (picking) status.
- Use the Task History File Search (WM3 6) to produce a spreadsheet with information concerning picking. Press F11 to produce a spreadsheet.
- Make parameter selections similar to the one shown below.
- Press F11 to proceed to the next screen to generate an operator summary spreadsheet.
- You can further refine your selection criteria by pressing F17 to enter the warehouse, branch, and date range, you want to include in the spreadsheet.
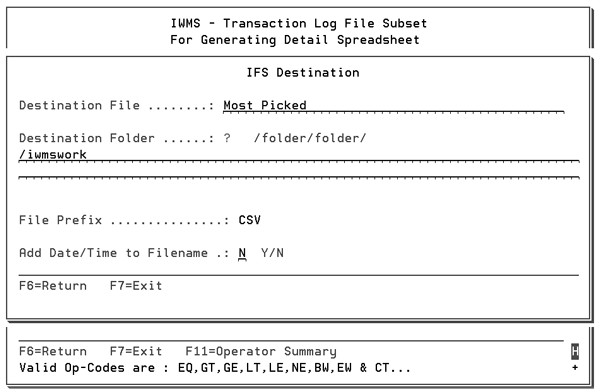
- Press Enter to generate the spreadsheet. The last screen in the process asks you where, on the IFS, you want to place the file.
- The spreadsheet can be manipulated as needed; in this case to show who picked the most material.

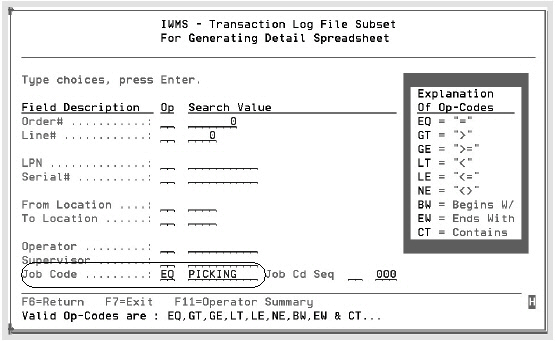
In the example shown above, all task/transaction log entries with a job code equal (EQ) to PICKING will be included.
Which Warehouse Worker is the most Productive?
In this example we want to include information from all the job codes to productivity.
- Use the Work with Job Code Definition File to create all the necessary job codes (i.e., picking, receiving, cutting, and miscellaneous jobs).
- Access the Task History File Search through option WM3 6.
- Press F11 to convert the information to a spreadsheet. Since we want to include all the warehouse tasks, set the Job Cd Seq to include all the tasks with a Job Code Sequence greater than or equal to (GE) 000. This ensures all tasks are included.
