Picking Inventory in IWMS
Mass Applying Putaway and Picking Sequences
Building a Pallet in IWMS
Using IWMS to pick inventory for pallets provides the following benefits:
- Movement of several order lines with one scan.
- Status codes can be updated automatically based on the move to location.
- Transactions are recorded in the Task History Log.
Set-up
- Location records must be established for the forklifts. The system moves the inventory to a forklift as each line is picked. This is done via the Location file (option 7 - on menu WM1). For more information on setting up locations refer to IWMS Locations File
- Print license plate labels (LPNs). LPNs identify each pallet built. For more information on printing LPNs, refer to Printing LPNs.
Picking by Labels
Before beginning we recommend giving the picker several LPN labels and pick labels for the order lines to be picked.
- Select Option 4 - Build a Pallet from the RF menu. The first screen that appears is determined by whether or not the user is assigned to a piece of equipment.
- When the next screen appears, scan or enter the LPN. All lines scanned after the LPN is entered are associated with this pallet until you close the pallet.
- After the LPN is input, either by manually entering it or scanning it, the screen prompts you to enter the order/line being picked and added to the pallet.
- The next series of screens are based on what switches are set at the control panel for required scans. These options, shown below, are on page 3 of the control panel.
- If the control panel requires a scan of the location (To Loc and From Loc), then the location prompt appears. The location scan verifies you are at the correct location for the order/line.
- If the control panel requires a scan of the item number, then the item# prompt appears. If your Item Cross Reference file is configured you will be prompted to scan the item number, the suppler's item number, UPC code, or carton/package ID. This builds a cross reference table for the item.
- If the control panel requires a scan of the serial#, then the serial# prompt appears. The Scan Serial# field helps to verify you are scanning the correct serial number for the order.
- If the control panel requires a scan of the badge id, then the badge prompt appears. The Scan Badge field logs your badge number into the notepad file for the order. The task transaction file also stores your user ID when you sign on.
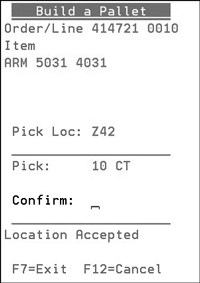
- The next screen that appears, is the Build-A-Pallet confirmation screen. Place a Y in the Confirm field to complete the addition of the order line to the pallet.
- The application returns to the prompt for the next order and line number you are to pick. Repeat the steps for each order line that is added to the pallet.
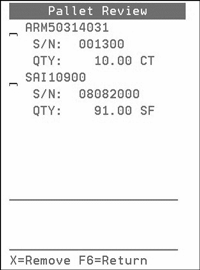
- Press F2 to review, or remove, the items currently assigned to the pallet.
- Press F6 to return to the Build-A- Pallet screen.
- After closing the pallet, the system looks to see if the Dock Door assignments have been set-up and if so, it suggests a staging area for the route of transfers to which the orders on the pallet are assigned. All of the order lines associated with the LPN will be updated in real time.
If the operator has not been assigned to a forklift, then they are prompted to scan the equipment ID. This equipment must be a valid location in the location file.
The equipment ID only has to be entered once.
If the operator is already assigned to a forklift, then the Assign Equipment ID screen is not displayed.
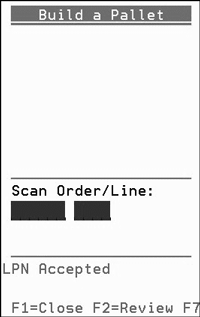

We recommend activating the From Loc, To Loc and at least the Item# or Serial# options.
The Item Master File has a field (Item Scan Ovr) that can be set to override these control panel settings for specific items. You can use this field to force item verification on individual items. This can be useful for expensive items, or items with a history of being picked incorrectly.
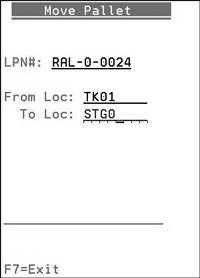
When the pallet is taken to the staging area or trailer, the picker can scan the location label.
If the location has the Auto Order Status update set, all order lines on the pallet are updated to the preset status.
If the location does not have any Auto Order Status settings, the picker is prompted for a new status, which they must enter, and then all the order lines are adjusted to reflect the new status.
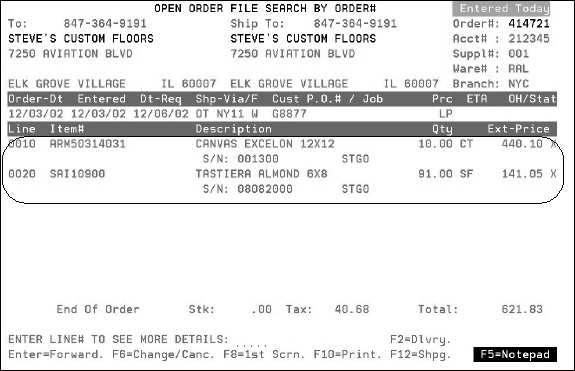
This is the order we have been working with after the lines have been picked and moved to the staging location STG0.
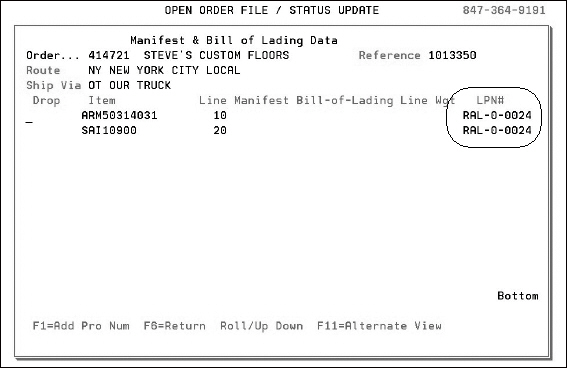
The Order Inquiry Manifest and Bill of Lading Data screen has been modified to show the associated LPN.
Directed Picking
Dropping Assignments in Directed Picking
Removal of Credit Hold orders from IWMS Directed Picking
Zero Pick Order Line Processing
Directed Picking automates the picking and pallet building process in a truly paperless environment. Operators are directed by the RF device (instead of by labels) to pick/stage material in an optimal sequence.
Directed Pick Paths are user definable, and can be prioritized in any way which best suits your needs. Different paths may be assigned to different users, and may be changed throughout the day.
Setting up Directed Picking
Default Order Priority Points File Maintenance - WM3 3
Work with Ship Date to Production Date Adjustments - WM8 51
Set Work Queue Scope Definitions - WM8 103
Picking Workflow Code Maintenance - WM8 104
Default Order Priority Points File Maintenance - WM3 3
This option lets you assign importance points to priority types such as ship via codes or customer types. The higher the number entered the faster a line item with that priority type will be picked up by directed picking. Negative numbers can be used to move items to the end of the pick pool.
An Example
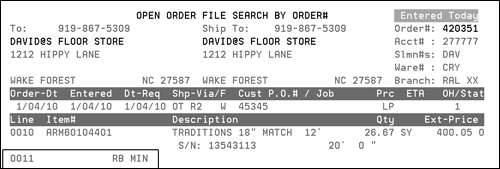
In this example, an order line has a comment that denotes it as a roll balance (i.e RB MIN comment added during order entry). We want this roll balance item to be processed after other orders are cut from the same roll. To do this, we can give the Comment Line order priority type a low or even negative number. Comment Lines are just one of several Order Priority Types that can add or detract points from an order lines placement in the pick pool. Some others are Branches, Account#s, and Manufacturer.
Consider the following order. Notice line 0030 is the roll balance request as denoted by the comment, line 0031, RB MIN.
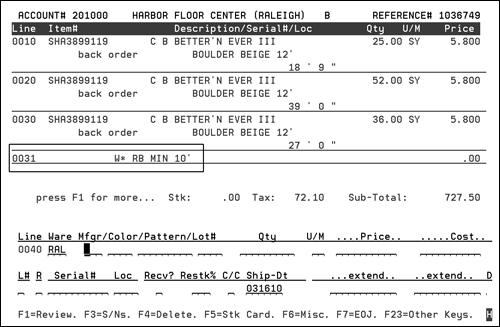
If the Comment Line order priority type is not assigned a low or negative number, the cut station operator is fed order lines without regard to the fact that all lines on the order are from the same roll and line 0030 should be processed last.
To ensure the roll balance item is cut last, access the Default Order Priority Points File Maintenance screen (WM3 3) and select Comment Line.
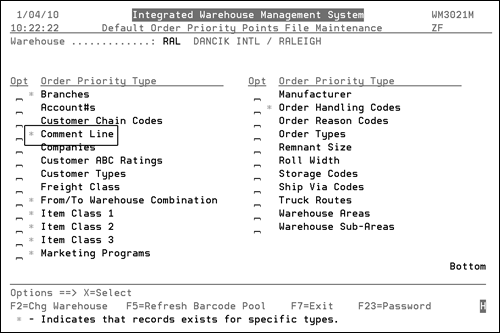
In the figure below, a comment related to rolled balance has been given a negative point value. When a comment line, that is associated with a line item, contains the RB MIN comment, this line will be last in the pick pool. Any orders that are being filled and designated as cut will precede the line item with the RB MIN comment designator.

When an order line uses the RB MIN comment...
....it is assigned -3000 order priority points. This can be checked through the Task Queue Manager section of the IWMS web application.
The example shown above shows the priority points assessed only for Comment Lines. If there are other Order Priority Types (i.e. manufacturer, customers, etc.) that apply to the order line, those point values would also be included in the Order Priority Points total.
Work with Ship Date to Production Date Adjustments - WM8 51
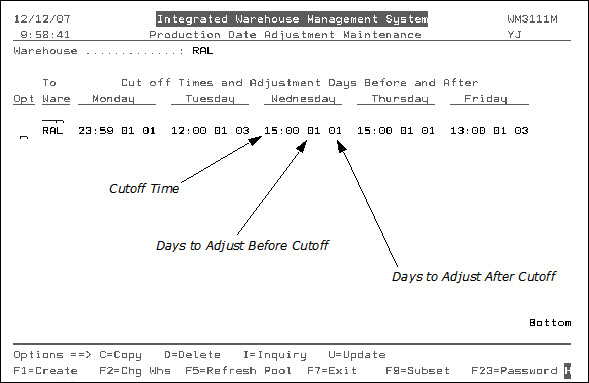
This option enables you to automatically assign the production date of an order based on the number of days for a delivery prior to and after the cut off time for each warehouse. This allows you to automate the process of updating production dates so orders/picks will show up with production dates (not just ship dates) in the work queues. A production date represents the date the warehouse should work on the order. If this option is not configured or used, then the production date must be manually updated using the public or private queries created in the IWMS Browser.
- Select option 51 - Work with Ship Date to Production Date Adjustments on the IWMS System Utilities Menu (WM8).
- To update the entries, enter a U in the appropriate Opt field.
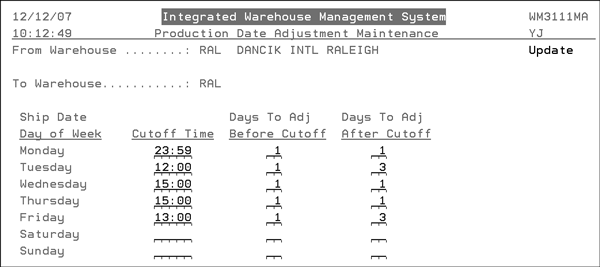
- To explain how this feature works, look at Wednesday on the figure above.
- Cutoff Time - If orders get entered before this time, they make the cutoff. If an order makes the cutoff time, that day (in this case Wednesday), then the production date equals the ship date less the Days to Adj Before Cutoff.
- Days To Adj Before Cutoff - The number of days before an order actual ships, if it makes the 15:00 cutoff time. So, in this example, if the order was shipping on Wednesday the production date would be Tuesday.
- Days To Adj After Cutoff - The number of days before the order is to ship, if the order does not make the 15:00 cutoff time. In this example, if the order was shipping on Wednesday, the production date would be Tuesday.
Set Work Queue Scope Definitions - WM8 103
Work queue scope definitions are used to determine the amount of work to assign to an operator when the next task is assigned to them by the directed picking application. The directed picking application processes the work queues in the priority set up with the IWMS Dashboard Task Queue panel. When an operator needs a new task, the application assigns the first order line based on priority, then the work queue scope comes into play by assigning the operator to the matching records based on the work queue scope definitions.
Examples of Work Queues:
- Job Pack: Some companies provide a service to their customers where they will pack the items specific to their customers job (based on the customer job or PO number). These tasks would be assigned as Job Pack and the system will direct them to operators assigned to do job packing. The scope for a job like this may be to include all lines that match the customer account and purchase order, or job name.
- Singleroll: You could group tasks for picking single rolls into a work queue that would direct operators assigned to roll picking equipment to those tasks. This would be a good choice for roll pickers that take rolls to cut stations.
Other examples would be to set up work queues for: picking trim, building parcels of ceramic, loading, etc.
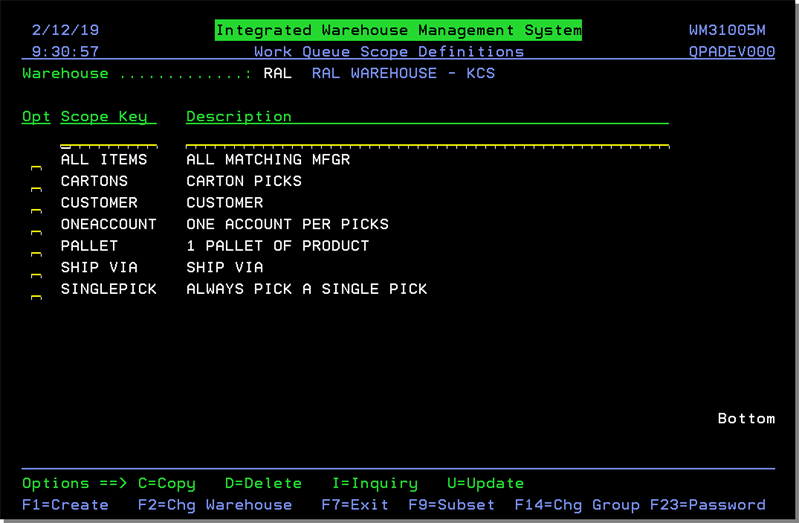
To update one, enter a U in its Opt field and press Enter.
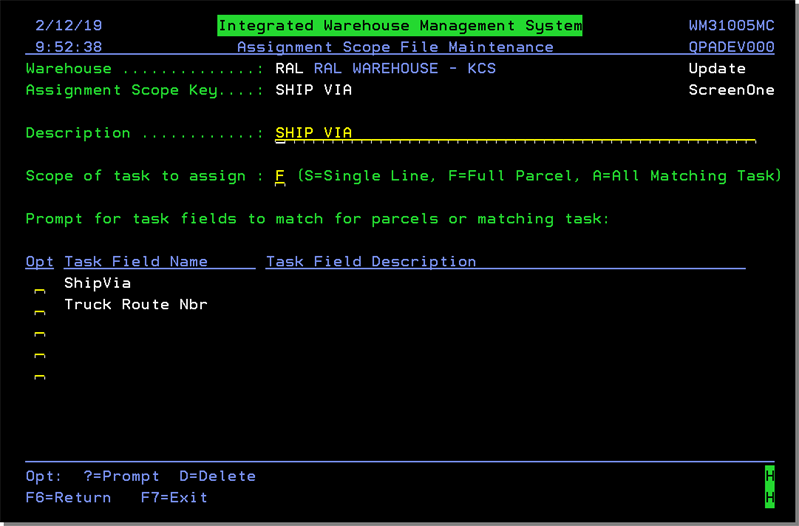
| Field | Description |
| Assignment Scope Key | Work Queue ID |
| Description | Description of the Work Queue |
| Scope of task to assign |
This defines how you want the tasks associated with the work queue grouped and sent to the operator during system directed picking.
|
| Task Field Name | Select from a list of fields in the task queue. These fields will define how the each group of tasks are built. The directed picking application will compare the fields from the first order line assigned, to each subsequent order within the work queue. If all the fields selected match the first order/line assignment, the new order is also assigned to the operator as a task. For example. If you were building a job pack work queue, you may want to select to match on Customer Account and Customer PO. Then when the operator gets assigned the first order line of the PO, they will be assigned all order lines on that PO that are within the work queue. |
Enter a X by a Task Field Name to load into drop downs for field selection in the IWMS Task Queue.
Picking Workflow Code Maintenance - WM8 104
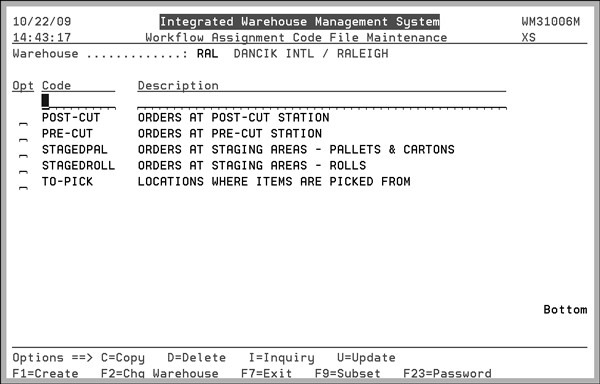
Work flow codes can be assigned to various stages/locations of a process. For example, a cutting process can have work flow codes of rolls in normal location, forklift, cut station (with both post cut and pre-cut locations), staging area, and dock door.
This option allows you to create workflow codes that are used primarily with Directed Picking and analyzing orders still in the pick pool. For example, you can create a work flow code for a particular dock door and then use that code when building Task Queues. Workflow codes are created in WM8 104, and then added to locations using WM1 7.
You can use the web based portion of IWMS to track open picks for each workflow code.
- The first thing for an operator to do is select the work queue where he will be working. To do this, press F1 on the RF menu. On the screen that appears, select option 53 - Pick Work Queue.
- Next, select the area of the warehouse where the operator will be working.
- The display refreshes to show the number of picks for this Work Queue.
- Press Enter to return to the RF menu.
- Select Option 4 - Build-A-Pallet. If you not currently assigned to a piece of equipment, the system prompts you to scan the equipment in.
- The screen refreshes to display the first pick location.
- After the LPN is input, directed picking displays the pick location and quantity.
- Scan the from location. The screen directs you to then scan the item.
- Confirm the entries.
- Press Enter. System directed picking automatically displays the next picking location.
- Once you have picked all lines assigned to you, Press F3 to close the pallet. You are directed to the assigned drop off location.
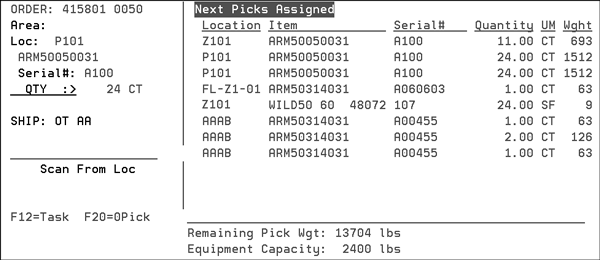
- To view the remaining pick tasks, press F12 and then use the Page Up and Page Down keys to scroll though the remaining tasks.
- If the pick location, does not contain enough inventory to fill the order/line number, press F20. This directs the system, through Zero Pick Order Line Processing, to find another location with replacement inventory.
- After completing all the picks, press F3 to close the pallet.
- On the next screen, scan the drop off location.
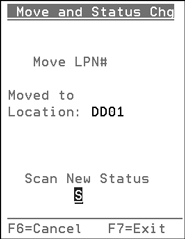
- The next display is for Move and Status Change. If the status is displayed, press Enter to accept that value. If the status is not displayed, enter the status to be assigned to the order/lines on the pallet you have moved.
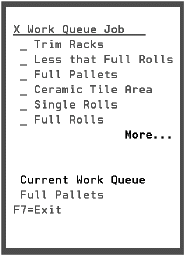
Work queues are created and assigned to the RF screen on the web based portion of IWMS. Under the Task Queue Manager tab on the web-based IWMS application, if a search has a Work Queue Description assigned it appears on the RF screen as a task queue.
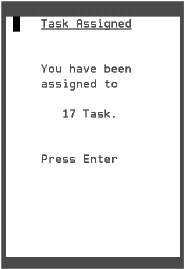
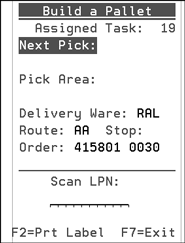
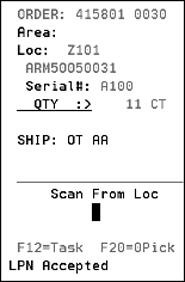
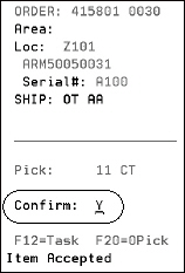
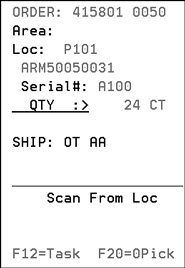
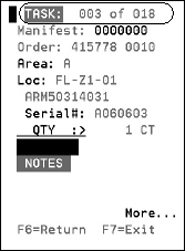
If you are using the vehicle mounted RF screen, the next pick assignments and additional information is already displayed.
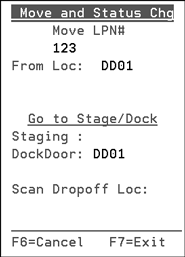
IWMS can automatically assign a status based on the type of location the material is moved to.
Dropping Assignments in Directed Picking
- If you cannot finish all the picks assigned to you by directed picking, return to the second screen of the RF menu.
- Select option 54 - Drop Assignments. The screen that appears shows the number of remaining tasks. Enter a Y.
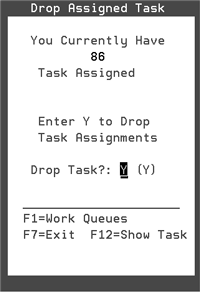
It is very important to drop unpicked tasks. If these tasks remain open in the pick queue, errors such as inventory not being put on trucks can happen.
Removal of Credit Hold orders from IWMS Directed Picking
This functionality removes orders from Directed Picking work queues if the order goes into a credit hold status. This includes omitting labels from being printed through either directed picking or via the label pool.
Associated Files
- System Wide Setting - Options to Suppress Printing of Invoices - This functionality has to be activated via the System Wide Setting - Options to Suppress Pick Labels/Pick Pool.
- Held Orders/Credit Release (AR 15) - This program shows all of the orders that are currently on credit hold and lets you selectively release them.
- Event Trigger (WM8 20) - The event trigger CRDHLDDOCK can be used to send an email if a credit held order is moved to a Dock Door.
Removing Credit Held Orders from Directed Picking and the Pick Label Pool
- Orders can be put on credit hold in the following ways:
- Manually via menu option CD 4 - Force Order Onto Credit Hold.
- Automatically via the Credit Hold Option on the AR and Credit Options of the Company Settings (Menu option SET 003).
- Customer credit checks during order entry.
- Customer accounts are assigned a credit code of H in the Billto File.
- To manually put the order into credit hold, enter the order number into menu option CD 4.
- Putting the order into a credit hold status removes it from the Task Queue Manager and ensures labels will not print for the order.
In this example, we are going to use menu option CD 4 to manually put an order into credit hold which will remove it from directed picking and the label pool.
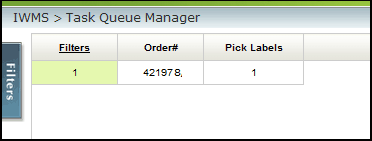
Prior to putting the order on credit hold, the order was included in the IWMS Task Queue Manager which directs directed picking.
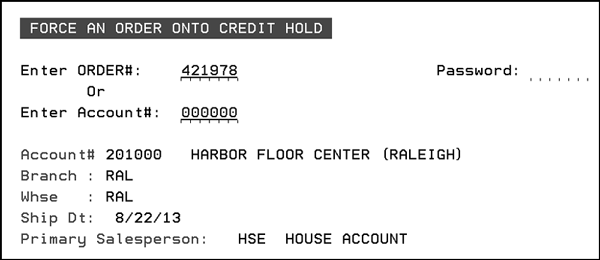
Enter an account number to put all the orders for that account into a credit hold status.
Credit Hold flag in the Task Queue Manager
The Credit Hold Flag can be used when building a picking queue.
The first thing to do is ensure the new credit hold flag is available in the drop down menu when buildÂing a picking queue.
- Go into menu option WM8 102 - Work with Web drop-down fields.
- Select Task Queue Manager.
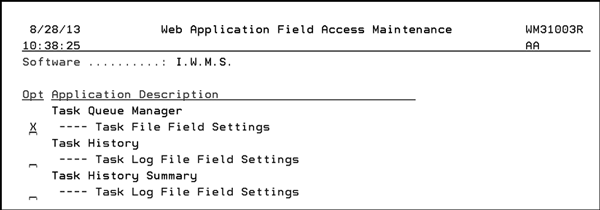
Find the Credit Hold Flag and select it....
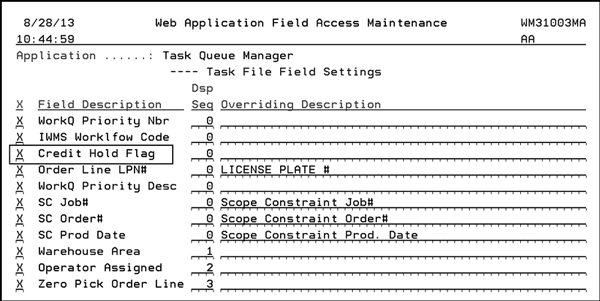
....to ensure it shows up in the drop menu when building a picking queue.
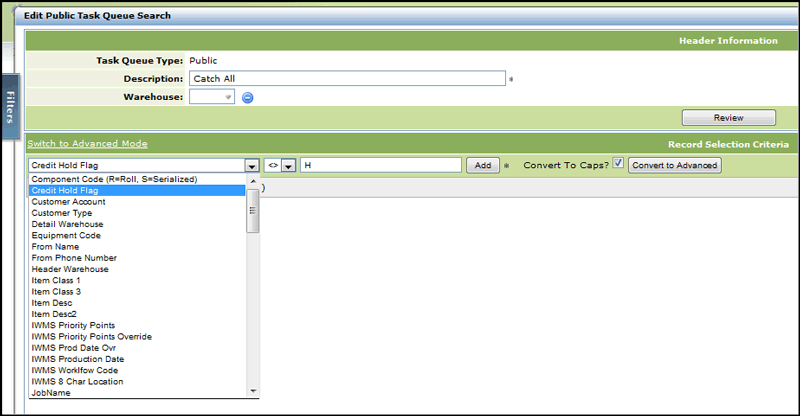
When building a queue, you can use the Credit Hold Flag to show orders on credit hold by making the following entry.

Or to ensure credit hold orders are not in the work queue make the following entry.

Zero Pick Order Line Processing
A Quick Glance at Zero Picking
Setup for Zero Pick Order Line Processing
An Example of Processing a Zero Pick
Zero Pick Functionality At Cut Station
A Quick Glance at Zero Picking
Zero Picking is an option on the RF menu that allows an operator to flag an order line as not being able to be filled at the specified location. When an operator sees that the line cannot be filled at the current location on the order line, they press F20 to flag it as a potential Zero Pick. Zero Pick is similar in concept to what some call Not Founds or Not in Locations (NILS).
If the line was not picked by ISO:
- The program will not try to fill from other inventory since it could have been a shade or dye lot controlled order line.
- The inventory in the location for that item is flagged with a serial# status of '#' so it will not be picked by other orders.
- An email will be sent to assigned addresses if the Event Trigger is set for ZEROPICK trigger.
- The order line is flagged in the barcode pool as a Zero Pick Line so the warehouse is aware of it. (It is suggested that the warehouse create a dashboard view of the Zero Pick order lines)
If the line was originally picked by ISO:
- The program runs ISO to see if the line can be filled by other inventory.
- If an acceptable replacement is found, then the order line is swapped to the new inventory and the order line is placed back into the task queue to pick.
- If an acceptable replacement is NOT found:
- The inventory in the location for that item is flagged with a serial number status of # so it will not be picked by other orders.
- An email is sent to if the Event Trigger for ZEROPICK has a message and recipients assigned.
- The order line is flagged in the barcode pool as a Zero Pick Line so the warehouse is aware of it. (It is suggested that the warehouse create a dashboard view of the Zero Pick order lines)
Setup for Zero Pick Order Line Processing
Menu WM2 Option 1
The status entered in the field Status Code for order line when Zero Pick cannot substitute pick in the Picking section on the second screen of the Warehouse Settings is the status assigned to an order line where a pick cannot be replaced.
For example, considering the example shown below, if an operator cannot fill an order line from the specified location and a replacement location cannot be identified (i.e., there isn't another location with enough inventory or ISO was used to select the inventory), the order line is assigned a Z status.
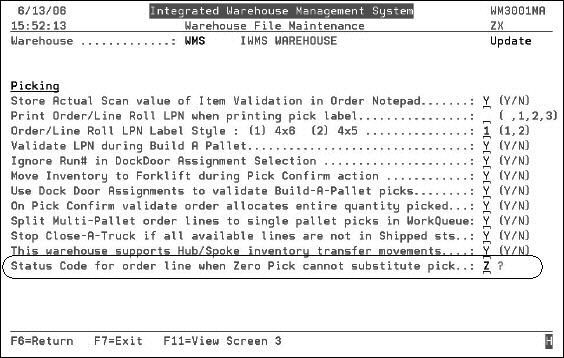
To find the orders that have not been replaced and are still at a Zero Pick status, you can run an open order report for status code assigned to Zero Picks (in this case Z). The open order reports are accessed via menu ROO. There are several types of open order reports, i.e., by customer, by supplier, by salesperson, but all of them contain the field Enter Status Codes, or leave Blank to Include ANY Order Status. Use this field to limit the report to the assigned zero pick status code.
Zero Pick Reason Codes - WM8 108
Use this table to create and maintain the reasons why zero picks occur. These are the reason codes that are inlcuded on the zero pick triggered emails.

To add a new zero pick reason code, simply type it and it's description in.
Email Triggers
These settings can automatically send an email to your Inventory and Customer Service personnel alerting them that there an order cannot be filled. They in turn can correct the inventory count and notify the customer that the order might ship late.
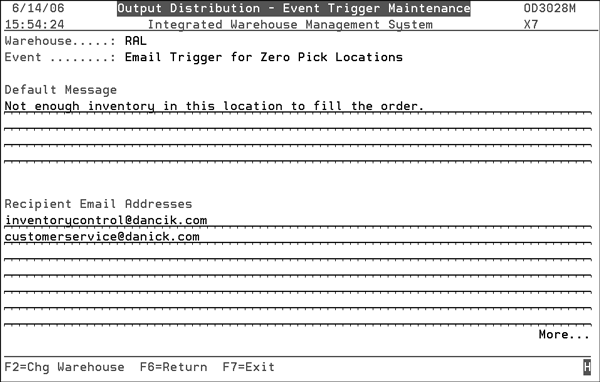
These email triggers are accesses via menu WM8 option 20. The two emails that pertain to zero picking are:
- ZEROPCKLOC - This trigger sends an email, usually to warehouse or inventory personnel, when the location that originally had the order allocation does not contain the necessary inventory.
- ZEROPICK - This trigger sends an email with information about the order that could not be fulfilled because no inventory is available to fulfill the order line. This email would generally go to customer service personnel.
To view or update the content and receipts of one of the email triggers, select it. A screen similar to the following appears.
An Example of Processing a Zero Pick
When processing a directed picking mode using the RF, the function key F20 is available for the Zero Pick. When the operator discovers that the location originally allocated to the order cannot fulfill the order, they can press F20 to have the system attempt to reallocate the order.
- The following screen begins the picking process. Along with other information, it shows the order number and order line.
- When the picker arrives at the location to start picking inventory, he scans in the LPN number.
- The quantity needed to fill the order line pops up on the screen.
- If the actual quantity in the location is not enough to fill the order, the operator can press F20. He can then enter a Y to direct the system to find another location with replacement inventory.
- Entering a Y directs the system to find another location with enough of the same inventory to fill the order. An email is also sent out, providing one has been setup, alerting your inventory control department that the original location is incorrect insofar as quantity is concerned.
- Press Enter to access the new location.
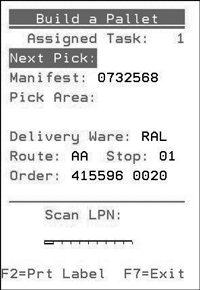
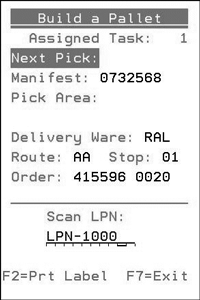
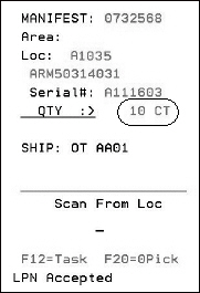
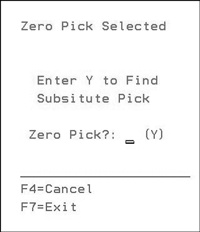
The system searches for a suitable replacement location. If one is found, the following message appears.
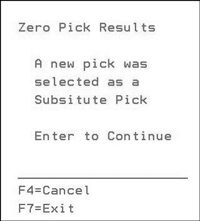
Zero Pick Functionality At Cut Station
This functionality allows cut station operators to zero pick rolled goods and to update the roll quantity when there is not enough inventory on the roll to fill the order.
Associated Files
IWMS Event Triggers (WM8 20) - The event trigger ZEROPICK can be set-up to send an email to those affected whenever a zero pick occurs.
Warehouse Settings (WM2 1) - The second page of settings contains options related to zero picking.
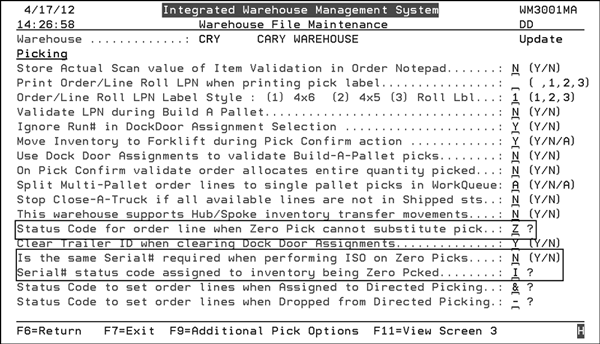
The setting Is the same Serial# required when performing ISO on Zero Picks is ignored when picking rolled goods. Rolled goods have unique serial numbers so ISO would never find the same serial number. However, by ignoring this setting for rolled goods, it can still be used for carton goods.
Making a Zero Pick at the Cut Station
Access the Oorder/Shipping Status Update screen (WAR 5).
Press F1 to access the Cutting Station Menu.
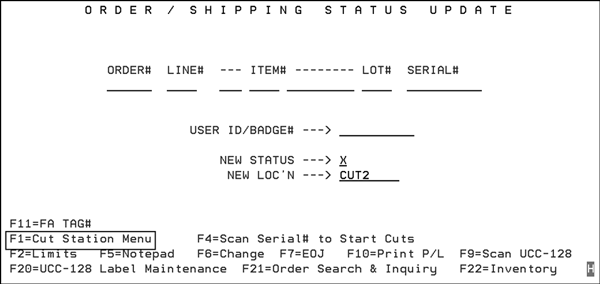
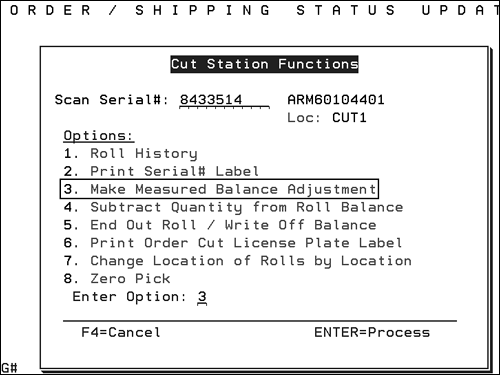
Scan the serial number and select option 8 on the Cutting Station Menu. The next screen asks the operator to scan the order and line number.
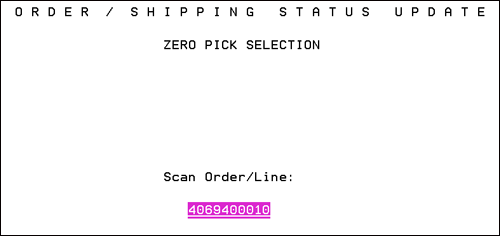
Since this functionality works at the serial number level, a Y should be entered in the next screen.
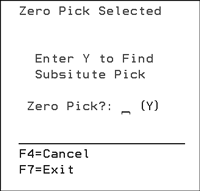
Press Enter on the next screen....
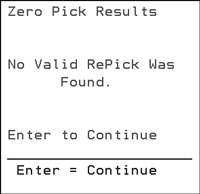
....to return to the Cut Station Menu.
Use option 3- Make Measured Balance Adjustment to correct the quantity of the roll.
Enter the measured quantity.
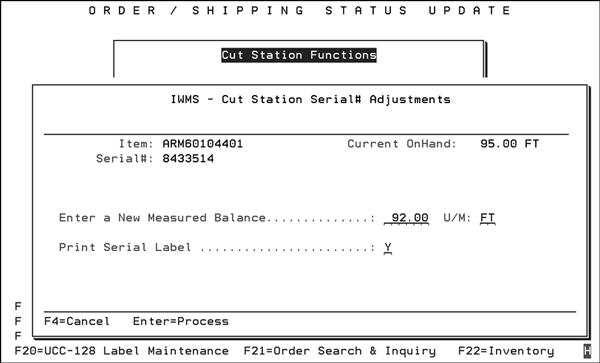
After the adjustment is made, the correct size of the roll is recorded, but the available inventory will show with a negative availability. This will be corrected when the customer service representative deallocates or reallocates the inventory to another serial number. This allows for the operator to make changes to the roll as needed.
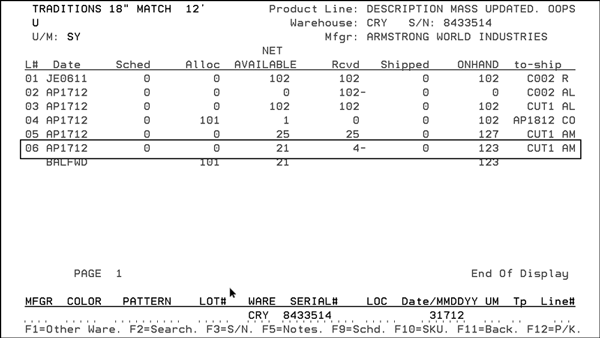
The status of the order is changed to the status entered in the Status Code for order line when Zero Pick cannot substitute pick on the Warehouse Settings menu (WM2 1).
Mass Applying Putaway and Picking Sequences
These options accessed via options 32 and 33 on the IWMS System Utilities Menu (WM8) allow you to quickly and easily apply putaway and picking sequences to a range of locations.
Putaway and picking sequences establish location priority and are required for IWMS's directed putaway/picking to function properly.
1. On IWMS System Utilities Menu, select option 32 - Mass Apply Location Putaway Seq or option 33 - Mass Apply Location Picking Seq.
In this example, option 32 - Mass Apply Location Putaway Seq was selected. The screen that appears, shown below, is the same for both options.
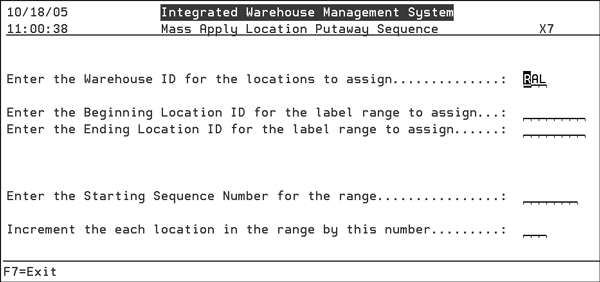
| Field | Description |
|
Enter the Beginning Location ID for the label range to assign Enter the Ending Location ID for the label range to assign... |
Enter the beginning and ending location ranges for this putaway/picking sequence. For example, an entry of Rack1 to Rack 55 could cover your rolled goods locations while a range similar to AA1A to Z999 might cover pallet locations. Any location between the starting and ending location range will have a sequence number assigned. |
| Enter the Starting Sequence Number for the range | The number entered here is where the putaway/picking sequence numbers begin. The location assigned this sequence number will have the highest priority within directed putaway/picking. |
| Increment the each location in the range by this number | This is the value added to each successive location within the range. For example, if the sequence starts at 1 and a 1 is entered here, the next location in the range will have a putaway/picking sequence of 2. |
Consider the following example.
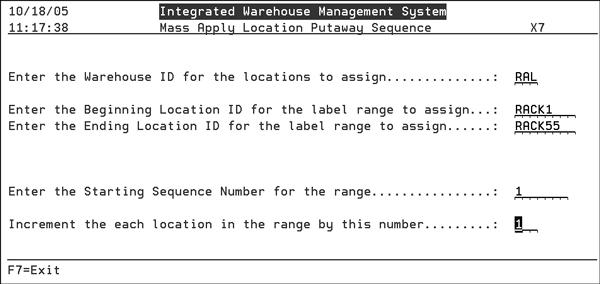
- The range of locations we are working with is RACK1 through RACK55. Anything between these locations will be included.
- The starting sequence number is 1. Therefore, RACK1 is assigned a putaway sequence of 1. In this example, this location will receive the highest priority from directed putaway. Maybe RACK1 is closer to the receiving area than RACK55 and therefore is easier and faster to get to.
- Since each location, in this example, is incremented by 1, RACK55 is assigned a putaway sequence of 55. This means that before IWMS directs inventory to be located there it will look at 54 other locations first to see if they are usable.
