Directed Putaway in IWMS
Establishing Warehouse Storage Codes
After a few set-up steps, IWMS's directed putaway automatically finds the optimum place to store your incoming inventory.
Bulk storage can be managed efficiently by the Directed Put-Away function. You can assign bulk storage locations to products, as primary or secondary receiving areas.
The Directed Put-Away program attempts to find the most suitable bulk storage location based on the quantity received. For example, if 16 pallets of a single product are received, the program first tries to put away all 16 pallets in a location that can accommodate all 16 pallets (such as a 15-20 pallet bulk location). If a 15-20 pallet location is not available the program will try to find two smaller locations. For example, ten pallets can be stored in a 10-15 pallet location, and the remaining six pallets can be stored in a 5-10 pallet location.
Set up for Directed Picking
- Setup Areas and/or Sub-Areas.
- Setup the Storage Code Master File using Menu (WM1 Option 10).
- Setup the sequence to search for available space for each storage code by warehouse (Menu WM1 Option 5)
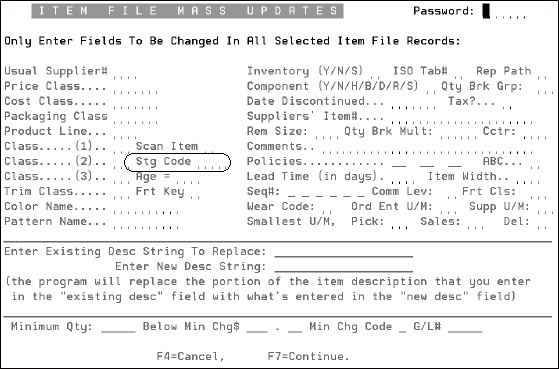
- Apply the storage codes to your items using the Item Mass Update (FIL 101 or SYS 108).
- Enter the capacity for each location in the template or location itself. Try to use whole pallets or cartons. Rolls count by the number of serial numbers in the location, not the size.
- Apply a putaway sequence number to each location you want to store inventory (WM1 option 5).
Directed Putaway Steps
- Check for a Crossdock Opportunity - Can the quantity of one receipt line exactly fill the order quantity for one backorder line that is shipping within a specified date range you enter, (using menu WM2 option 001. For more information on setting this up, refer to Warehouse Settings File). This can avoid any putaway at all. However, the dock doors need to be assigned to the routes for the backorder, otherwise IWMS does not know where to stage it.
- Check for available space in the location in the Stock Keeping Unit file.
- Check for available space in a location that has the same item/serial# as being received.
- Check for available space in a location using the priority areas, then sub-areas assigned to the Storage Code of the Item. (Think of storage codes as hard allocated locations, but it doesn't have to be the exact location, but in the general vicinity).
- Run through the available locations in Putaway sequence assigned to the locations and find the first available location with enough space.
Establishing Warehouse Storage Codes
Storage codes designate the lowest level of a warehouse location. Use storage areas to further organize your inventory. For example, you can establish storage codes for different colors or sizes of the same items. These codes will work in conjunction with the putaway sequence.
The following options on the IWMS Physical Warehouse Setup Files (WM1) menu allow you to establish storage codes:
- 10 - Storage Codes Master File - This is where you actually create storage codes that can apply to all warehouses.
- 5 - Storage Codes by Warehouse - This option allows you to assign specific storage codes to warehouses. When this option is selected, the current storage codes for the active warehouse display.
Assign regular (Reg), Sub areas (Sub), and alternate (Alt) areas as needed. When you enter the Area Type, its code is automatically entered.
When inventory is received and scanned in, IWMS, through directed putaway, looks to see if there is room in each location within the areas and sub-areas entered. For example, the storage code CT12 is set up for 12 x 12 tile. When 12 by 12 tile is received, indicated by the storage code CT12 in the item record, the system tries to place it into sub area CT12X121. If there is enough room in that location, the system suggests it via directed putaway. If the first sub area doesn't have the necessary capacity, the system goes down the list looking for a sub area that has the necessary capacity. If none of the sub areas can be used, the system then looks at the areas and the alternate areas.
Keep in mind that the storage codes are actually created via option 10 - Storage Codes Master File. Area, sub area, and alternate locations are created in the Areas File (Option 2 on IWMS menu WM2) Sub-Areas File (Option 3 on IWMS menu WM2), and Alternate Areas File (Option 4 on IWMS menu WM2).
Item File Mass Update
After you have established storage codes. you can update your item records via the Item File Mass Update option on the Special System Maintenance Functions Menu. This option is accessed via menu SYS option 108.
For example, if you have a supplier for molding and trim only you can update all the items you receive from them easily with this option.
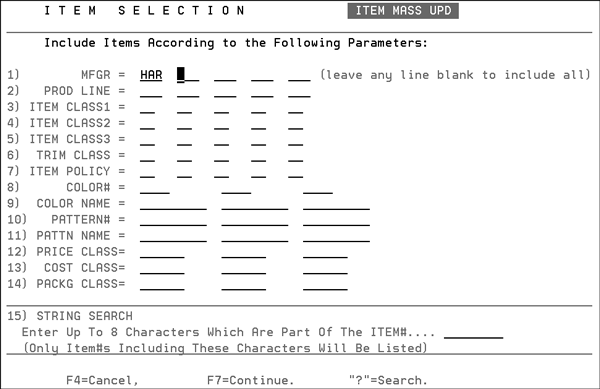
- Go to SYS 108 and select the appropriate parameters. On the following screen, a molding and trim manufacturer is entered.
- Press Enter then F7 to proceed to the next screen. This is the screen where you add the storage code in the Stg Code field.
- Press Enter to continue with the process.


