Entering GL Journals (GL 1)
1. On the General Ledger Menu, select option 1 - Enter G/L Journals, and press Enter. The General Ledger/Journal Entry Screen appears.
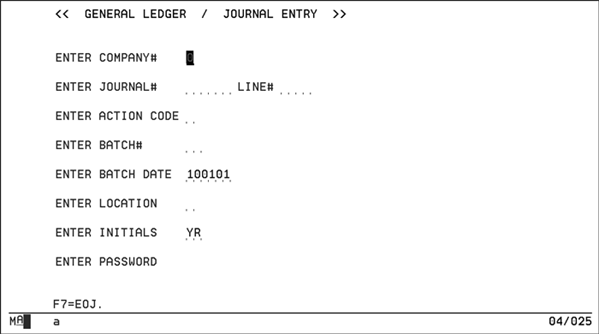
This screen is used to set up the entry of journal entries.
2. Complete these fields each time you use this program unless you access different batches.
Following is a description of the fields on the above screen.
|
Field Name |
Description/Instructions |
|
Company# |
Enter the company number to which all journal entries in the batch will be posted. |
|
Enter Journal# |
The G/L system automatically assigns journal numbers. Skip this field unless you are correcting, adding to, or viewing a journal entry already entered in this batch. If you are entering a RJE, enter the RJE number that you have created in the Enter Recurring Journal Entries Program. The system assigns consecutive journal numbers within each company. RJEs are kept permanently under their, own RJE number. However, each time they are used to create actual JEs, the new JEs are assigned the next consecutive journal number, just as any other JE. Remember that RJEs are only models on which actual JEs are based. |
|
Line# |
Each journal number can have many as 9999 lines. Each line represents a single debit or credit to a single account number. Skip this field unless correcting, adding to, or viewing a JE already entered in this batch. |
|
Enter Action Code |
Valid action codes are:
|
|
Batch # |
Enter the two-digit batch number in which the JE is included. All JEs must be entered by batch number. Batches can be numbered 00 - 99, with Batch 00 being reserved by the system for JEs automatically posted from other applications such as A/P. Each batch can consist of a single or multiple JEs, or all JEs for a month. You can run the Batch Status Report, option 4, on this menu to see which batch numbers are available and the status of all batches that are in use. We recommend that you enter many journals into a single batch so that in the event of your keeping many months open concurrently, you will not run out of available batch numbers. There are 99 batches available for you. Batch numbers become available again once the month into which they are posted is closed. |
|
Enter Batch Date |
This is the default transaction date for journal entries in the batch. The system inserts today's date as the default. You can override it for each journal in a batch. This date appears on the G/L reports as the journal date. The journal date is the date the journal entry was entered into the system. All journals in a batch do not have to have the same date. Do not confuse this date with the period date, which is entered on the next screen. This date does not establish the period that the journal will affect. It is merely a transaction date for tracking when the JE was entered. |
|
Enter Location |
Enter the one-character code assigned to your office location. You control these codes. For example, N can indicate New York, D indicates Dallas, and L indicates Los Angeles. These location codes can later be used for sorting journal entries by the office that entered them. Leave this field blank if you only post G/L journal entries in a single office. |
|
Enter Initials |
The default for this field is your workstation terminal ID. You can override the default and enter your initials. |
|
Enter Password |
Enter the required password. Only a valid password will allow Screen 2 and 3 to display. In some cases, the password may be set to blanks, in which case you do not have to enter a password. The password does not display when you enter it in. However, it remains in effect throughout the use of the program. Enter it once each time you use this program. When you return to this screen, it is not necessary to re-enter the password. |
The General Ledger is set up so that you can directly access any specific lines, without having to scroll through the journal from the starting line number.
3. Enter the G/L# (Journal #) and the Line# you want to access. The following G/L Inquiry Screen shows the results if journal 000021 and line number 40 are entered.
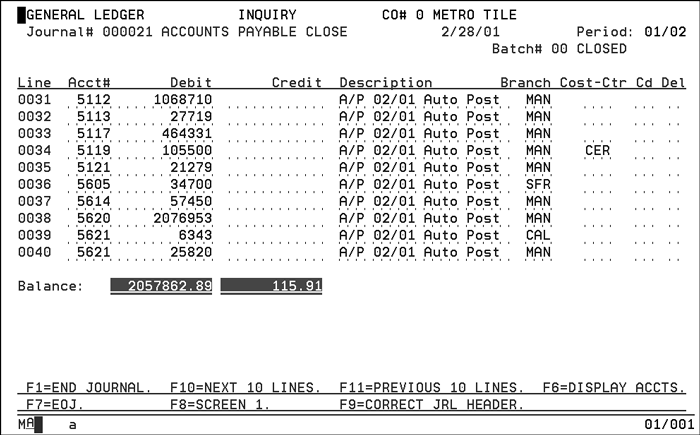
4. The Journal Detail Screen appears after you have entered the required information on the initial Journal Entry screen.
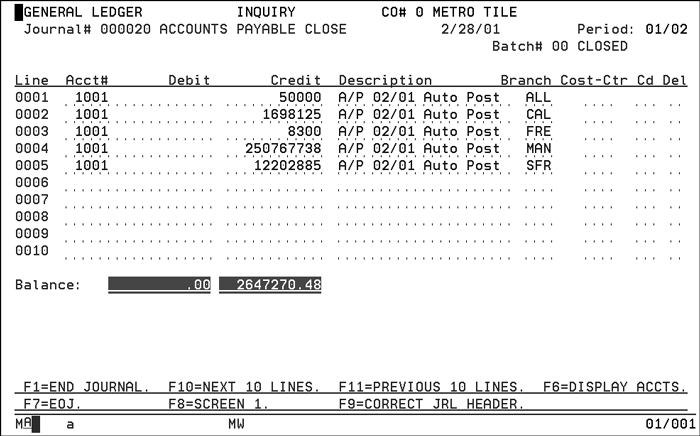
5. Enter journal details on this screen.
Each line number represents a single entry debit or credit for an account number, and optionally, a branch or cost center. Up to ten lines per page can be entered. Use F10 to display another page and F11 to display a previous page. Up to 9999 lines per journal can be entered. As you enter data, the total balance of debits and credits displays under the ten line numbers. Total debits must equal total credits in order for the journal to be in balance and to be eligible for posting. The balance figure shows in reverse image if it does not balance.
6. After enter as many lines on a page as needed, press Enter.
All lines are checked for validity of information entered, and if no errors are found, the screen displays the message Accepted and the debit and credit balances at the bottom part of the screen. The following table describes the fields on the above screen.
|
Field Name |
Description/Instructions |
|
Line |
This the line number for each line entered in the journal entry. There are 9999 lines available to enter your journal entry. It is assigned by the system and cannot be overridden. |
|
Acct# |
Enter the five-digit account number from the chart of accounts. Each account number consists of six total digits, with the first always being the company number. Since the company number is already known, this screen requires only the last five digits. |
|
Debit |
Enter the amount being debited to the particular account for the journal entry. On each line enter either a debit or a credit, but not both. Assume two decimal places, but do not enter the decimal point. |
|
Credit |
Enter the amount being credited to the particular account for the journal entry. On each line enter either a debit or a credit, but not both. Assume two decimal places, but do not enter the decimal point. |
|
Description |
Enter an extra description, if necessary, for this line number. The description entered here is specific to this line and is in addition to the journal title on the Header Screen and the Notepad. Do not enter the account title here as the system already knows it by the account number entry. Press DUP to duplicate the description from the line directly above. For example, if you are on line 0002, press DUP in the Description field to duplicate the description entered in line 0001. An actual
DUP key exists on an
IBM workstation keyboard. If you are working on PC, the DUP key functions have to
be mapped through Client access to an existing key (or combinations
of keys).
|
|
Branch |
You can allocate the JE to a specific three-character branch number or code or to all branches by entering ALLin this field. If you leave this field blank, the system assumes all branches. ALL indicates the entire company, not a specific branch. Press DUP to duplicate the branch from the line directly above. For example, if you are on line 0002, press DUP in the Branch field to duplicate the branch entered in line 0001. An actual
DUP key exists on an
IBM workstation keyboard. If you are working on PC, the DUP key functions have to
be mapped through Client access to an existing key (or combinations
of keys).
|
|
Cost Ctr |
You can allocate the journal entry to a specific three-character cost center number or code, or to no cost center by leaving this field blank. Cost centers are defined using the Accounting File Maintenance Menu, Cost Center File option. Press DUP to duplicate the cost center from the line directly above. For example, if you are on line 0002, press DUP in the Cost Center field to duplicate the cost center entered in line 0001. An actual
DUP key exists on an
IBM workstation keyboard. If you are working on PC, the DUP key functions have to
be mapped through Client access to an existing key (or combinations
of keys).
|
|
Cd |
This extra code field is user-defined and can be used to identify the line as relating to a specific circumstance. For example, to track all expenses related to moving, you could enter MV here. Then, using the various report options, you can request a list of all journals labeled MV. |
|
Del |
A D in this field deletes the current line. Deleted lines are not processed. If you make an error, type the correct information over the error. Enter D in this field only if you want to delete the line. If you press F4 from the Header Screen to delete an entire journal all lines will have a D inserted in this field. |
The following table describes the function keys on this screen.
|
Function Key |
Description |
|
F1 |
Ends processing of the current journal and returns to Screen 2 for entry of another journal. Make sure to press Enter before pressing F1. |
|
F6 |
Displays the account titles in the Description field in order to verify account numbers. The account titles come from the Chart of Accounts File. F6 also switches you into Inquiry mode. To return to update mode, press F8 and enter action code U. Pressing F6 does not delete your description entries. It displays the account title over them. This function also toggles between showing the account description entered by the user, and the description of the account in the Chart of Accounts file. This functionality can be used to ensure the account names being entered match those contained in the chart of accounts which can ease reconciliation. |
|
F7 |
Ends the job and returns to the General Ledger Menu. |
|
F8 |
Returns you to the initial Journal Entry screen. |
|
F9 |
Displays and corrects the Journal Header information. |
|
F10 |
Advances the screen to the next ten lines. There are 9999 lines available. F10 also enters the current page. Therefore, you can fill a page and press F10 without first pressing Enter. |
|
F11 |
Displays the previous ten lines. F11 also enters the current page. Therefore, you can fill a page and press F10 without first pressing Enter. |
7. Press F9. The Journal Header Screen appears.
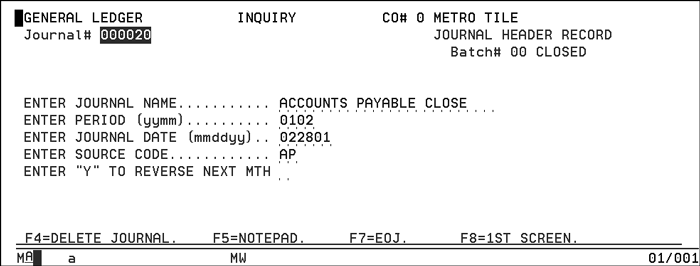
This screen includes the header information for each journal. It displays the journal number as entered on Screen 1, or automatically assigned by the system, company name, the status of the batch, for example, New, To Edit, Edited, and In Balance) and other input fields as shown on the above screen.
The following table describes the fields on the Header Screen.
|
Field Name |
Description/Instructions |
|
Enter Journal Name |
Enter the name or description of this journal entry. The JE name appears on all applicable reports. |
|
Enter Period (YYMM) |
Enter the period in which this journal is to be posted. You must enter the period in YYMM format. For example, if this entry is being posted for the month of June 1997, then enter the period as 9706. |
|
Enter Journal Date (mmddyy) |
The system inserts today's date as the date you are entering this journal entry. The system date can be overridden. The date entered in this field appears on your G/L reports as the journal date and is separate from the period entered in the Enter Period field. It is valid for this date to be in a month other than the period date, reflecting that the journal was entered either prior to or after the posting period. |
|
Enter Source Code |
The following source codes are available for the journal entry:
These codes are inserted automatically by the system and cannot be overridden. |
|
Enter Y To Reverse Next Mth |
Enter Y if you want to reverse this journal entry into next month. After posting the entry to reverse into the next month, the posting report shows the journal number created from the reversing entry. The General Ledger Enter Journals Program (option 1 on the G/L Entry Menu) provides for automatic reversing entries. To initiate an auto-reversing journal, enter Y at the prompt on the Journal Header Screen. Reversing journals are entered exactly the same as any other journal except for entering Y to reverse. When Y is specified for auto-reversing the journal, the following processes occur:
|
The following table describes the function keys on this screen.
|
Function Key |
Description |
|
F4 |
Deletes the entire journal. The Journal Header Screen or the Journal Details Screen appears. When a journal is deleted, a D appears in the Del field on Screen 3 and the Journal Name field is changed to Deleted. |
|
F5 |
Accesses the Notepad which allows you to enter additional comments for this journal. Enter as much information as necessary to describe this journal. Once in the Notepad, press F10 to access the next page of the notepad. Press F11 to return to the previous page of the notepad. All notepad entries appear as footnotes on the General Ledger Report. |
|
F7 |
Returns to the main menu and ends the job. |
|
F8 |
Returns to Screen 1. |
Example of GL Journal Entry
The following example shows the procedure for making a journal entry.
1. On the General Ledger Menu, select option 1 - Enter G/L Journals, and press Enter. The General Ledger/Journal Entry Screen appears.
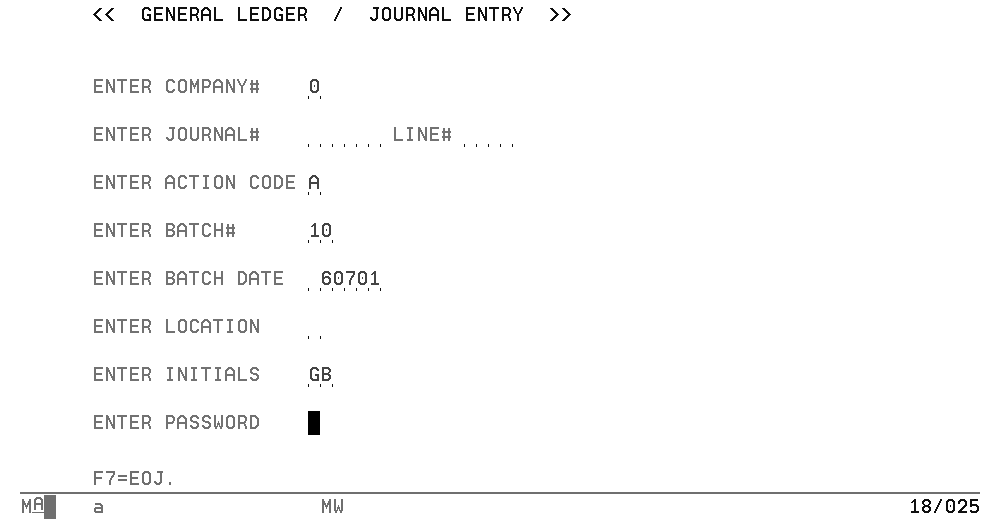
2. On the General Ledger/Journal Entry screen, enter your Company #, which was created in the Company File.
3. You do not need to enter the Journal # or Line #. The system assigns the journal number when you add new entries.
4. Enter A to add new journals.
5. Assign an available Batch #.
6. Enter your Location, if necessary, and the Password. The password does not display on your screen.
7. Press Enter to go to the Journal Header screen, which shows the fields you just entered.
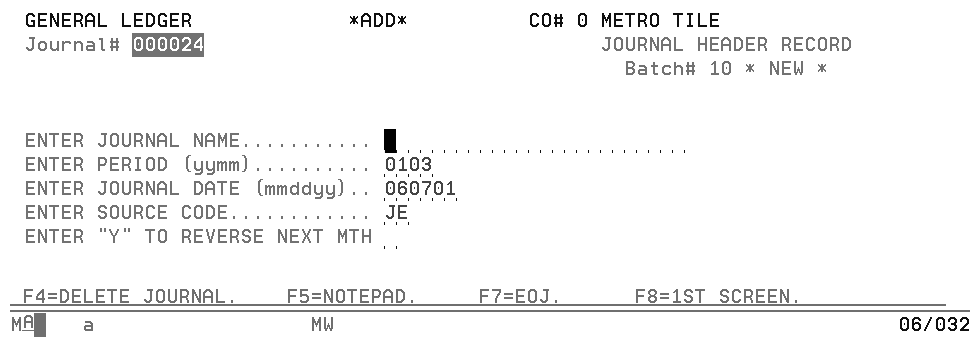
8. Enter the Journal Name and the Period to which the journal entries are to be posted. The transaction date from the initial screen appears in the Journal Date field. Since this is a journal entry, the source code is JE.
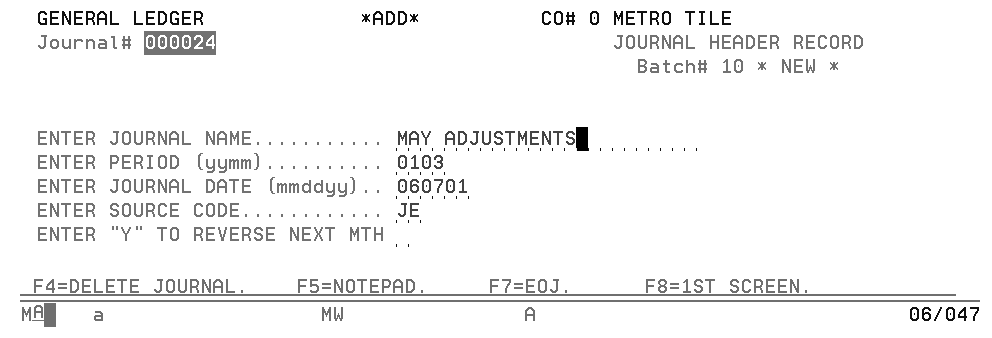
9. Press Enter. A blank Journal Details screen appears.
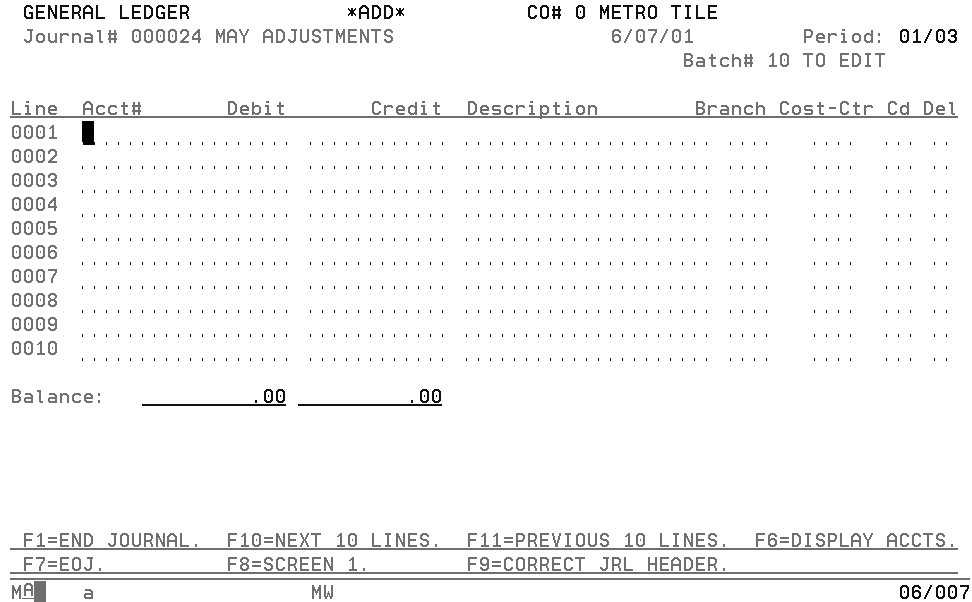
10. Complete the fields on this screen. In the figure below, the following data was entered:
-
Two separate journal entries were entered for May 2001.
- One for interest income
- One for a money transfer from one account to another.
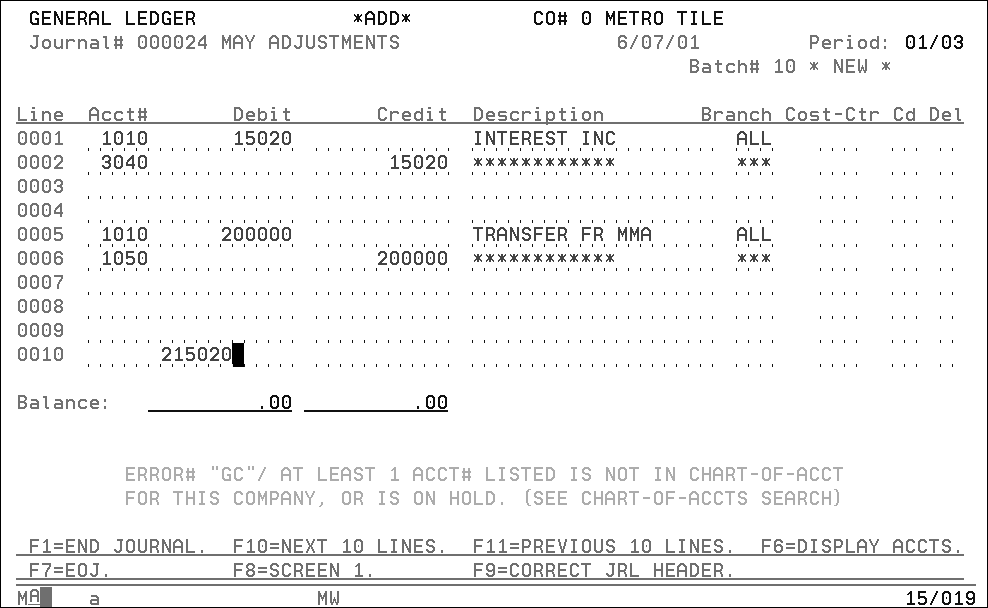
You can enter up to 9999 lines of journal entries.
You can also leave empty lines between journal entries to separate them for easier viewing. This option does not take up disk space in the system, and the Edit and Posting G/L Journals printout do not display the empty lines.
