Supplier File - FIL 3
Supplier File Phone Number Screen
A supplier is a company you buy inventory from, which has a three-character, alphanumeric code. Generally, suppliers and manufacturers are the same, though some suppliers have no corresponding manufacturers. For example, you might need to buy material from a local competitor. You can buy the same items from multiple suppliers.
The Supplier File contains essential information about each supplier, including the address that appears on checks, summarized accounts payable (AP) statistics, and AP system parameters.
The Supplier File is shared by all companies using the AP and Purchasing Systems. More than one company can enter purchase orders, post bills, and write checks to the same supplier. All statistics are available for each company and for all companies. However, you should note that summarized statistics displayed on the Supplier File Entry screen are for all companies.
The Supplier File Profile screen contains information relevant to both the Purchasing and the AP system.
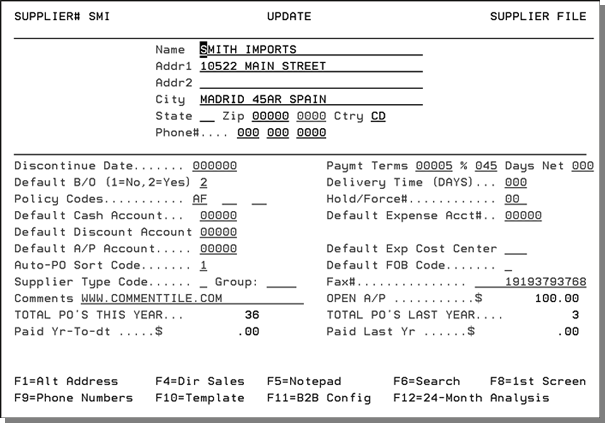
Review, update, or add information to the fields, as necessary.
You can use the first part of the Supplier File Profile screen to enter information about that supplier, such as address and phone number. Most of the remaining information you establish at the supplier level has to do with the G/L accounts you want transactions posted to. You can enter this after you've created your Chart of Accounts File. Some important exceptions are
- Discontinue Date - the date after which no purchases can be made from the supplier
- Default B/O (back order) code - controls how the system handles unreceived lines on purchase orders when material is received
- Policy Codes. Some examples of commonly used supplier policy codes are:
- SU - for printing when POs in a unit of measure different from the native unit
- AF – to use auto-fax features (which requires additional hardware).
Note also, that the default terms you receive from the supplier are established here. You can enter ? in the Policy Code field to search for the different policy codes defined by the system.
The following table describes the fields on this screen.
|
Field Name |
Description/Instructions |
|
Name |
The name of the supplier. |
|
Addr1 |
the address of the supplier. If the supplier has a different address for purchase orders than for remittance, enter the purchase order address here, and use the alternate address screen for the remittance address. |
|
Addr2 |
Additional line for address information. |
|
City |
The city in which the supplier is located. |
|
Discontinue Date |
Leave blank unless your company stops doing business with this supplier. If so, enter the date on which your company stops doing business. |
|
Default B/O |
Enter 1 if you do not want to automatically issue a back order for unfilled quantities when receiving purchase orders. Enter 2 if you want to automatically issue a back order. |
|
Policy Codes |
Policy codes trigger special processing or identify certain suppliers or situations. These can be user-assigned or assigned by Kerridge. These policy codes created and maintained
via the SUPPLIER/VENDOR POLICY CODES table (table ID SUPPPOLCY)
accessed via menu option SET 29 - System Tables Maintenance.
Policy codes:
|
|
Default Cash Account |
A cash account number entered as the default overrides the main system default, as entered in the Company File, when entering accounts payable invoices for this supplier. Leave this field blank, or enter all zeros, unless this supplier usually requires a cash account, other than the one set in the Company File, as the default. Use this field only under special circumstances, such as for a single company with multiple checking accounts. |
|
Default Discount Account |
A discount account number entered here as the default overrides the main system default, as entered in the Company File, when entering accounts payable invoices for this supplier. Leave this field blank, or enter all zeros, unless this supplier usually requires a discount account, other than the one set in the Company File as the default. This field should be used only under special circumstances, such as for a single company with multiple discount accounts because it has a foreign, as well as a domestic, payables account. |
|
Default AP Account |
An A/P account number entered here as the default overrides the main system default, as entered in the Company File, when entering accounts payable invoices for this supplier. Leave this field blank, or enter all zeros, unless this supplier usually requires an A/P account other than the one set in the Company File as the default. Use this field only under special circumstances, such as for a single company with multiple A/P accounts. |
|
Auto-PO Sort Code. |
This field affects the automatic purchase orders generated as part of the Reorder Reports System. It has the following optional values:
If this field is blank, the default setting automatically sorts purchase orders by item number. You can enter ? to display a search window. |
|
Supplier Type Code |
This code works in conjunction with the Inventory Summary by G/L Account report (Menu GL Option 112) to categorize your receipts by supplier type. The following supplier type codes are available:
Enter a ? in the field and press Enter to display the available codes. Codes are established via a system table, SUPPTYPECD. |
|
Group |
This field allows you to assign a supplier/vendor to a group. The Supplier group provides another level of organization of payments. For example, you can group vendors by the type of product or service they provide, and generate checks by group. You can set up groups for installers, import suppliers, domestic suppliers, etc. Supplier/Vendor groups are established via ACT 120. |
|
Payment Terms |
The usual (default) terms offered by this supplier. Payment terms are calculated by two interrelated fields. The first field, followed by a percentage sign (%) allows you to enter the percentage of discount, if any, that this supplier gives upon payment received within a limited period. You can use the second field, followed by the word Days,to define the maximum number of days within which any payment discount will be given. An entry in these two fields of 00200%, 30 days means that this supplier usually offers a 2% discount if bills are paid within 30 days of receipt. Terms can also be entered or overridden for each invoice. |
|
Payment Terms
Days Net |
This field, displayed only if the System Wide Setting - Options for Accounts Payable is activated, gives you flexibility over two tier terms. Two tier terms have 2 due dates - one to get the discount, and a final net due date. For example, if a supplier's terms are 2% 15 Days, Net 30, then the AP system initially sets the due date at 15 days from the invoice date. With two tier terms activated, if the invoice is not paid by the due date, then the due date is changed to 30 days from the invoice date. Use this field to establish a discount, the days it is effective, and the net due date of the invoice. If you enter terms, then in Accounts Payable when you enter the invoice from this Supplier, the terms are pulled from the respective files. You can override the terms in Accounts Payable. The following are some examples of how these settings work:
Only enter the Net Days field if there is a discount, and the net days is greater than the discount days. |
|
Delivery Time |
The average number of days between placing a purchase order with this supplier and receiving the merchandise. This field is for information or reference only. The Purchasing System only uses the lead time (delivery time) from the Product Line and Item Files. |
|
Hold/Force # |
This field can provide a powerful tool for automatically paying vendor invoices. There you will see a payment option for automatically paying bills for all vendors through a given vendor invoice date or due date. Sometimes you want to pay certain vendors a little later or earlier than others, based on your knowledge of the vendor's expectations or systems. You can use this field to let the system know which vendors should be paid earlier or later. A positive number in this field tells the system to hold, or pay later, by the number of weeks you specify. A negative number tells the system to force, or pay early, by the number of weeks you specify. By assigning Hold/Force#s to all vendors you can create a flexible and automatic payment schedule for each supplier/vendor. For example, 03 in the Hold/Force# field of a certain vendor has the following effect: If you automatically pay all vendor bills through May 31, this vendor's bills will be paid only through May 10th. This vendor's bills are held three weeks longer. An entry of 03- (negative three weeks) causes this vendor's bills through June 21 to be paid. These bills are forced into being paid three weeks early. Furthermore, you can enter a 99 to hold all payments from the supplier or vendor until removed. This applies to check runs pulled by the company or vendor. Essentially this code stops any bills from being paid by the check writing programs. The only way to issue payment to a held supplier or vendor is manually. When the Cash Requirements report is generated all of this supplier's invoices will be placed on Hold. Furthermore the A/P Inquiry Ledger will indicate that payments to this supplier are on Hold. You may also enter values from 1-98 and negative 1 to negative 99. This will hold (or force forward) payments by the number of weeks specified. For example, a value of 1 holds payments for one week more than the specified due date on the vouchers. To enter a negative number, enter the number followed by the Field Minus (-) key. By assigning Hold/Force numbers to all vendors this applies to, you can create a flexible and automatic payment schedule that incorporates separate payment schedules for each vendor or supplier. This field is used by the Accounts Payable system when using the Pull Vendor Invoices by Company Program. |
|
Default Expense Acct# |
The expense account number for this supplier. See the General Ledger Chart of Accounts. For suppliers, the account for Purchases or Trade Purchases is usually used. Each time an invoice for this supplier is entered in the Accounts Payable system, the default expense account number automatically appears. If this supplier requires split-expense invoices, press F10 to go to the Supplier Template, which provides a table for you to enter multiple expense accounts, cost centers, and so on, as needed. The description that you enter for this account number when defining your Chart of Accounts, displays for your reference below the Fax # field at the lower right of this screen. |
|
Default Cost Center |
If you utilize the cost center for accounting purposes, and this supplier's invoices are always charged to the same cost center, enter that cost center code here. If a cost center is entered here, it automatically appears on the Accounts Payable input screen whenever invoices are entered for this supplier. If this supplier requires split-expense invoices, you may enter multiple default cost centers using the Supplier Template Screen. |
|
Default FOB Code |
Unless overridden by a FOB code entered on the order header screen, the code entered here will be the FOB code used on purchase orders for the supplier. This field works in conjunction with the System Wide Setting - Options for Purchase Orders. If the setting Default File for FOB Code on PO in Order Entry is flagged to read the FOB code from the Supplier File, the FOB code is the default set in the Supplier File. FOB codes are one-character codes that represent shipping freight terms. Example FOB codes are: include:
FOB
codes are created using the Classification
Codes File on the File Maintenance menu.
If this FOB Code is left blank, the FOB code in the Purchasing Account (Account 00001 in the Billto File) is used. |
|
Fax# |
The fax number of this supplier. |
|
Comments |
Comments or additional information. |
|
Open AP $ |
The total A/P amount open for this supplier. This is not an input field. The information in this field is automatically updated by the system. |
|
Total PO's This Year |
The number of purchase orders placed with this supplier during the current fiscal year. This is not an input field The information in this field is created and automatically updated by the system. |
|
Total PO's Last Year |
This field reflects the total number of purchase orders placed with this supplier during the last fiscal year. This is not an input field. The information in this field is created and automatically updated by the system. |
|
Paid Yr-To-dt |
The amount paid to this supplier in the current fiscal year. This is not an input field. The information in this field is automatically updated by the system. Paid Yr-to-Dt total is an accumulation of checks recorded through AP 1 or AP 8, and checks issued through AP - 105. |
|
Paid Last Yr |
The amount paid to this supplier in the last fiscal year. This is not an input field. The information in this field is automatically updated by the system. |
Function Keys
|
Function Keys |
Description |
|
F1 |
Takes you to the Alternate Address screen. You can print the alternate address on accounts payable checks or simply store it here for reference. The main supplier address you entered on the Profile Screen is the address to which purchase orders should be sent. |
|
F4 |
Go to the Supplier File Direct Sales Analysis screen. This screen shows statistics that represent the direct ship sales for this supplier number on the Order Entry Screen. Press F4 again to go to the Supplier File Month-by-Month Direct Ship Sales Analysis screen. |
|
F5 |
Go to the Supplier File Notepad screen. |
|
F6 |
Go to the Supplier File Search screen. |
|
F7 |
End the job and return to the File Maintenance Menu. |
|
F8 |
Return to the Supplier File Entry screen. Use this command if you have not pressed Enter and want to exit the current supplier record without saving your changes. |
|
F9 |
Go to the Supplier File Phone Number screen where you can store multiple phone numbers, extensions, fax numbers, and email addresses for each supplier. |
|
F10 |
Go to the Supplier File Template Maintenance Screen. |
|
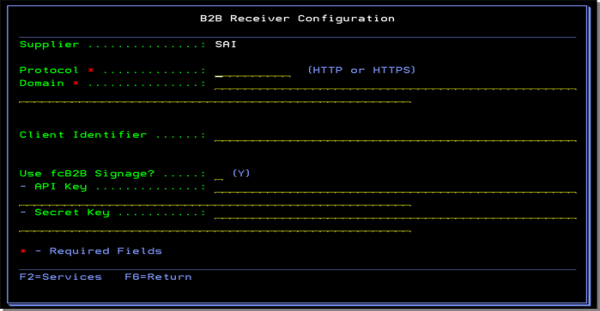
F11 - B2B Config |
This function allows you to:
Pressing F11 accesses the following screen. The information in the following screen is supplied by the supplier.
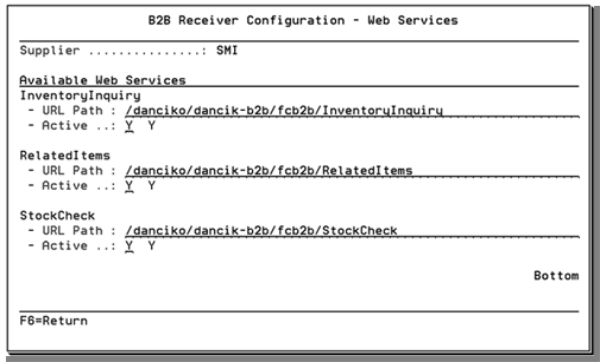
Press F2 to see the web services available for the supplier. The Supplier provides the URL Paths contained in the following screen.
Associated FilesNavigator Order Entry - Item Information - The Supplier Data tab uses the fcb2b web service inventoryinquiry to retrieve item information from a supplier's system. |
Supplier File Phone Number Screen
Phone Number File Special Options
To go to this screen, press F9 on the Supplier File Profile Screen. You can use this screen to store multiple phone numbers, extensions, fax numbers, and email addresses for each supplier.
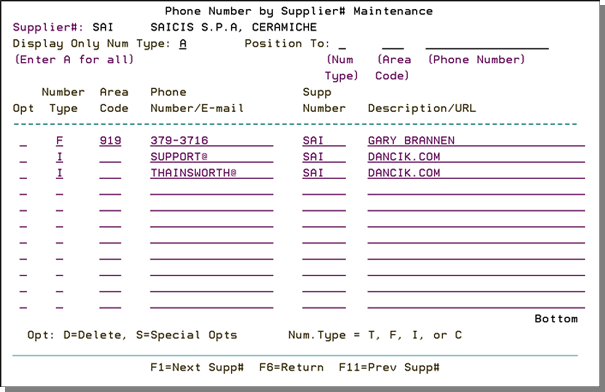
|
Field Name |
Description/Instructions |
|
Opt |
Options are D to delete a phone number or S to display the Special Options Screen. |
|
Number Type |
T - telephone number F - fax number I - Internet/email address C - Order Contacts - The only entries required for a Customer Contact record are the Acct# and Description. |
|
Area Code |
Specify area codes except for number type I. |
|
Phone#/Email |
Do not use spaces or punctuation in telephone or fax numbers. Enter only the portion of the email address before the URL. For example, joe@abc.com, enter joe@ in this field and abc.com in the URL field. |
|
Supplier Number |
Leave this field blank to default to the supplier number shown. You can also enter numbers for other suppliers by overriding the supplier number. |
|
Description |
Description of what the number represents (optional). If it is an email address, then enter the URL here. |
Phone Number File Special Options
You can use the special options feature (option S) on the Supplier File Phone Number screen to indicate special uses for fax numbers and email addresses.
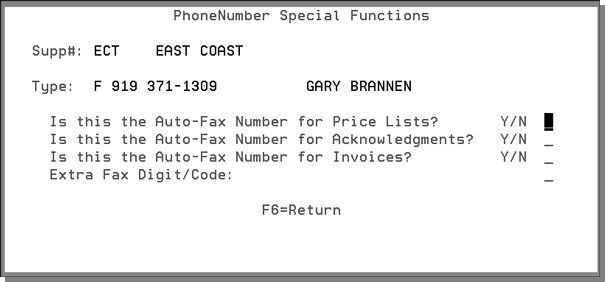
The Extra Digit field is important for distinguishing local numbers (numbers that do not require an area code) and for distinguishing 10-digit numbers that require the 1 prefix. The following options are available:
- Leave blank if no prefix should be dialed prior to the fax number.
- Enter L if this is a local number and you want the area code to be ignored.
- Enter 1 (or other applicable digit) if a prefix number should be dialed before the fax number.
Supplier File Template Screen
On the Supplier File Profile Screen, press F10 to go to the Supplier File Template screen.
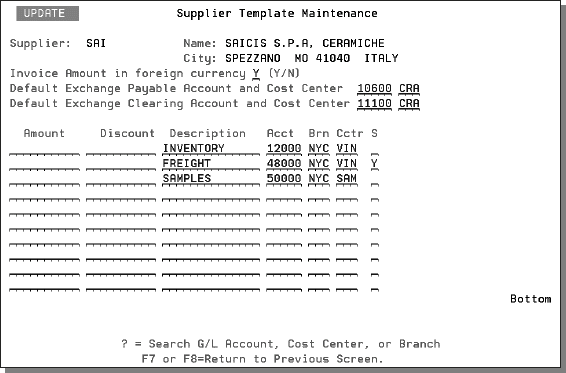
On this screen, you can enter more than one default expense account number, branch, cost center, and instructions as to whether to suppress discounts for each expense line when entering invoices for this supplier. When you create a Supplier File Template screen, it becomes the default A/P Entry screen for all invoices entered for the supplier.
If the invoices for this supplier are in a foreign currency, you can set up default exchange rate account numbers and cost centers for AP. To use this feature, you must first set up the Exchange Rate Table and the Supplier Currency Code Table in the System Settings Menu.
The following table describes the fields on this screen.
|
Field Name |
Description/Instructions |
|
Supplier |
The supplier code. |
|
Name |
Full name of the supplier. |
|
City |
The city in which the supplier is located. |
|
Invoice Amount in Foreign Currency |
Enter Y if the invoices processed in A/P for this supplier are in foreign currency. Otherwise, enter N. If you enter Y, you must also enter into the next two fields. When you enter invoices for this supplier you enter the foreign currency invoice amount, and the conversions and exchange account number entries are created automatically by the A/P program. |
|
Default Exchange Payable Account and Cost Center |
The default exchange payable account number and cost center code. |
|
Default Exchange Clearing Account and Cost Center |
The default exchange clearing account number and cost center code. |
|
Amount |
Default voucher line amount to use when processing A/P transactions for this supplier (optional). |
|
Discount |
Default voucher line discount amount to use when processing A/P transactions for this supplier (optional). |
|
Description |
Default voucher line description to use when processing A/P transactions for this supplier (optional). |
|
Acct |
Default G/L line expense account number to use when processing A/P transactions for this supplier. |
|
Brn |
Default voucher line branch to use when processing A/P transactions for this supplier. |
|
Cctr |
Default voucher line cost center to use when processing A/P transactions for this supplier. |
|
S |
Suppress discount. Enter Y to suppress discount for this line. Otherwise, enter N. |
Associated Files
AR Supplier/Billto Cross-Reference File - ACT 11
Supplier and Vendor Groups File (ACT 120)
Supplier/Product/Warehouse Table - FIL 45
Supplier Reorder Parameters Table - FIL 46

