Messages File - FIL 17
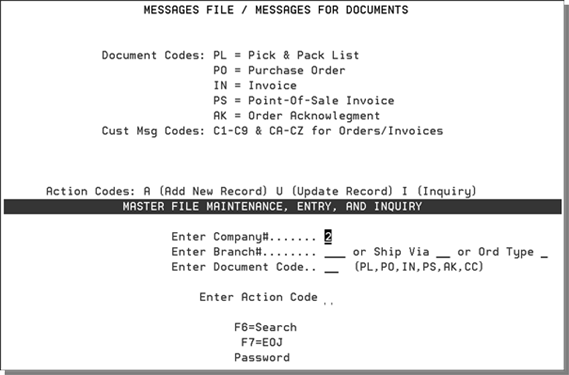
Use the Messages File to enter messages and information to print in the lower left-hand corner of certain documents. You would not use this file with documents that have preprinted information in on that part of the document. The messages can be different for each type of document, company, and branch. You can also use this file to enter messages to print on documents for specified customers. Customer messages print in the body of documents before the first line item. You use document codes to enter messages that print on specified documents, and customer message codes to enter messages that print only for specified customers.
The message file works as follows:
- Documents first check for message for a Company# number plus Ord Type.
- If no message is found (or if message is blank or deleted), then the document checks for a message for that Company# plus Ship Via.
- If no message found (or if message is blank or deleted), then the document checks for Message for that Company# plus Branch.
- Only messages for the respective Document Code print.
- Usually branch messages are general in nature, such as holiday greetings and reminders about policy changes. Messages related to Ship Via codes or Order Types should convey specific information pertaining to these codes.
- Companies that install materials may need to have a special message appear on orders with install as the ship via method.
- On the File Maintenance & Inquiry screen, select option 17 - Messages File.
- On the Messages File Entry screen, enter the one-digit Company# for the company whose messages you want to add, update, or inquire about.
- Enter one of the following:
- Enter the three-character Branch# for the branch whose messages you want to access or create.
- Messages based on Ship Via code - These messages can apply to pick lists, order acknowledgements, purchase orders, invoices, and packing lists. These messages override Branch messages if both types are found for any one document.
- Messages based on Order Type - These messages override both Branch and Ship Via code messages.
- If you are creating a document message, enter the appropriate code for the document on which you want messages to print.
- Enter Action Code A to add a new record, U to update or change an existing record, or I or leave blank to inquire about an existing record.
- Enter the Password, if required, and press Enter.
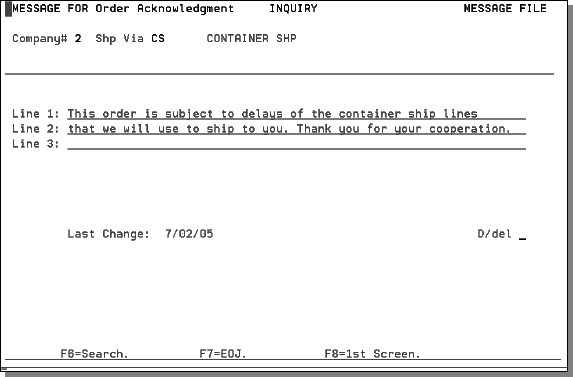
- On the Messages File Profile screen, review, update, or enter the message and other fields, as necessary.

Enter PL for pick list, PO for purchase order, IN for invoice, PS for point-of-sale invoice (F9), or AK for order acknowledgement. If you are creating a customer message code, enter a two-character code beginning with C. For example, CA - CZ or C0 - C9. Customer messages print on pick lists, order acknowledgements, and invoices.
Document messages print each time you print a selected document. They print in the lower left-hand box of the regular invoice or order form. For example, to create a pick list message for company number 0, branch NYC, enter 0, NYC, and the document code PL. The message will appear on all pick lists for company number 0 and branch NYC. Customer messages print only if the message code is assigned to a customer. To assign a message code to a customer enter the second character of the customer message code in the Msg field of the customer's Billto File record. For example, enter 2 in the Msg field of the Billto File if you want customer message C2 to print for the customer. Customer messages print in the body of the document (pick list, invoice, or order acknowledgment) before the first line item.

The three lines available for your message text are roughly equal in size to the lower left-hand boxed area of the multi-purpose invoice/pick list form.
|
Field Name |
Description/Instructions |
|
Line 1, 2, or 3 |
Three 66-character lines for terms and conditions, holiday greetings, or to define areas for fields not provided for on the form, such as the driver's name. These lines fit in the lower left-hand corner of the multi-purpose form. Make sure your pre-printed forms do not have pre-printed information in the message area. |
|
Last Change |
Date the record was last updated. |
|
D/Del |
D in this field indicates that the record will be deleted. |
|
Is this a COD/CASH Message |
Enter a Y in this field of you want this message to print only on applicable customer COD or CASH documents. Enter N in this field if you want this message to print on customer documents for customers coded with this message number. Message numbers are entered in the Billto File. You can use this feature to automatically suppress this message when a COD or CASH customer has an order or invoice without COD or CASH terms. For example, if a customer is coded for the message shown above, and a credit manager changes the order from COD to open account, the order will not contain this message. |
|
Is this a FLOOR PLAN message |
This field is for customer messages that are applicable to Floor Plan invoices. Entering Y if you want the message to appear only on Floor Plan invoices. Enter Y only if you want to restrict this message to Floor Plan invoices for customers assigned to this message code. |
Associated Files
- Maintain Macro Message Manager - SET 23
- AR Statement Message File - ACT 10
-
List Messages File - RMF 17
