Classification Codes File - FIL 19
You can use the Classification Codes File to define codes for classifying customers, items, and other functions. The system automatically tracks each category in all strategic management categories such as sales, gross profit, average order, and number of credits. This program includes an on-screen list of the available categories, the ability to search through all established codes, and sales analysis screens for each code.
The Classification Codes File includes many different types of categories, so you can access statistics on-line instead of running reports. You need define all of the user-defined categories, whereas the program includes some system-defined categories
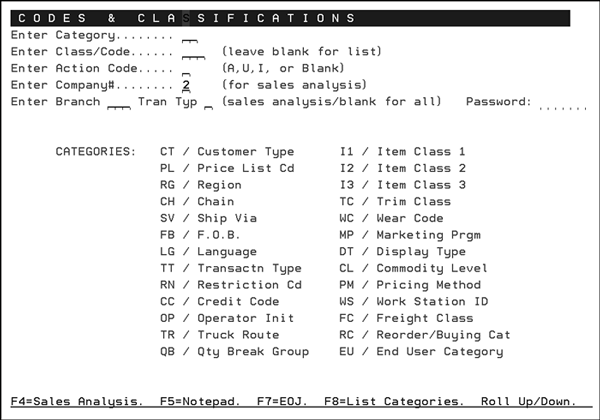
Enter a two-character Category Code as listed on the lower part of the screen.
To add or change a record, or to display more detail about information such as sales and gross, enter the specific code you have assigned within each category in order. Leave this field blank and press Enter to display a list of codes for the designated category.
Enter Action Code A to add a new record, U to update a record, or I or leave this field blank to inquire about or view a record.
If you are inquiring about a record:
- Enter the Company Number if you have more than one company.
- Enter the Branch Code to see the sales analysis for that branch, or leave blank to see the sales analysis for all branches.
- Enter the transaction type or leave blank for all transaction types. Enter I for inventory only. Enter D for direct ships only. Enter S for special orders only. S type sales are also included in the I type statistics, since special orders pass through inventory. Enter C for inter-company sales only.
You can enter a low-level or high-level password to view sales analysis statistics. However, you cannot view gross profit statistics with a low-level password.
Following is a list of actions and their associated commands.
|
Action |
Command/Instructions |
|
To see a list of all codes in a category |
Enter the two-character category codes, leave the Class/Code field blank. Press Enter. |
|
To see sales analysis of a code |
Enter the two-character category code and one of the classes or codes in that category. Leave the Action Code field blank and press Enter. You can also enter a company number, branch or warehouse number, or transaction type code to further refine the sales analysis shown. |
|
To add a new code to a category |
Enter the two-character category code. Enter the new code in the Class/Code field and enter A in the Action Code field. |
|
To update the description of an existing code |
Enter the two-character category code. Enter the class or code you want to update. Enter U in the Action Code field. |
|
To add or update notes about an existing code |
Enter the two-character category code. Enter the class or code you want to update. Enter U in the Action Code field. Press F5 instead of Enter. |
The following table describes the category codes:
|
Category |
Description |
||||||||||||||||||||||||
|
CT/Customer Type |
Examples include CO for contractor, and HC for home center. A code is assigned to each customer in the Customer Type field of the Billto File. Try to create codes to represent the important differences between the customers in your marketplace. For example, avoid using codes that would combine very different types of customers. Color Tile and Home Depot could both be coded as national accounts and chain stores, but would be better differentiated as National Floor Covering Chain and Home Center Chain.
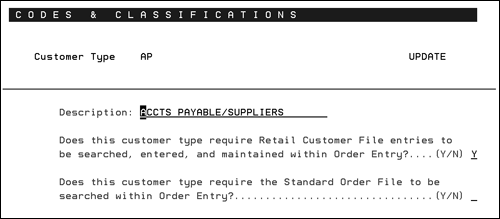
Customer types are assigned in the Billto File. The following Customer Type codes are entered when the system is initially installed and should remain as shown below to ensure consistent and proper use of the system.
Does this customer type require Retail Customer File entries to be searched, entered, and maintained within Order Entry?.- enter Y if you want customers with this customer type to automatically invoke the Retail Customer File within Order Entry. Does this customer type require the Standard Order File to be searched within Order Entry? - This option allows you to narrow the multi-unit functionality to only those accounts that you have Standard Orders created for. |
||||||||||||||||||||||||
|
PL / Price List |
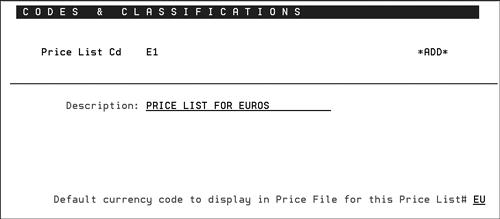
These two-character codes represent different price lists you maintain on the system. For example, you could use DL for dealer price list or BL for builders price list. Avoid using the following price list codes when creating price list codes, because they represent pre-programmed pricing options on the system that can be specified where ever a price list can be specified.
Examples of price list numbers you can create:
To create a new price list tied to a currency, enter the new price list code in the Enter Class/Code field and an A in the Action Code field. After pressing Enter, the following screen appears.
|
||||||||||||||||||||||||
|
RG/Region |
These two-character codes represent geographic regions in which your customers are located. These codes are separate from, and in addition to, codes for state and country, and from zip codes, and county numbers. A region code can be assigned to each customer in the Billto File. Region code setting can be used for sales analysis, mailing lists, and for assigning promotional pricing. |
||||||||||||||||||||||||
|
CH / Chain |
These three-character codes represent chain stores and other multi-location accounts, or groups of accounts. For example, JCP for JC Penny. Assign chain codes to all account numbers in each chain using the Chain field in the Billto File. You can use this feature creatively to link customers that are not technically considered chains. When you create a chain, you can analyze sales for the chain, as well as the individual customers included in the chain. |
||||||||||||||||||||||||
|
Ship Via |
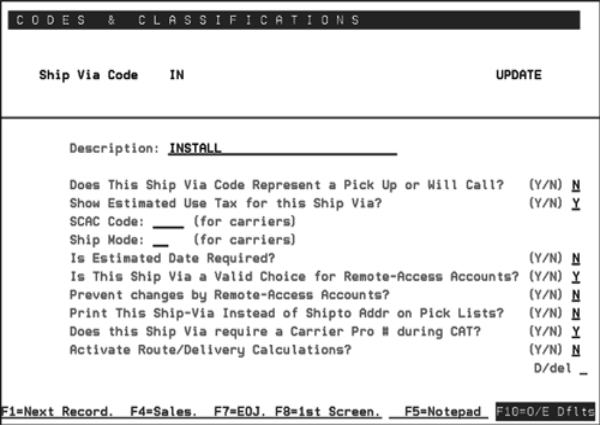
These two-character codes represent shipping methods. These codes are used in Order Entry. They also display throughout the shipping and credit processes. Default ship via codes can be entered into the Billto File and into the Work Station Control Panels. Suggested entries include:
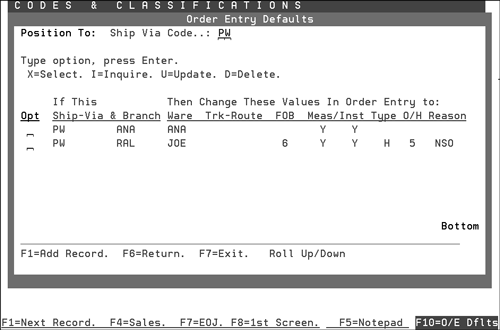
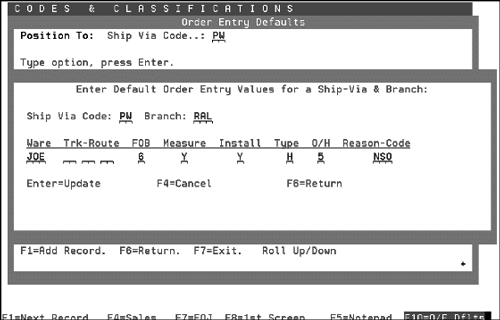
Ship Via Code Order Entry Triggers The Ship Via Code maintenance screen, which is part of the Classification Codes File, contains the function F10=O/E Defaults. By pressing F10 from any Ship Via Code maintenance screen, the Order Entry Defaults window is displayed. This window enables you to trigger certain values to be automatically populated on the Order Entry header screen, whenever this ship via code is used. Certain ship via codes can automatically set the warehouse, FOB, truck route, order-handling code, measure flag, install flag, order type, and order reason code to specific values. This technique can be used when shipping to consolidation centers, shipping to installation companies, and shipping customer orders to suppliers for fabrication, binding, glazing, assembly, etc. To establish triggers that act as defaults on the Order Header screen press F10.
From this screen, you can inquire about, update, delete, or create order entry defaults. On the example above two order entry defaults have been created for the PW code (pick up via workroom). The order entry defaults are keyed separately for each branch. Enter a U in the appropriate Opt column to update a series of defaults.
According to the figure shown above, if the ship via code PW is used in conjunction with the RAL branch the following defaults are automatically inserted during order entry:
|
||||||||||||||||||||||||
|
FB / F.O.B. Code |
These one-character codes represent the FOB and shipping freight terms. This code is used in Order Entry. Default FOB codes can be entered into the Billto File and into the Work Station Control Panels.
Suggested codes include:
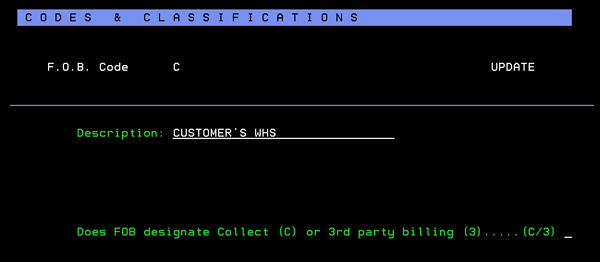
We suggest that you abbreviate these descriptions as much as possible. Only the first 14 characters can fit on most documents. Always use the FOB code to note whether freight is prepaid or collected on common carrier shipments. Does FOB designate Collect (C) or 3rd party billing (3):
|
||||||||||||||||||||||||
|
LG / Language |
These one-character codes represent languages in which your special instructions for items and customers are entered or printed. A code is assigned to customers using the Language field in the Billto File. Each customer can be coded as speaking a language which, when applicable, will be chosen when information entered in multiple languages print on pick lists, invoices, and so on. Refer to information about the Special Instructions screens in the Item, Manufacturer, Product Line, and Billto Files. Create language codes only if you will enter information in more than one language. Suggested codes include:
|
||||||||||||||||||||||||
|
TT / Transaction Type |
These one-character codes are defined by the system. You can not create transaction type codes. These codes define the type of transactions available to the Order Entry, Sales Analysis, and Pricing modules. These codes should be included when your system is initially installed. They include:
Sales statistics are automatically gathered for each of these codes. Different prices and costs can be maintained based on transaction type. |
||||||||||||||||||||||||
|
RN / Restriction Cd |
Restriction codes are system-defined codes used primarily for pricing. You can not create restriction codes.
Sales analysis statistics are automatically gathered for these codes, so you can monitor roll vs. cut business, and your use of the management authorized sale price feature. These codes are used in the Order Entry system to retrieve prices. If you use the 3 price option (roll/cut/balance) for rolled goods, then M is the mid/balance price. |
||||||||||||||||||||||||
|
CC / Credit Code |
These one-character codes represent types of credits or reasons for credits that are used by Order Entry and Invoicing. You must enter a credit code whenever a credit is entered. Suggested codes include:
You can also reserve a few codes for identifying special types of sales in Order Entry. For example, code Z could indicate low margin blow out sale or code X could indicate special spiff sale. These codes can be reported on using the X by Y Sales Analysis Reports. These codes can also trigger special sales commission rates. For example, code X can trigger a 5% of sales commission. |
||||||||||||||||||||||||
|
OP / Operator's Initials |
This two-character code represents each order entry operator's initials. Since every user can potentially enter an order, we recommend each user's initials or code be entered. These codes should be entered into each user's Control Panel, causing them to become each user's default initials in the Order Entry program. The system gathers order entry and sales statistics for each user and enables you to analyze operator's productivity. |
||||||||||||||||||||||||
|
TR / Truck Route |
Create two-character codes representing truck routes if you deliver and have defined routes. For example, use NL to indicate New York local truck or WS to indicate West St. Louis truck.
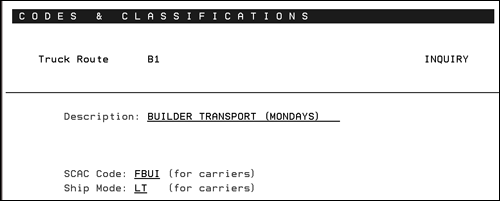
A truck route is defined as a group of destinations serviced on a consistent basis. For example, the WS (West St. Louis) route represents a number of cities, towns, and customers who are serviced on consistent days, such as every Monday and Thursday. Do not confuse truck routes with ship vias. For example, a ship via can be OT (our truck) with the truck route then specifying the route the trucks will take for that customer. You can also set up time tables for each truck route using the Delivery Systems Menu. Become familiar with the functions available on the Delivery Systems Menu before finalizing your truck route codes. Although this screen defines a truck route, you can use a common carrier or external shipping company to deliver your goods. In that case, your truck route represents a carrier as well as a route. If this is the case, and you are using EDI, you might be required to transmit the carrier's SCAC Code and Ship Mode code. The SCAC and Ship Mode codes can be stored on this screen for all your routes that utilize common carriers. |
||||||||||||||||||||||||
|
QB / Quantity Break Group |
These two-character codes are used by invoicing to group items together to determine quantity break pricing. Examples of Quantity Break Codes:
|
||||||||||||||||||||||||
|
I1 / Item Class 1 |
These two-character codes represent broad classifications of items. For example, use WD for wood, FT for floor tile, or VT for vinyl tile. Each item is assigned one of these codes in the Item Class 1 field in the Item Master File. If you specialize in a small range of products, create codes meaningful for your business. For example, a distributor of ceramic products might break item class 1 into WT, FT, and AC for wall tile, floor tile, and accessories, respectively. It is important to limit the number of Item Class 1 entries. We suggest that you have no more than 20 - 30 Item Class 1 codes. You also have the Item Class 2 and Item Class 3 fields to further classify your items. Item Class 1 is used by the pricing system and for assigning salespersons. Pricing exceptions can be made for an Item Class 1. Promotions can be created for an Item Class 1. If you have separate sales forces based on product or division, you can assign salespeople by Item Class 1. We recommend that you create item classes using a hierarchal structure as follows: Divide items into cost centers. These are analogous to divisions such as carpet, vinyl, or ceramic. Cost center is your broadest product grouping. Cost centers are defined using the Cost Center File. Assign one or more Item Class 1 codes for each cost center. For example, the carpet cost center could include CA for carpet and RG for rugs, or it could just include one item class, in effect making the carpet cost center analogous to the Item Class 1 for carpet. You can also separate residential from commercial use materials. Assign multiple Item Class 2 codes for each Item Class 1 code. Therefore, each Item Class 1 entry will be sub-categorized by Item Class 2. If applicable, assign Item Class 3 codes for each Item Class 2. However, Item Class 2 will usually break down your Item Class 1 codes well enough to enable you to use Item Class 3 for an additional or other type of product classification, not necessarily related to the other class codes. |
||||||||||||||||||||||||
|
I2 / Item Class 2 |
This two-character code further categorizes your items. See above instructions for Item Class 1. |
||||||||||||||||||||||||
|
I3 / Item Class 3 |
This two-character code further categorizes your items. See the instructions above for Item Class 1. |
||||||||||||||||||||||||
|
TC / Trim Class |
This two-character code is used to identify trim items. Trim is defined as support products or products sold as accessories to your main products. They would include reducer strips and moldings for wood, and bullnoses and out corners for ceramic tile. Enter a trim class only for trim items. Optionally, you can code setting materials, polishes, samples, tools, and so on as trim. If you do not need to sub-categorize your trim items, you may simply enter a single trim class code of TR for trim, and enter that code for all trim items. Many reports on the system have an option to include or omit trim items. We especially recommend the use of this feature for ceramic tile. For wall tile lines, classify your trims into categories such as surface, mud, bullnose, or angles to facilitate flexible stock reporting. These codes are assigned to items in the Item File. |
||||||||||||||||||||||||
|
WC / Wear Code |
This one-character code represents the durability rating of each product. Usually, each industry will have standard codes such as:
You can enter industry standard codes or create your own. One of these codes should be assigned to each applicable item using the Wear Code field in the Item Master File. |
||||||||||||||||||||||||
|
MP / Marketing Programs |
This three-character code groups or categorizes customers for a variety of purposes. Usually, marketing program codes are used to identify a customer as belonging to a group of customers for promotional or marketing purposes. For example, marketing program H96 could be assigned to all customers participating in the Hawaii 1996 Promotional Contest. Marketing programs are assigned via F14 from the Billto File. You can assign up to 20 different marketing programs to each customer. Special pricing can be assigned to a marketing program. |
||||||||||||||||||||||||
|
DT / Display Type |
This three-character code represents major product displays and sample sets that are provided by your company or your suppliers, and used by your customers to promote your products. This enables you to track which customers have which displays or samples, and to analyze sales for customers with and without these displays. Display types are then entered for each customer via F14 from the Billto File. You can code up to 20 displays per customer. Special pricing can be assigned to a display type which affects all customers assigned with that display type code. |
||||||||||||||||||||||||
|
CL / Commodity Level |
This one-character code represents the relative value class of each item. Suggested codes are:
Each item can be assigned a commodity level code in the Item File. You can take a more detailed approach to the commodity level and assign codes that represent specific price ranges. For example, 1 equals up to 1.99 or 2 equals up to 2.99. This field is designated to help you analyze the levels of the market place with which you are the most and least successful. You can also run many sales reports such as Customer by Commodity Level. |
||||||||||||||||||||||||
|
PM / Pricing Methods |
These one-character codes represent the method used to determine pricing of a line of an order. Every line entered and priced in order entry is assigned a pricing method code to show how the pricing was calculated. You cannot create pricing methods because they are imbedded in the software and installed on your system. Pricing methods are:
A pricing method code is assigned automatically to every line of each order and invoice. The system tracks the overall profitability of each of these methods of pricing. The sales screens for each pricing method reveal the profitability of each type of pricing. For example, you can see if promotional pricing results in higher than average orders or simply business as usual at a lower margin. |
||||||||||||||||||||||||
|
WS / Workstation ID |
This two-character code represents the workstation IDs on your system. These codes are assigned automatically to each order, and enable tracking of activity by terminal. |
||||||||||||||||||||||||
|
FC / Freight Class |
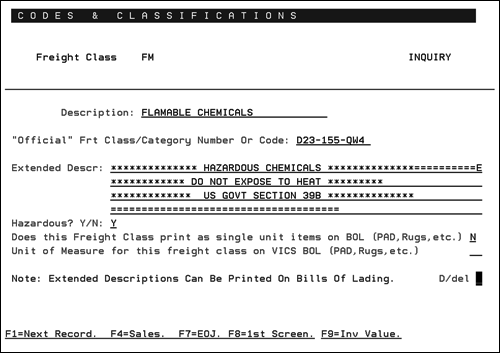
These two-character codes represent types of items as they relate to shipping or freight, which are assigned in the Item File. They are used primarily on warehouse shipping reports such as the Load Sheet and Bill of Lading. Bills of lading are summarized by freight class. When entering freight class codes, you can also enter extra information to appear on bills of lading.
|
||||||||||||||||||||||||
|
RC / Reorder/Buying Cat |
These three-character codes are used to group items together for reordering. This code can be assigned to group items together on reorder reports. A reorder/buying category can represent the group of products such as DCT = Domestic Ceramic Tile or the buyer, such as JOE = Joe Smith. Reorder/buying categories are assigned to product lines using the Product Line File maintenance program. |
||||||||||||||||||||||||
|
EU / End User Category |
This two-character code is defined in this file and then assigned in the Price File. Each price class can be entered into a single end user category. The end user category is a category for your customers, not for your internal statistics. It is used for the following functions: Customer Price Lists can use the end user category as a parameter. You can request price lists for specified end user categories. They can also be sorted by the end user category. By omitting a price class record from all end user categories, you can block customers from seeing that record on price lists and dial-in screens. This process can be useful for samples, off goods, and other records you want omitted from your customer price lists and screens. Enter only the end user category in price records that you want to include on price lists or customer dial-in screens. End user categories need only to be entered on the LP records of the Price File. Because the end user category is not intended for sales analysis, it does not build online statistics. |

