Processing Cash Disbursements
Processing cash disbursements includes writing checks, handling discounts, and GL accounting functions related to check writing.
The Cash Disbursements Options area of the Accounts Payable menu contains the programs you need to process and control cash disbursements. Use this section to assess cash flow on a company, date, or vendor level, to pay vendor bills, and to perform other processes for the open items on the AP ledgers.
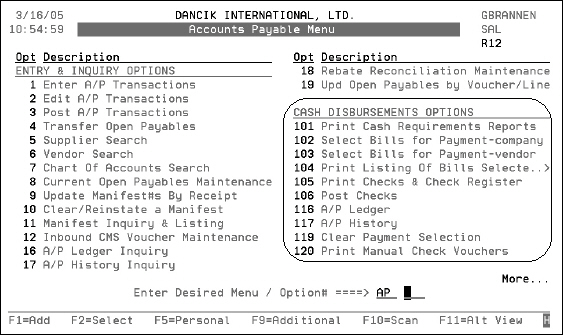
Print Cash Requirements Reports - AP 101
Select Bills for Payment by Company - AP 102
Select Bills for Payment by Vendor - AP 103
Print Listings of Bills Selected for Payment - AP 104
Print Checks and Check Register - AP 105
Print Manual Check Vouchers - AP 120
Print Cash Requirements Reports - AP 101
This program lists open payables and is useful for cash flow analysis. It shows how much cash is necessary from each cash account to pay invoices as they become due. You have several sorting options for this report.
Cash Requirements Report by Cash Acct Number/Invoice Date
Cash Requirements Report by Cash Acct Number/Due Date
Cash Requirements Report by Cash Acct Number/Pay Date
Cash Requirements Reports by Vendor/Cash Acct Number/Invoice Date, Due Date, or Pay Date
Cash Requirements Report by Cash Acct Number/Invoice Date
This report summarizes all open payables for each company. It prints a separate schedule, aged by the vendor's invoice date, for each cash account within each company.
The aging in this report is controlled by the vendors invoice date. The Open Payables Debits column lists the total of all open debits with each invoice date. The DB Balance column shows the running balance of the open debits. The Open Payables Credits column lists the total of all open credits with each invoice date. The CR Balance column shows the running balance of the open credits. The Total Balance column is the CR balance minus the DB balance, or the net amount payable for bills dated through each listed invoice date.
Cash Requirements Report by Cash Acct Number/Due Date
This report summarizes all open payables for each company. It prints a separate schedule, aged by the due date, for each cash account within each company.
The aging for this report is controlled by the vendor's due date. The Open Payables Debits column lists the total of all open debits with each due date. The DB Balance column shows the running balance of the open debits. The Open Payables Credits column lists the total of all open credits with each due date. The CR Balance column shows the running balance of the open credits. The Total Balance column is the CR balance minus the DB balance, or the net amount payable for bills dated through each listed due date.
Cash Requirements Report by Cash Acct Number/Pay Date
This report summarizes all open payables for each company. It prints a separate schedule, aged by the pay date, for each cash account within each company.
In this example, invoices have all been assigned pay dates for the 10th of a month. The Open Payables Debits column lists the total of all open debits for a pay date. The DB Balance column shows the running balance of the open debits. The Open Payables Credits column lists the total of all open credits for a pay date. The CR Balance column shows the running balance of the open credits. The Total Balance column is the CR balance less the DB balance, or the net amount payable through each pay date.
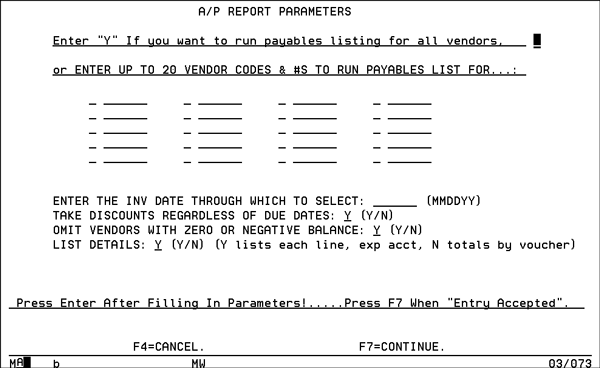
Cash Requirements Reports by Vendor/Cash Acct Number/Invoice Date, Due Date, or Pay Date
These reports include a detailed listing of each selected vendor's ledger. It prints a separate schedule, aged by the selected date, for each vendor, within each cash account, within each company (This is the recommended option). The operator is prompted for parameters that optionally run the report for one or all companies, and for one, some, or all vendors. These reports are used for analyzing and selecting bills to be paid.
The three options for you for running these reports are:
- Take discounts regardless of due date.
- Omit vendors with zero or negative balances. This option omits vendors that have either a total zero/negative balance, or a zero/negative balance through the date selected.
- Show details or summarize by voucher/invoice number. This summary makes the reports shorter and should be used if breakdown of each expense account is not required.
All three of these options simplify the bill selection process and make the cash requirement report parameters match the parameters of the selection programs. Therefore, selecting bills to pay the same parameters used to print the Cash Requirement Report will cause the exact amount that appears on the report to be pulled for payment.
- The first screen prompts you to select a version. Do one of the following:
- The next series of screens prompt you to enter additional parameter, such as company and branch numbers. Make the necessary entries and press Enter.
- Do one of the following:
- To run listings for all vendors, enter Y next to the first prompt and press Enter.
- To run listings for select vendors skip the first prompt and enter the appropriate vender codes and numbers. Remember, if the vendor is in the Vendor File, the vendor code is V; if the vendor is in the Supplier File the vendor code is S; and if the vendor is a miscellaneous vendor the vendor code is M.
- Enter a date through which you want to select, or leave the date blank to include all dates.
Enter 1 to run the Long Version. This version lists selected vendor's entire current ledger. It includes the vendor's address, all open items, all payments made this month, and an aging, such as Over 30 and Over 60.
Enter 2 to run the Short Version. This version only lists the selected vendor's open items and is preferable if you are selecting bills for payment.
The fields: Take Discounts Regardless Of Due Dates, Omit Vendors With Zero Or Negative Balance, and List Details will not display if you are running the long version of the report.
The type of date to select is based on the report option you chose. It can be invoice date This program lists open payables and is useful for cash flow analysis. It shows how much cash is necessary from each cash account to pay the bills as they become due.
Select Bills for Payment by Company - AP 102
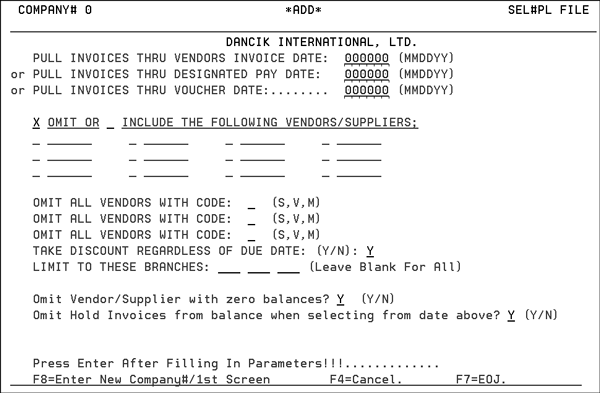
You can use this option to enter parameters by which the system can automatically select bills to be paid on a company-wide basis. You could, for example, ask the system to select all bills dated through 02/15/07 for company 0. This option makes use of the hold/force entries in the Vendor and Supplier files. This option also lets you include or omit certain vendors/suppliers from each run.
This program creates or adds to an existing check run if not posted. When you select this option and there is already an existing check run, the system asks if you want to a add to the existing file, or delete the existing file and create a new one.
- From the Accounts Payable menu, enter option 102 - Select Bills for Payment (by company). The Cash Requirements screen appears. Enter the Company Number and press Enter.
- After entering the appropriate parameters, press Enter. The ENTRY ACCEPTED or a self-explanatory error message appears. Correct your entry, if necessary, and press Enter again.
- After entry is accepted, press F8 to select for another company number, or press F7 to continue. The invoices are selected for payment and added to a file, which will be processed and removed from the temporary file when checks are printed and posted.
- After you have run this program, you can fine-tune the selection process by using option 103. This option lets you to select items on a vendor-by-vendor and item-by-item basis. It also shows the items selected in option 2 - Select bills for payment by Company creates.
- After completing this procedure, a summary of bills selected prints. Use option 104 - Print Listing Of Bills Selected For Payment to print a detailed list of bills selected for payment.
- Using Select Bills for Payment by Company creates the file under batch #99. Use batch #99 if you need to update this information through option 3.
| Fields | Description |
|
Pull invoices thru vendors invoice date Pull invoices thru designated pay date Pull invoices thru voucher date |
Use these fields to select a date span to pay your invoices. These settings are on a company-wide basis and encompass all vendors and suppliers. Use the MMDDYY date format to enter one of the three date parameters. Only invoices with dates on or before the date entered are pulled. |
| Omit or include the following Vendors/suppliers | To omit individual vendors or suppliers from the selection, enter the vendor codes and numbers in the designated areas for example, V 000100, S ABC. |
| Omit all vendors with code | To omit all vendors, all suppliers, or all miscellaneous vendors, enter V, S, or M in one or more of these fields. |
| Take Discount Regardless of Due Date | The default is Y. This option takes all available discounts on the selected bills without checking to see if the due date has passed. |
| Limit to these branches | Enter up to three branches to run cash disbursements for, or you can leave the fields blank to include all of the branches. |
| Omit Vendor/Supplier with zero balances | Enter a Y to exclude vendors and suppliers that have a zero AR balance. |
| Omit Hold Invoices from balance when selecting from date above |
Flagging this field with a Y directs the system to check if there are invoices in the date range specified that are marked as hold and omit them from the balance calculation to pay. The default setting is Y. |
This program omits any vendor or supplier with a zero or negative open balance. You must select any bills from these vendors or suppliers by using option 103 - Select Bills for Payment by Vendor. This prevents accidental printing of void checks, which have negative amounts. Miscellaneous vendors are not affected by this change.
Select Bills for Payment by Vendor - AP 103
You can view open items for each vendor and select items to be paid on an item-by-item, invoice-by-invoice basis. You can group the items to be paid in batches, which you can run separately or together. For example, if you create batch 01 containing bills to be paid today, and batch 02 containing bills to be paid tomorrow or next week, when you are ready to print checks, you can use menu option 105 - Print Checks & Check Register to select the batches to print.
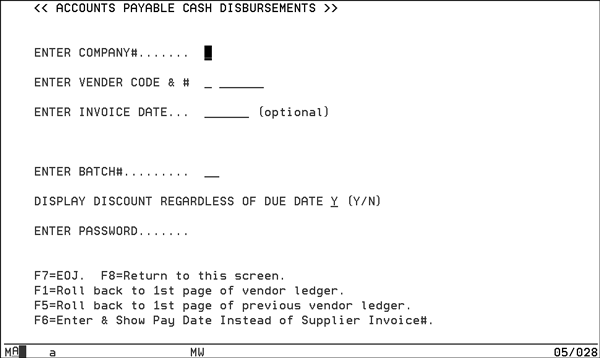
- From the Accounts Payable menu, enter option 103 - Select Bills for Payment (by vendor) the Accounts Payable Cash Disbursements screen appears.
- Enter the necessary information and press Enter.
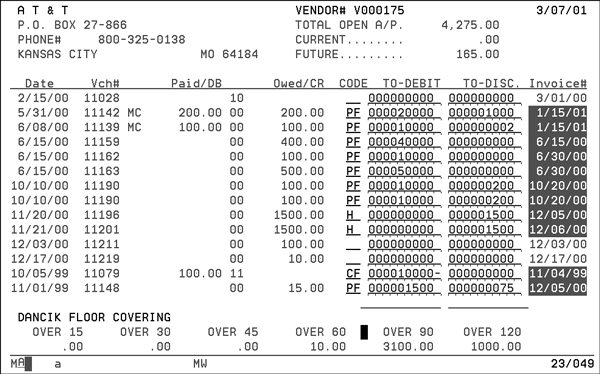
- Screen two shows the vendor's current ledger, including all open items and any items paid in the current month. Up to 14 items can appear on each page. It also includes three columns of input fields labeled Code, To Debit, and To Disc. These input fields let you select the items to be paid and to specify payment and discount amounts. If a discount is available, it will appears in the To Disc field. You can override this entry. You can select all, some or none of the bills listed on a page.
- To go to the next page of the ledger, press Enter. To return to the first page of a vendor's ledger press F1. If updating information from Option 2 - Select Bills for Payment by Company, all invoices selected for payment will have the transaction code pre-filled.
- Press Enter to record all of the selected entries on the page and advance to the next page of the vendor's ledger. If you are on the last page of a vendor's ledger, pressing Enter takes you to the first page of the next vendor's ledger.
- PF - selects the item for full payment.
- PP - selects the item for partial payment.
- CF - selects a vendor's credit memo or any item that appears in the Debit column to be applied against bills.
| Fields | Description |
| Enter Company# | Enter a one-digit company number. |
| Enter Vendor Code & # | Enter V, S, or M for vendor, supplier, or miscellaneous vendor followed by the six-digit vendor number, or the three-character supplier number you want to access. |
| Enter Invoice Date | Usually, this field is left blank, which indicates that you want to see all open items for the selected vendor or supplier. If you enter an invoice date, only open items dated on or after that date appear. Enter date in MMDDYY format. |
| Enter Batch# | Enter a two-digit number from 01 - 99. The items you subsequently select for payment will be assigned this batch number. When you select menu option 5 - Print Checks, you will be prompted to select a batch number or to print checks for all batches. After the checks have been printed and posted, you can reuse this batch number. If updating information from Option 2 - select Bills for Payment by Company, The batch # given by the system is #99. |
| Display Discount Regardless of Due Date | The default option, Y, takes all available discounts on the selected bills without checking to see if the due date has passed. You can override this field with an N. |
| Enter Password | Enter the required password. |
Function keys
| Function Key | Description |
| F1 | This command key is used only on Screen 2. It redisplays the first page of a vendor's open items, if they take more than one page. Each page displays up to 14 open items. |
| F5 | This command key is used only on Screen 2. It redisplays the previous vendor's ledger, if you have gone forward to the next vendor's ledger. |
| F6 | This command is similar to pressing Enter, except that it causes the Pay Date field for each invoice to appear instead of the Vendor's Invoice Number. |
The following table describes the fields on screen two of Selecting Bills to Pay by Vendor.
| Fields | Description |
| Date | The vendor's invoice date. |
| Vch# | The voucher number that was assigned by the system when the item was entered. |
| Paid/DB | The Debit column, which is the amount paid or debited for this item. If there is a payment amount in this column, it is always preceded by a two-character transaction code indicating the type of payment. Refer to the list of A/P Transaction Codes for their meaning. |
| Owed/CR | The Credit column, which is the amount of vendor's invoice owed or credited for this item. If there is an amount in this column, it is usually preceded by a two-character transaction code indicating the type of item it is. In the preceding example, the transaction code is 00, which means regular bill from vendor precedes each amount. |
| Invoice# | The vendor's invoice number, unless you pressed F6 on Screen 1, in which case the pay date appears. |
| Code |
If you are selecting an item for payment or processing, enter a valid two-character transaction code here. The transaction code tells the program how to process the item. For example, code PF means payment in full. You can also key items off by positioning the cursor at this field and pressing the Dup key. This automatically inserts a PF code, if the item is in the Credit column, or a CF code, if the item is in the Debit column. This in an easy way of keying off items. Refer to the list of A/P Transaction Codes. The codes you will use most often are: |
| To Debit | Enter the amount to debit against a selected item with two decimal places, for example, enter 10000 for $100.00. If you need to enter a credit amount, enter the amount and press Field Minus instead of Field Exit. A negative number in this field indicates a credit amount. When you are completely paying or clearing open items, which is done with the Dup key or with the PF or CF codes, leave this field blank. The program inserts the amounts for you. For all other codes, you must enter the amount to debit here. |
| To Disc |
Enter the amount of the discount to take against a selected item. If a discount is available, this field is automatically completed. If you select an item that shows a discount, but you do not want to take the discount, remove the discount by pressing Field Exit. The amount paid to a vendor or supplier is always equal to the Debit minus the Discount. For example, if you enter a PF code against a $100.00 vendor invoice and 200 $2.00 in the To Disc field, $98.00 is paid on the check. The check lists the amount paid and the discount taken for each invoice. At the bottom of the To Debit and To Disc columns are fields for issuing on-account payment, and fields showing the total of what you have selected for the vendor. |
Print Listings of Bills Selected for Payment - AP 104
Use this option to print a list of the invoices selected using menu options 102 - Select Bills for Payment (by company) and option 103 - Select Bills for Payment (by vendor). Use this list to verify your selections and the amount required to pay the selected bills or items. It will also show the number of checks required for the check run.
- On the Process Cash Disbursements screen, enter option 104- Print Listing Of Bills Selected For Payment.
- On the next screen, enter a company number or leave blank to include all companies. Press Enter.
- The List of Bills Selected For Payment screen appears.
- Enter a 2 Digit Batch# to list only that batch, or enter ALL to list all batches.
- Press Enter. The list of bills selected to be paid is sent to the job queue.
- Review the printout and make any necessary changes, additions, or deletions by going back to option 102 - Select Bills for Payment by Company and Option 103 - Select Bills for Payment by Vendor. If you have no changes, go to Print Checks and Check Register - AP 105.
Print Checks and Check Register - AP 105
This program lets you to print checks for the items selected using menu options 102 - Select Bills for Payment-company and 103 - Select Bills for Payment-vendor, bills for payment by company and by vendor. You can run checks for some or all of the existing batches of selected items. The program lists the batch numbers, company numbers, and cash account numbers that are required by this program. It also prints a register listing all of the checks.
Since the checks will relate exactly to the listing created by option 104 Print List of Bills Selected for Payment, we recommend that you run option 104 - Print Listing of Bills Selected for Payment before printing checks.
We recommend running a few test checks on plain paper or forms before running actual checks. This lets you see if any adjustments need to be made to the printer, or to your pre-printed forms.
You have the option to print only one check per vendor, if you are paying more than twelve invoices for a vendor at a time. This option prints all checks, except the last one, to each vendor with complete voucher information, but reads Void/See Voucher on the checks, except for the last check. The last check printed for each vendor has the total amount of items listed on all the vouchers. This option requires that Kerridge establish a Check Reconciliation File on your system. This option also requires additional disk space. Consult Kerridge if you want to install this option.
Associated Files
- Company File - The country code field of the Company File assigns a country code. A CN code, for Canada, activates all fields and functions that are applicable only in Canada as does a AU code for Australia.
- Work Station Control Panel (SET 1) - The Print Checks/FormCode fields of screen 3 assign a printer and determines the type of checks to print. For example, entering an M in the Form Code field directs the system to print checks with an easier to read larger font size.
Printing Checks
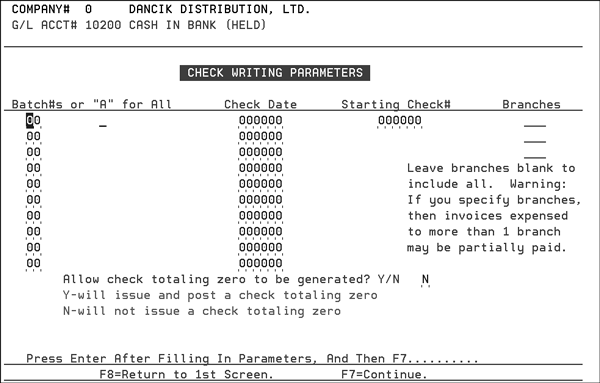
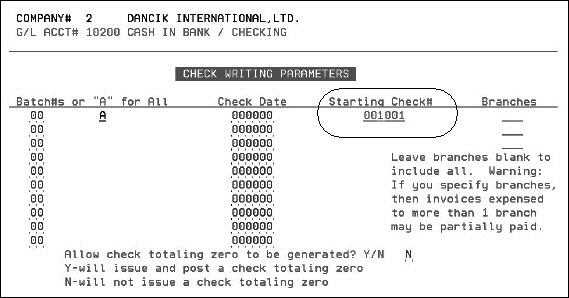
- On the Process Cash Disbursement Menu, enter option 105 - Print Checks & Check Register (option APF 105 is used for future checks). The Check Writing Parameters screen appears.
- Enter a Company Number, a G/L Cash Acct#, and a Password, then press Enter.
- Select all the batches by typing A in the A for All field, or select specific batches by entering the batch numbers in the column labeled Batch#s.
- You can enter a different check date for each batch by using the corresponding field in the Check Date column. You must enter a check date for each selected batch number, or one check date if you entered the All batch option.
- In the Starting Check# field, enter the check number of the first check to be printed.
- Enter specific branches or leave the fields blank to include all branches.
- The field Allow check totaling zero to be generated lets you decide about printing checks that equal zero.
- If N is entered, the calculation and printing of zero checks is skipped.
- Press Enter. The message Entry Accepted appears.
- Press F7 to continue. A series of verification questions appears.
Leave two to five checks for aligning forms. For example, if the next available check number is 100, enter 102., 103, 104, or 105 in the Starting Check# field. As you gain experience in aligning forms, you will waste fewer checks when aligning them. All selected batches will be combined in a continuous string of checks.
We do not recommend that you run by branch, if you enter A/P invoices and split invoices on a single invoice to multiple branches. In this case, you can pay a partial invoice. For example, if an invoice was split expenses to NYC and RAL, then paying bills for branch NYC will cause a partial payment for the portion that was expensed to NYC. This option is for companies that issue payments strictly by branch.
If a Y is entered, checks with zero balances are generated and issued a check number.
The default entry is N.
System Generated Check Numbers
You can have the system automatically generate the next check number based off a check number wheel. This function is recommended for users that prefer to have the system display the next check number or users that have dedicated printers (or printer drawers) for checks, and do not need to perform a printer line-up each time checks are printed. This function eliminates having to manually enter the starting check number for each Accounts Payable check.
Set-up
ACT 109 - Accounts Payable & General Ledger Defaults - The field Activate system notification of next check number to use activates system notification of the next check number.
- Press F10 to display the Check Number Wheel Maintenance screen.
- Enter the G/L Account and Next Check# or enter a ? in the G/L Account field to display all the available G/L accounts and the last check entered against the account.
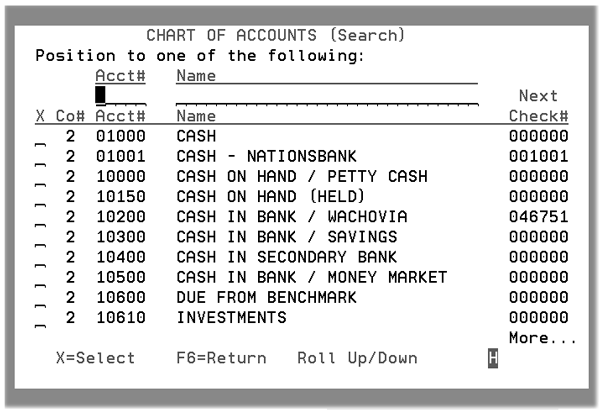
- If you have two G/L cash accounts representing different banks, establish the next check number for each of the respective G/L account's check stock. For example, as shown above Nations Bank next check number is 1001 and Wachovia's is 46751.
Printing System Generated Checks
When either option AP 105 (or option APF 105) are accessed. The beginning check number field is pre-populated.
When checks are posted, for both current and future payables, the check number is updated with the next check number. The check number cannot be changed on this screen. If it needs to be changed, it has to be changed via the F10 function on ACT 109.
Post Checks - AP 106
Use this option immediately after printing and verifying that the checks are ready for posting. The system posts information such as the check numbers, dates, amounts, and which bills were paid from a temporary work file to the A/P files. After this step, the printed and on-screen A/P ledgers reflect the new transactions.
1. On the A/P Cash Disbursements menu, enter option 106 - Post Checks.
2. On the next screen, enter Y to post Accounts Payable checks.
3. Enter the one-digit company number to post checks for, and press Enter. The program posts the checks and returns you to the menu. The payment information appears on all applicable AP reports and screens.
AP Ledger - AP 116
The AP Ledger Screen shows all open payables for each vendor account on the system. It also shows transactions that were closed or paid in the current month. Each vendor's ledger is headed with the vendor's name, address, and telephone number. If more than one company is on the system, the vendor has a separate ledger within each company. The transactions are sequenced by vendor's invoice date. Items with the same vendor invoice date are sequenced by voucher number. Each open payable is on a separate line. The information includes:
- vendor's invoice number and date
- amount billed
- amount paid to date
- open balance of the bill
- running balance by date of all vendors' open items
- date the bill is scheduled to be, or was, paid
- description of the open item
- total amount open per vendor
- aging of the total amount open per vendor
AP History - AP 117
You can review a chronological history by accounting month and date for each vendor or supplier. This program shows each transaction, including all invoices, credits, adjustments, and payments. It also shows which invoices were paid by each check.
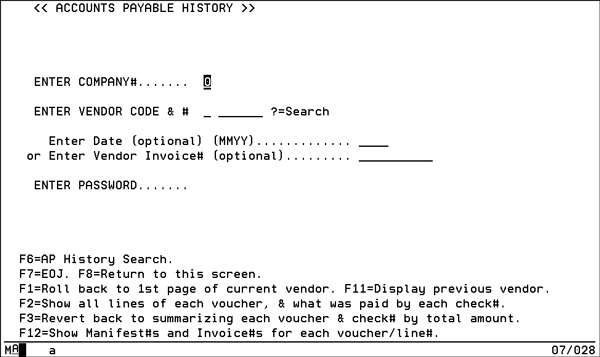
1. On the Process Cash Disbursements menu, enter 117- A/P History to go to the Accounts Payable History screen.
| Field | Description |
| Enter Company | Enter Company Enter the one-character code for the company whose A/P records you need to search through. |
| Enter Vendor Code | To search for a specific vendor. Enter a V followed by the vendor number (maximum of six numeric characters). Enter ? to search the vendor database. |
| Enter Date or Vendor Invoice | An entry of either a date or a vendor invoice number narrows your search and limits the results to your specifications. This is an optional field. |
Function Keys
| Function Key | Description |
| F1 | To return to the first page of a vendor's ledger. This command is useful only past the first page of a vendor's ledger that contains more than one page of entries. Each page contains a maximum of 14 lines. |
| F2 | To see all lines of each voucher and what was paid by each check number. |
| F3 | Reverses the effect of F2. It reverts back to summarizing each voucher and check number by total amount. |
| F6 |
To drill down into the AP history files. |
| F7 | To end the job and return to the Enter Accounts Payable Transactions menu. |
| F8 | To return to screen 1. |
| F11 | To return to the previous vendor's ledger. |
| F12 | Shows the manifest number that relates to each supplier invoice number. The manifest number only appears if it was entered into the Manifest field of the A/P Entry Screen when the invoice was entered. This can be particularly useful when you are searching for a vendor invoice, based on an item and serial number with a claim or complaint. On the Inventory Inquiry Stock Card screen is a receipt. If you enter the line number of the receipt, you can see the manifest and receipt date. You can then find the manifest and invoice number in A/P History. |
2. Enter the necessary information and press Enter. The Summary screen appears.

The Summary screen shows only one line per voucher and per check. It shows the total of each voucher, including all lines if split between multiple expense accounts, branches, or cost centers. The total of each check and the total discount taken per check are also shown.
The following table describes the fields for the AP History Summary Screen.
| Field | Description |
| Date | The vendor's invoice date. The ledger screen sorted by vendor's invoice date within accounting month posted. |
| Code | The action code used to process the entry of this payable item. In the above example, the transaction code 00 means it is a regular bill from vendor, and $$ means it is a payment. See the A/P Transaction Code Listing for definitions (Option 204 on the AP menu) of all of the codes. |
| VCH/CHK Line | The voucher number assigned by the system. If two or more items have the same vendor invoice date, they are sequenced by voucher number. When you press F2, items expensed to two or more expense accounts appear on two or more lines, each having the same voucher number. |
| Debit | All debits appear in this column. In an A/P system, debits mainly consist of payments to vendors and credit memos from vendors. |
| Credit | All credits appear in this column. In an A/P system, credits mainly consist of bills owed to vendors and check reversals. |
| Discount | The discount taken when payment was made. |
| Inv# | The vendor's invoice number. |
| Mth=Posted | The accounting month in which the payable or payment was posted. |
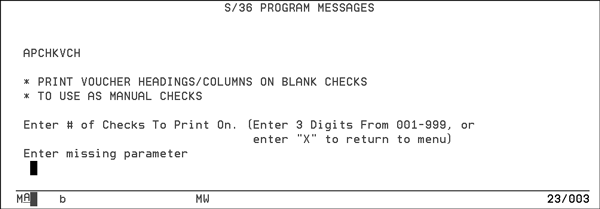
Print Manual Check Vouchers - AP 120
This option lets you print headings and columns on blank check vouchers to use when writing manual checks.