Making a Payment through CyberSouce/Wells Fargo
CyberSouce/Wells Fargo is a third party real time online payment application that KerridgeNC teamed up with to allow electronic credit card payments.
Making Payments with CyberSource
Cybersource Set-up
To implement the Wells Fargo hosted payment page for integration with DNav Online, the following steps must be completed:
- After setting up an account with Wells Fargo, use the following URL to login with the credentials they provided: https://ebc.cybersource.com/ebc/WellsHome.do
- There are 3 crucial items needed before setting up the PAY 4 Payment Institution Profile:
- Profile ID
- Access Key
- Secret Key
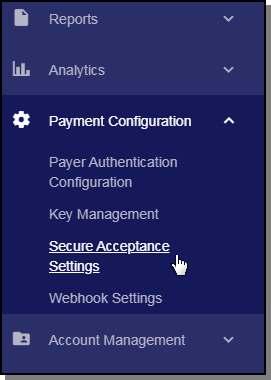
- After logging into Wells Fargo CyberSource, on the left menu, go to Payment Configuration > Secure Acceptance Settings.
- On this screen you can create a new profile.
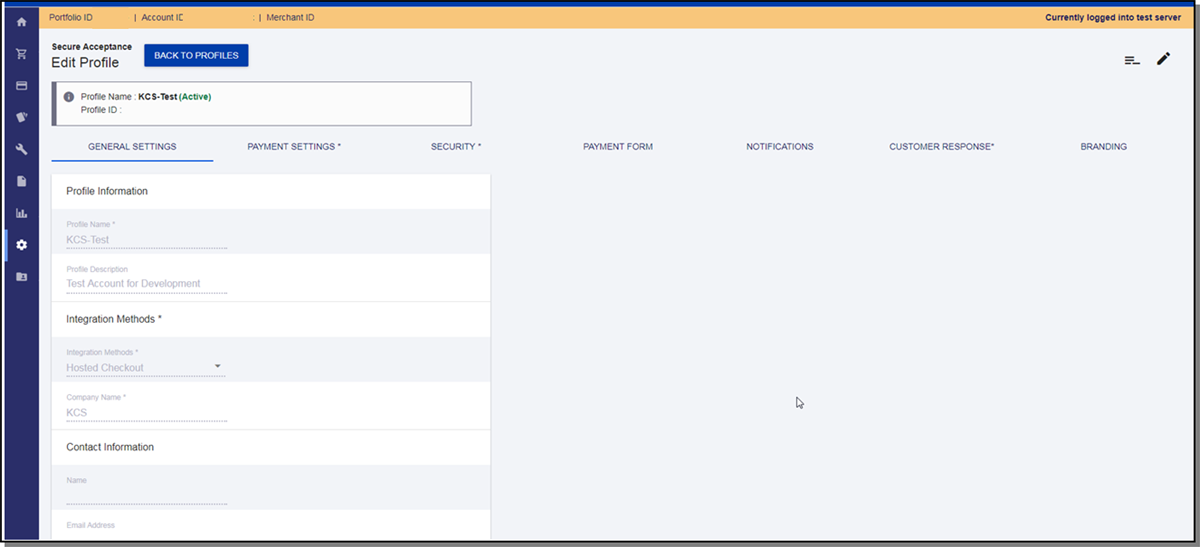
- Once in the edit view, you will see the Profile ID under the Profile Name near the top of the screen. Copy this and paste this in Notepad as you will need it later.
General Settings Tab
- Fill out the general information on this tab. Integration Methods should be locked down to Hosted Checkout.
- Enable Payment Tokenization at the bottom of the screen if you would like to let your users save their payment information.
- Click Save.
Payment Settings Tab
- Click on the next tab Payment Settings. This is where you will add the card types you would like to accept.
- Leave Payer Authentication 3DS Version at 3DS 1
- Select all options in Automatic Authorization Reversal.
- If you would like to accept ACH payments, select Enable eCheck Payments and then select the account types you will accept.
- Click Add Currencies and select the desired currency.
- Click Save.
Note: We do not currently support the PayPal Express Checkout.
Security Tab
- In the Security Keys section, click the plus sign to add a new key.
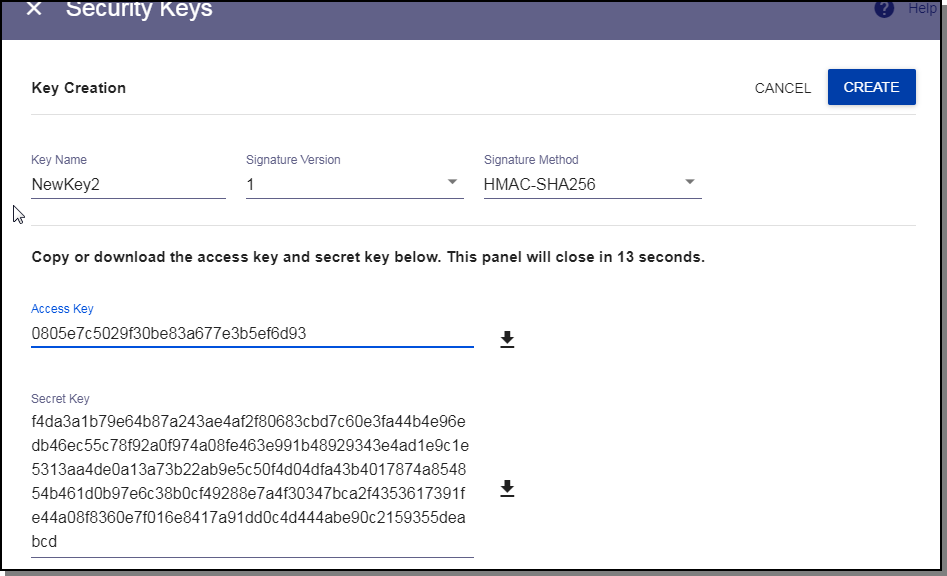
- Type in any name for the Key Name. Signature Version should be 1 and Signature Method should be HMAC-SHA256.
- When you’re ready, click Create.
-
Copy the Access Key and paste in Notepad as you will need it later.
-
Copy the Secret Key and paste in Notepad as you will need it later.
-
Click X to close the dialog.
-
Pay special attention to the expiration date of the newly created security key as you will need to generate a new one before it expires and copy the access key and secret key into the Payment Institution Profile.
Note: before clicking Create, not that you will have 30 seconds to copy the info in the next step so be prepared and go ahead and read the next section. If you don’t copy it in time, it’s OK. You can select the new key and click the eye to view it again.

Payment Form Tab
Everything on this page is personal preference except do not check the box to display the tax amount on each step.

Click Save.
Notifications Tab
This step involves the process in which the payment data is sent back to your system to be displayed in the AR Payments tab.
- Check the Merchant POST URL box.
- If the way your customer access DNav Online is similar to the following
- https://subdomain.mycompany.com/danciko/d24/
- replace d24 with dancik-ows/gateway-callback/cybersource/datapost so the url will look like
- https://subdomain.mycompany.com/danciko/dancik-ows/gateway-callback/cybersource/datapost
- Paste the URL in the URL input below the Merchant POST URL box.
- Leave other boxes unchecked.
- For Card Number Masking, select “Return last 4 digits card numberâ€.
- Click Save.
Customer Response Tab
- For Transaction Response Page select Hosted By You.
- If the way your customer access DNav Online is similar to the following
- https://subdomain.mycompany.com/danciko/d24/
- add gateway/receipt/index.jsp to the end of it so it will look like the following
- https://subdomain.mycompany.com/danciko/d24/gateway/receipt/index.jsp
- Place the URL in the URL input.
- For Transaction Response Message select how many time you will allow them to attempt the transaction.
- For Custom Cancel Response Page, select Hosted By CyberSource.
- Custom Redirect After Checkout isn’t actually used in our integration, but it’s required. You can simply put the URL that your customer use to access DNav Online.
- Click Save.
Branding Tab
Branding isn’t necessary since it is just a simple payment form displayed within DNav Online.
- At this point, click on the Back To Profiles button near the top of the screen.
- Select the profile you just created and click the Promote Profile icon.

PAY 4 Menu Setup
- In the PAY 4 menu, click F1 to add a new Payment Institution Profile.
- The Institution Profile ID can be any unique 2 character identifier.
- Description can be something similar to CyberSource Profile.
- Payment Institution ID must be CS.
- Click Enter.
- Copy the values you pasted into Notepad into their related areas. Profile ID, Access Key and Secret Key.
- Merchant Id was provided to you after setting up an account with Wells Fargo CyberSource.
- If you chose earlier to Enable Payment Tokenization (enabling users to save their payment methods) you will type a Y for Payment Token Enable.
Making Payments with CyberSource
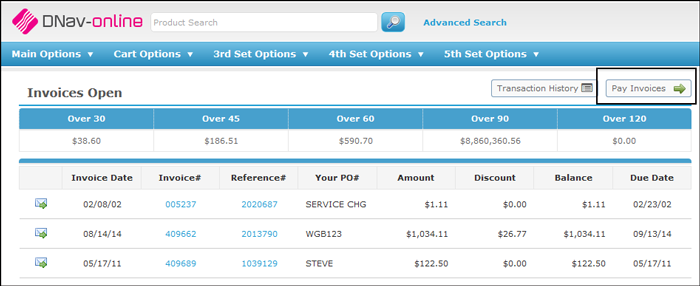
- Access Decor 24 and display the open invoices.
- Click Pay Invoices.
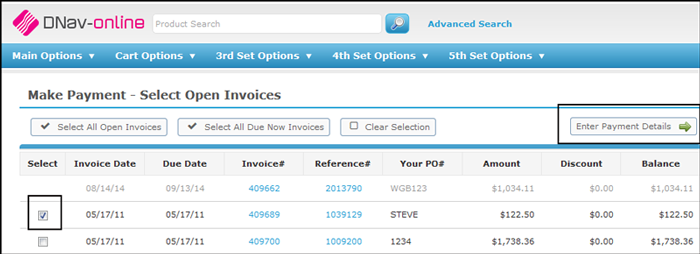
- On the Make Payment - Select Open Invoices window that appears, select the invoice(s) to pay and click Enter Payment Details.
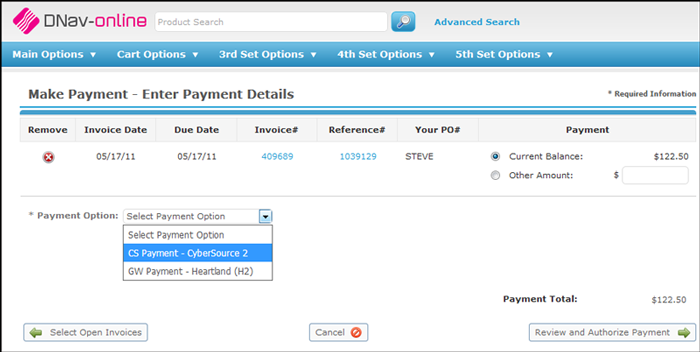
- Select Wells Fargo/Cybersource payment option.
- Some additional settings display.
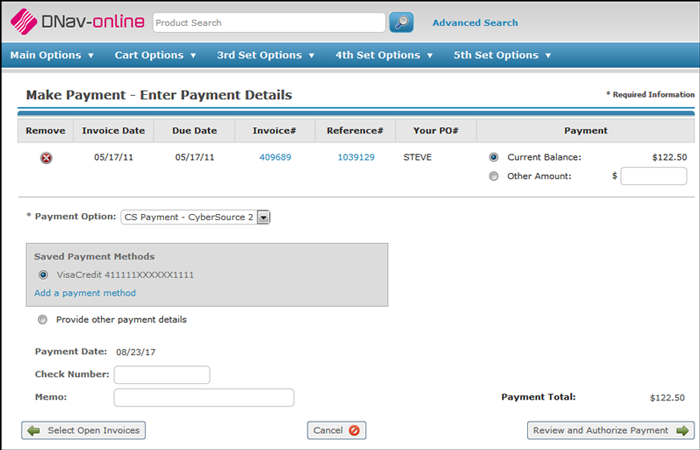
There are a couple of different payment methods.
Saved Payment Methods
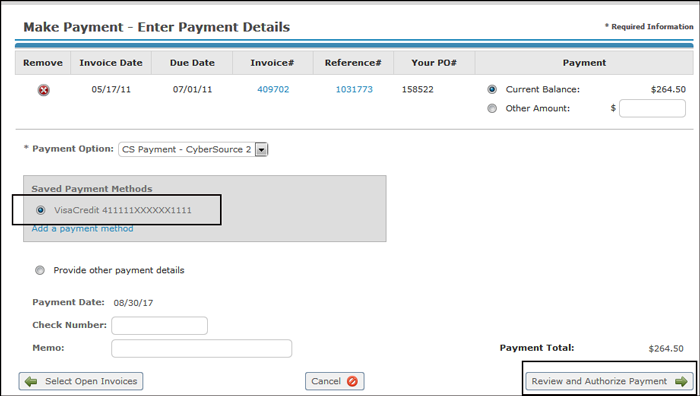
- With a Saved Credit Card or eCheck. These are stored and displayed under Saved Payment Methods.
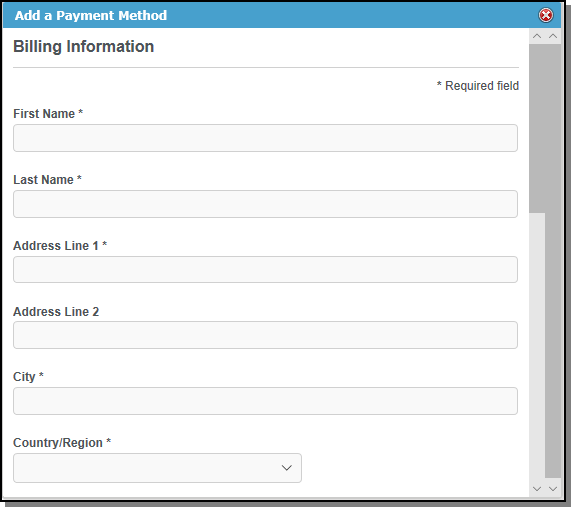
- Click Add a payment method to store new credit cards and/or checking accounts.
- Click Save to add the Payment method and return to the Payment window.
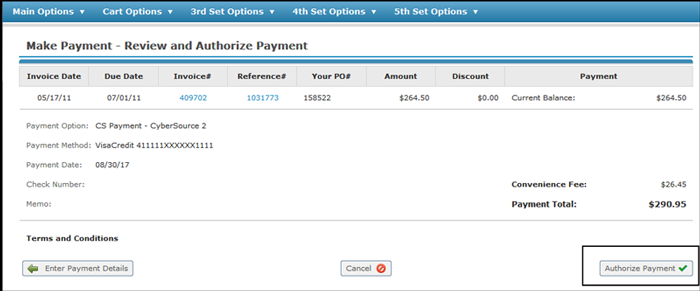
- Select a Saved Payment Method and then click Review and Authorize Payment.
- Review the payment and if it looks correct click Authorize Payment.
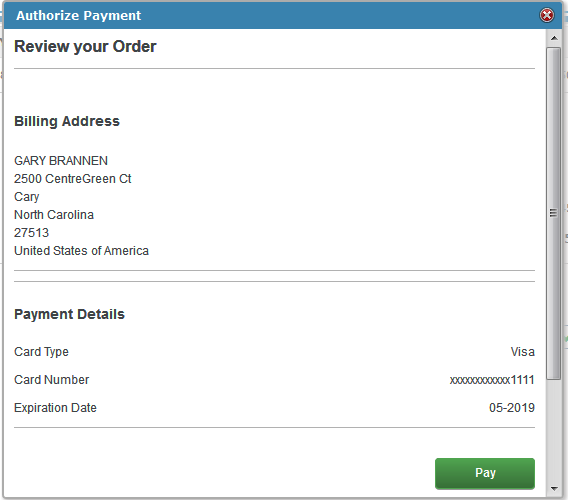
- The next window allows you to make the payment.
- Click Pay. At this point, a receipt is generated and the payment is sent to Wells Fargo/Cybersource for payment completion.
Provide other payment details
- Use the Provide other payment details button to enter credit card or checking account information that will not be saved.
- If the payment if by check, enter the Check Number in the box provided click Review And Authorize Payment.
- If the payment is by credit card, click Review And Authorize Payment.
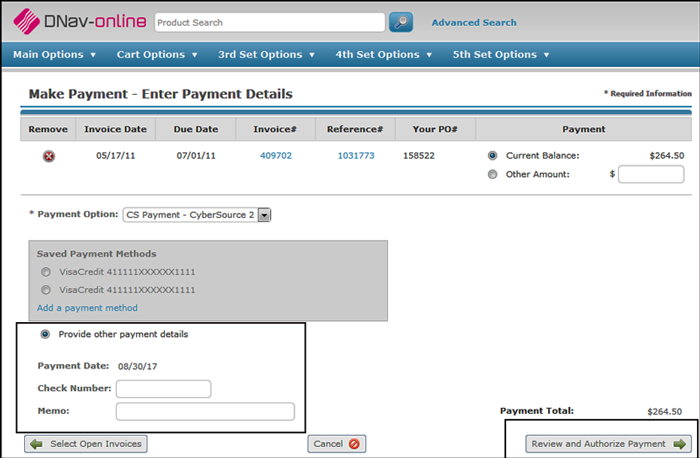
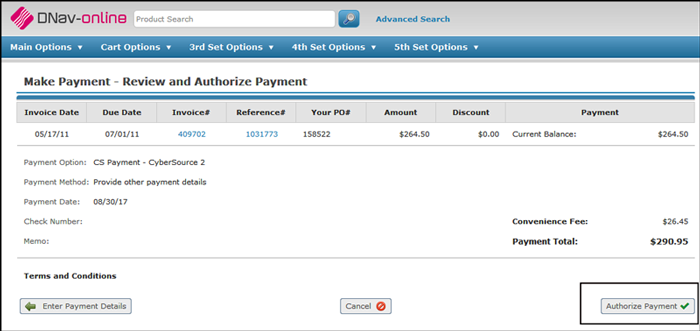
- After Review And Authorize Payment is clicked, review the payment details and click Authorize Payment.
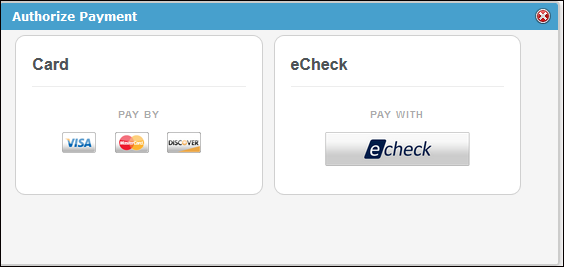
- Click on a payment method.
- To enter credit card information, click on the specific credit card icon and enter the billing information.
- Click eCheck to pay by electronic check. Enter the billing information which includes the Routing and Account number.
- Click Pay.
Managing Your Account and Saved Payment Methods
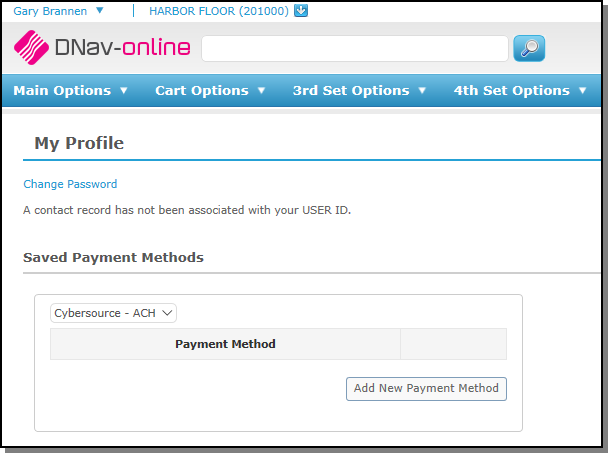
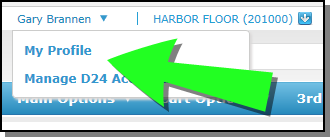
Click the user name in the upper left hand corner.
Select My Profile.
Make changes or additions as needed.
