Financial Statements - Build a Workbook
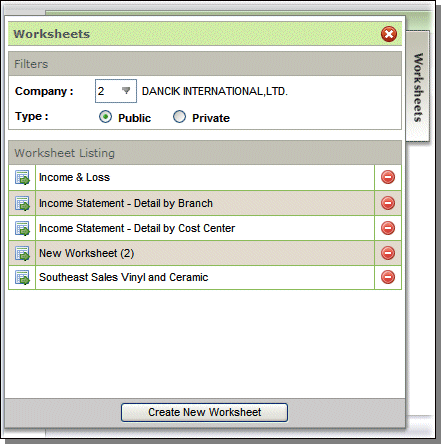
- After selecting Financial Statements - Build a Workbook off the Accounting menu on Navigator, the first screen of the Financial Statements - Build a Workbook application appears.
- Select a company to view any existing Worksheets already created for it.
- Click Create New Worksheet. A New Worksheet entry is created for the entry in the Worksheet Listing.
- Click on the icon to the left of the new worksheet. New worksheets automatically begin with one group, one category and one row.
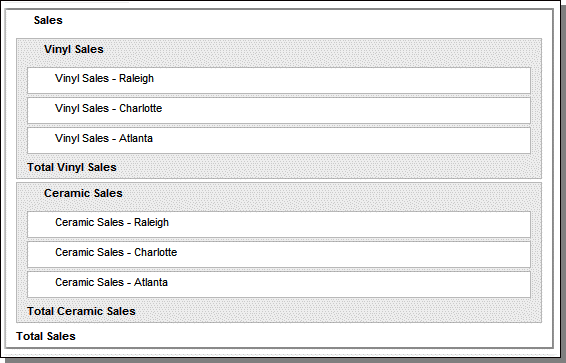
- The hierarchy of the information is group, category, and then row.
- When a new Group or Category is added, a Total line is also automatically added.
- To change a title name, simply click on it delete the existing title, and retype the name you want.
- When an entry is moused over, three icons appear.
- Continue adding groups, categories, and rows as needed. The following example, has one group (Sales) consisting of two categories (Vinyl Sales and Ceramic Sales). Each category has three rows (Vinyl Sales - Raleigh, Charlotte, Atlanta and Ceramic Sales - Raleigh, Charlotte, Atlanta).
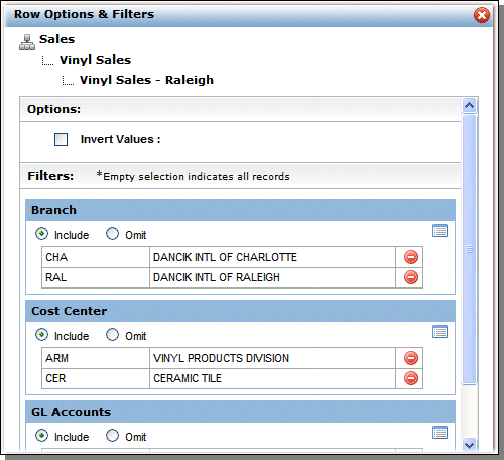
- When you mouse over a row, you will notice a new icon. Use this icon to edit setting criteria for the row. Clicking the icon reveals the Rows Options and Filters window.
- Activate the Invert Values option to convert negatives to positives and vise-versa. For example, when creating a financial statement if you do not want to see income showing as a negative, you can invert the sign to show as positive.
- Use the Rows Options and Filters window to include or omit branches, cost centers, and GL accounts from the row. If you include entities only they are included in the selection. If you omit entities, all entities except the ones you enter are included.
- To add or exclude filter entities, click the Open Search Window icon to the right of the row.
- On the Search window that appears, select the branches, cost centers, or GL accounts that you want to include or omit from the worksheet.
- As you select items, they are added to the appropriate filter.
- If you want the row (in the example shown above the row is Vinyl Sales under the category Sales) to show negative numbers and be calculated as a negative number on the spreadsheet, activate the Invert Values option.
- Click Save to return to the Worksheet.
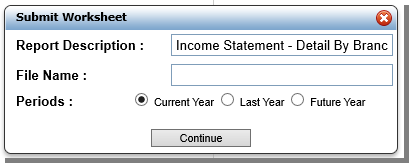
- Click Submit Worksheet to assign a File Name and select a time period (Current Year, Last Year, or Future Year).
-
When Current Year is selected journals in periods from GLSYS record type 12 are included.
-
When Last Year is selected journals in periods from GLSYS record type 11 are included.
-
When Future Year is selected include journals in the periods from GLSYS record type 13.
- Click Continue to save the worksheet and return to the initial window where the newly created and saved worksheet appears in the Worksheet Listing.

Note: Information is taken from both open and closed months.
Note: If you are creating Financials at the branch level where you are listing each individual branch after the other, make sure all entries posted to the GL have a branch code. This concept also applies for Cost Centers.
On an existing worksheet, when Add New Group is clicked. The new entry is entered at the bottom of the worksheet. In this situation, categories and rows are not included.
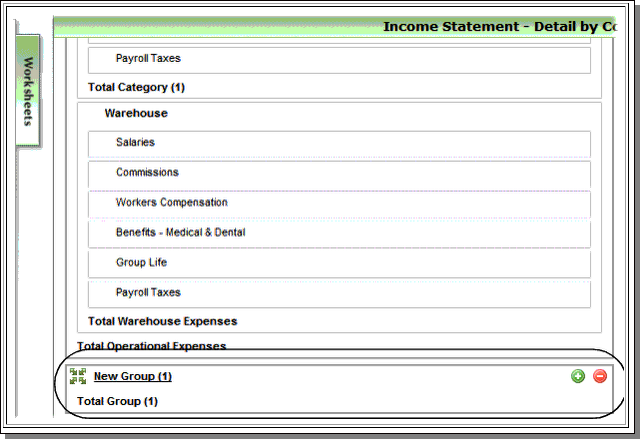
The following icons appear with the new group.

Add as many groups, categories and/or rows as needed.
To change the name of a group, category, or row, simply click the current name and edit as needed.
To view the report, click the ODS link in the top right hand corner and select the file from the listing that appears.

