Accounts Payable Available Options
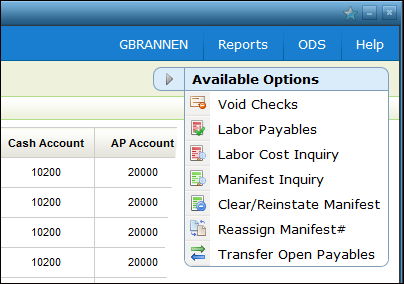
These options are accessed via the drop down menu on the right-hand side of the window.
Reassigning a Manifest to a Receipt
Void Checks
Use this Available Option to void checks entered today (prior to night jobs).
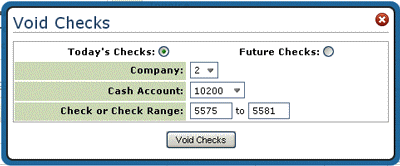
Checks that are voided will reopen the invoices on the AP Ledger to be paid again.
If you want to see if the check was voided you can print a Check Register via option AP 206. This check register lists all checks written in the current accounting month, sorted by check number, within each cash account number, with separate totals and recaps by type of transaction for each cash account. You can run this report for one or all companies and show the company, check number, check date, amount paid, discount taken, vendor or supplier, and cash account number. Computer checks, manual checks, and other payments as well as a monthly recap by category are also included. This report prints as part of the end of month close.
Labor Payables Report
This report provides for the systematic creation of vouchers needed to record labor payable and retainage. Three vouchers are created when the report is run and processed:
- The first voucher shows how much the installer is owed. This voucher is identified as XXXXXXP (where XXXXXX is the date of voucher creation) in AP.
- The second voucher shows how much was retained, via the Vendor or Supplier File settings, from the installer. This voucher is identified as XXXXXXR (where XXXXXX is the date of voucher creation) in AP.
- The third voucher shows how much the installer owes for the purchase of tools and/or supplies. This negative voucher is identified as XXXXXXA (where XXXXXX is the date of voucher creÂation) in AP.
- If both flags are set to N, still able to run report , no AP transactions are created.
Running the Labor Payables Report
Checking and Processing the Vouchers in AP
Associated Files
System Wide Setting - Options for Accounts Payable
Two new settings have been added.
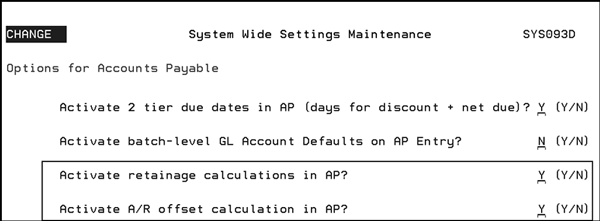
These settings determine how much functionality is available in the Labor Payables Report.
- If both are set to Y:
- Step 1, Process labor payables and run report, and step 2 Process AR Charge Backs are available. The steps are displayed at the top of the Labor Payables Report window.
- If Activate retainage calculations in AP is set to N:
- Step 2 is not accessible and the user can only run the labor payables report (no processing).
- If Activate A/R offset calculation in AP is set to N:
- Step 2 is not accessible and no voucher is generated for AR charge backs. N is a viable entry if your installers do not purchase tools or material from you.
Running the Labor Payables Report
- Access the Labor Payables Report from the Available Options drop down.
- Enter the necessary report parameters. Notice that the Component Codes field is defaulted to only include labor items (L in the I/O field and a component code of L).
- Enter the invoice dates, install dates or a range of invoice numbers to run the report for. You can make entries into all three fields, or only one.
- Use the I/O (Include or Omit) feature to narrow or broaden the report as needed. For example, you can run the report only for selected branches by entering an I and then entering the branch codes. Or in the case of cost centers, you can make a clean separation by cost center (carpet, ceramic, etc.). The report only includes installation information for those branches. Whereas, if you omit (O) those branches the report runs for all the branches except the ones you want omitted.
- Select up to four sorting options. This allows you to format the report to display the information that is the most useful and important to you.
- Process and Run Report - Generates the vouchers and generates the Labor Payables report.
- Report Only - Generates the Labor Payables report only. The report is accessed via the ODS link in the upper right hand corner of the window. After the report is run, you can match the labor charges reported against incoming bills in the AP system.
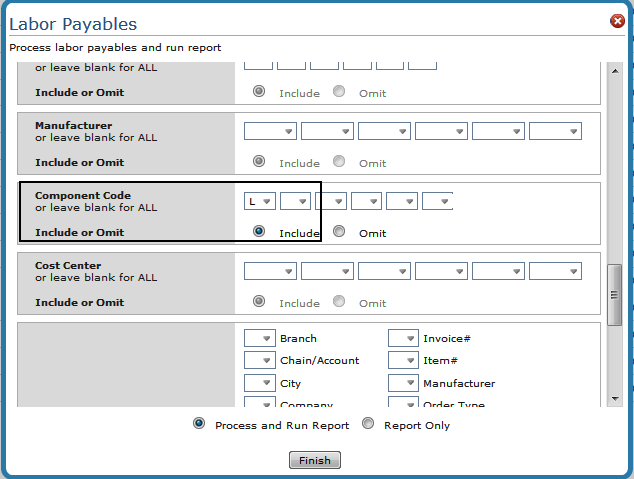
Choose to:
Checking and Processing the Vouchers in AP
The new vouchers are displayed within the AP Entry tab.

From here the vouchers are processed through the normal AP process.
Labor Cost Inquiry
This option allows you to view, correct, and balance labor costs, by comparing the labor costs on an order to an amount billed by the installer or contracting company.
You can use this option to inquire on labor costs, or you can use it to reconcile to a suppliers' labor invoice.
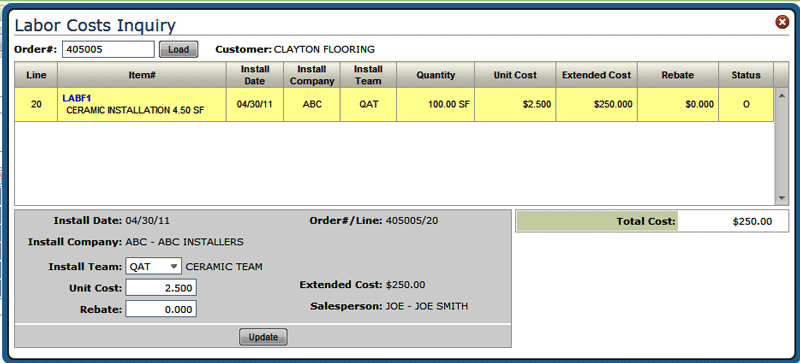
If the installer gave you a rebate, it should be entered in per unit cost. For example, a $20 dollar rebate should be entered as -.20.
Associated Files
Work With Teams (INS 2) - The order has to be assigned to an Installation Team.
Manifest Inquiry
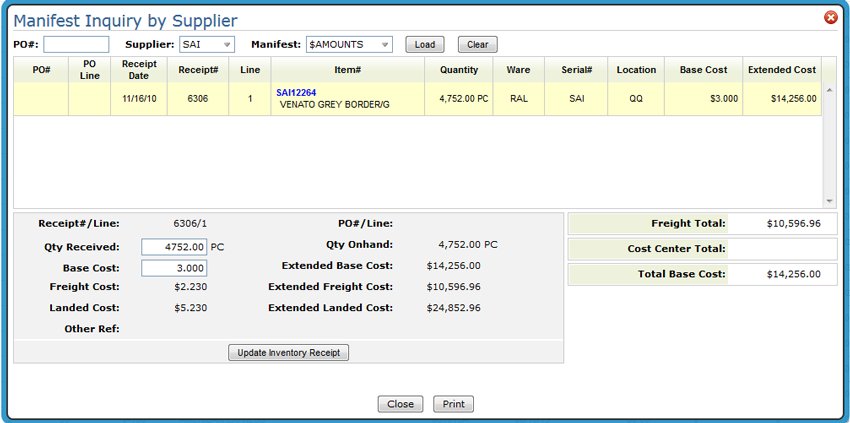
This option lets you review manifest data from the receipts file and make changes to the cost or quantity if authorized.
Searching By Manifest
- Enter a supplier and a manifest number then click Load to view the manifest details. If you do not know the manifest number, use the drop down arrow to search through the manifests connected to the entered supplier.
- The manifest inquiry displays each receipt and line item on the manifest. The main purpose of the manifest inquiry is to help determine if receipts match to accounts payable billing. Therefore, the base cost is prominently displayed (material only). Base cost is what will match your suppliers' billing for the material cost.
- Click a Receipt line to display more details.
- If you are authorized on your control panel, you can change the quantity received and the base cost.
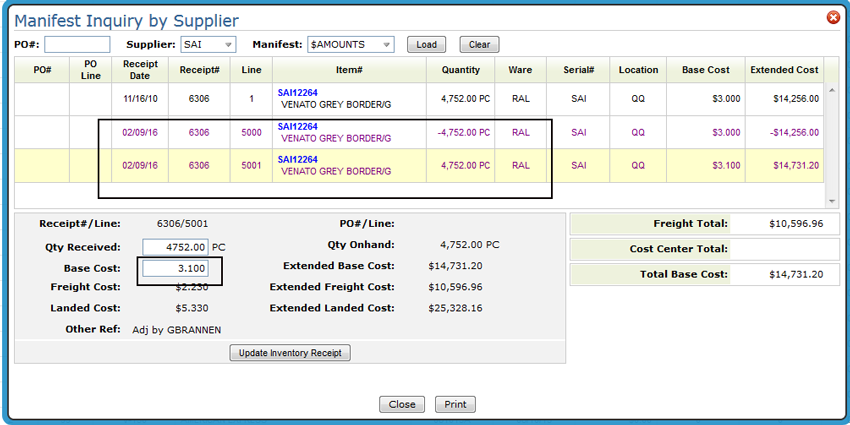
- If a change is made to either the Base Cost or Quantity, the receipt is corrected. The system adds a line to the receipt which reverses the original line, and adds a new line that reflects the changes. Any subsequent manifest will display the adjustments, and the total value of the manifest is updated.
- If all of the material is still in the original location of receipt, then the inventory is also updated to reflect the updates. If some or all of the inventory has been sold or moved from the original location, that portion of the inventory is NOT updated. In this case, you can still balance the suppliers' invoice to the manifest, but the effect on inventory will show on the Inventory Reconciliation Report as a cost variance, rather than as a receipt. The cost variance column of the Inventory Reconciliation Report should be booked as an adjusting GL entry to the general ledger.
- The program does not allow you to create negative onhand inventory. Therefore, you can only adjust the quantity downward to no less than the remaining onhand quantity in the original location.
Searching By PO#
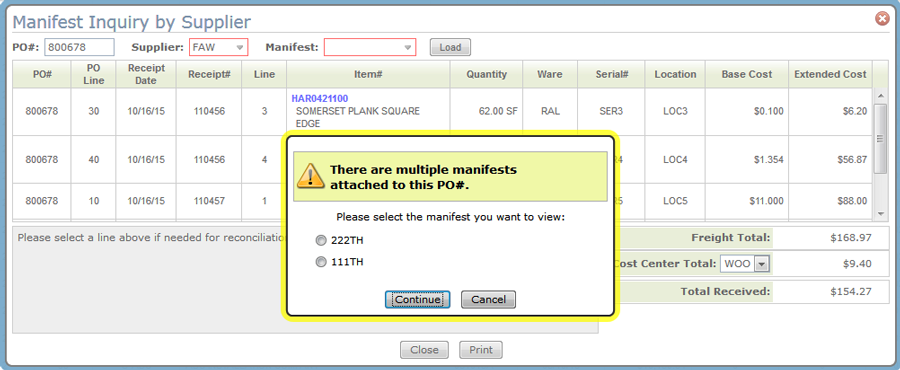
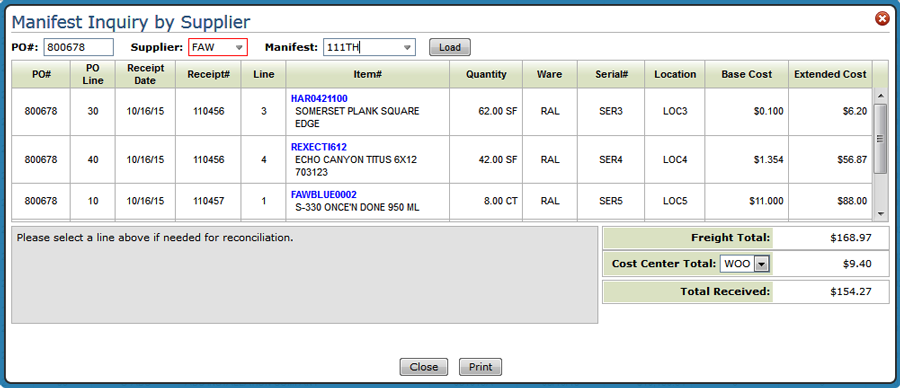
- Enter a PO# and click Load.
- The Supplier is automatically inserted in.
- If there are multiple manifests associated with the PO, a selection box appears.
- Select a Manifest and click Continue. The PO lines associated with the manifest are shown in detail.
Clear and Reinstate Manifest
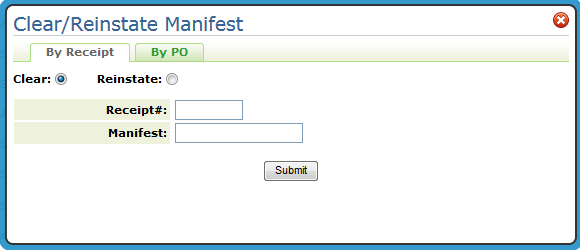
Clearing a Receipt
- This option clears unneeded receipts from the AP unvouchered receipts report without affecting the Accounts Payable system in any other way. However, you may need to create a journal entry to remove the unmatched receipts out of purchases clearing.
- If you have entered an invoice voucher for a manifest, this option cannot be used to clear or reinstate the manifest.
- Enter the receipt and its related manifest number you want cleared from the AP unvouchered receipts report.
Reinstating a Receipt
- Enter the receipt number and activate the Show manifest on the report option.
- The Unvouchered Receipts report is generated via the Job/Po/Manifest Audits (A/P vs Receiving) (menu option AP 217).
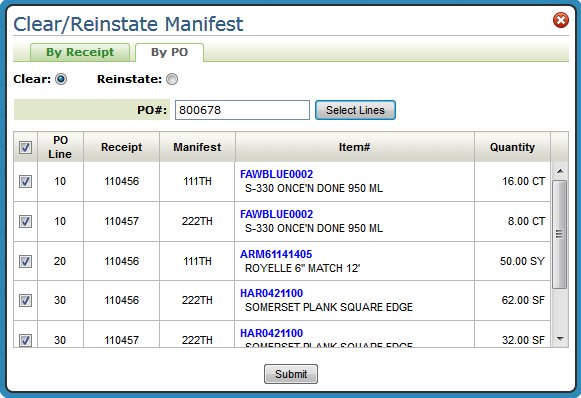
By PO
- Enter a PO and click Select Lines. By default all the lines on the PO are selected.
- Select PO lines and then click either Clear or Reinstate:
- When a Clear is done by receipt/manifest, all received records are flagged as being vouchered, which keeps them from showing on the Unvouchered Report. This option can be used for items where you are not expecting to receive an invoice from the vendor.
- A Reinstate removes the vouchered records for the receipt/manifest, which allows the items to show in the Unvouchered Report.
- Prior to the introduction of this functionality in 2015, you could only reinstate something that was previously cleared.
- The reinstate process no longer requires a prior clear.
- This process reinstates vouchered rows created by the Clear process or by the AP Voucher Entry process.
Reassigning a Manifest to a Receipt
You can use this option to update and correct the manifest numbers and supplier codes assigned to receipts. This feature makes it easier for you to match accounts payable vouchers to inventory receipts.
The system helps you match received lines to the manifest and supplier codes that will be, or were already, entered in the AP Voucher System. Multiple receipts can be assigned to a single manifest number.
The receipt shown below has three lines. Lines 2 and 3 are assigned to the same manifest (DADA3).
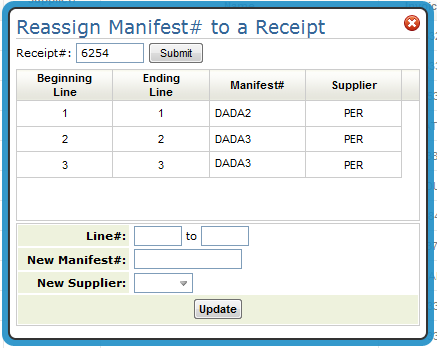
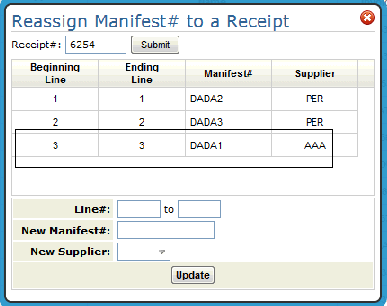
To change the manifest number or supplier assigned to a line, simply enter the information in and press Update.
Transfer Open Payables
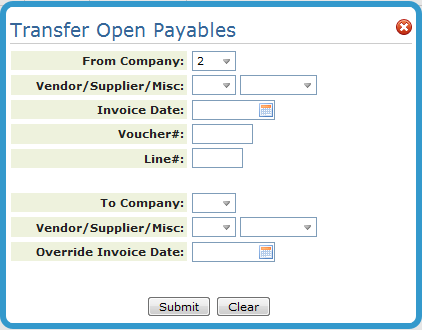
This option is for transferring payable items that have already been posted and appear on the AP ledger. When a transaction is posted to the wrong vendor ledger, this option provides a simple way of transferring AP invoices to the correct vendor ledger.
- From the Available Options drop down menu in the upper right hand corner, select Transfer Open Payables.
- Transfers are performed on one payable item at a time.
- Cash Requirements Report - Lists the invoice date, voucher number, and line number of the item to be transferred.
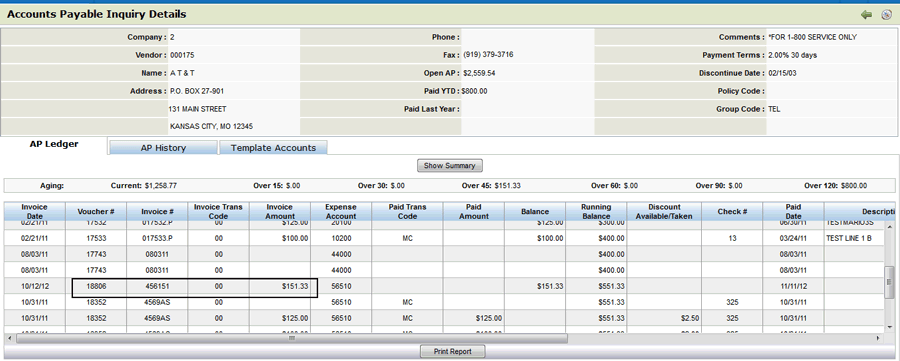
- AP Ledger - Shows the same information as the Cash Requirements Report except for the line number. The AP Ledger is accessed through AP Inquiry.
- If a full or partial payment has been posted against a payable to be transferred, the full invoice is transferred.
- If you get an error message, make the correction and press Enter again. Transfers require no edits or special posting steps. Once you get the Transfer Successful message, you can see the results on the AP ledger. The program enters, edits, and posts the transfer in one step.
- Transferred items retain the same voucher number as well as other related data, such as vendor's invoice number. However, a new line number is assigned by the program, starting with 101. Transaction code 23 is also recorded against the transfer from account and transaction code 22 is recorded against the transfer to account.
There are a couple of ways to list the open payables for a vendor.
Example
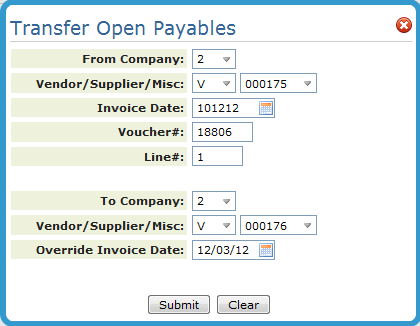
In this example, an open payable of $151.33 needs to be transferred.
- Use the AP Inquiry application to gather the information (invoice date, voucher# and line#) needed for the transfer.
- Go into the Accounts Payable application and select Transfer Open Payables from the Available Options drop down list.
- The Transfer Open Payables window appears. Enter the from and to account information.
- Click Submit.
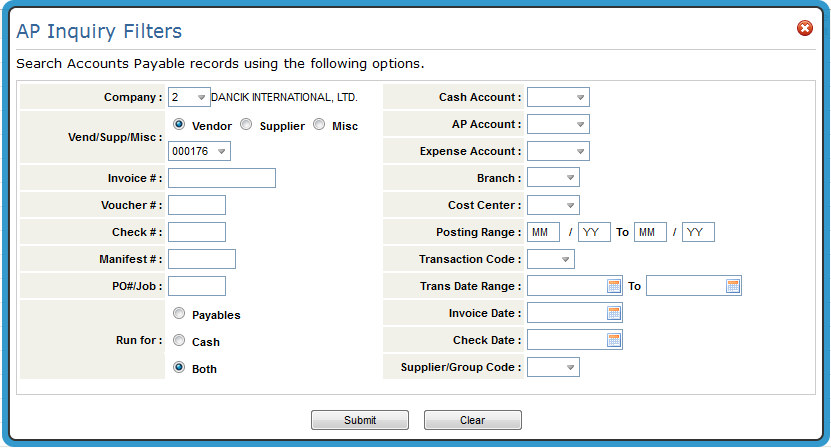
- To ensure the transfer was successful, go into the AP Inquiry application. On the AP Inquiry Filters window, enter, at a minimum, the company and account number.
- The open payables for the account appear. The transferred open payable displays.
