
Entering Special Orders
Entering a Special Order for Misc Items
Controlling where special orders print via Night Jobs
Special Order POs: Automatic Generation and Distribution
Orders are considered special when there isn't enough inventory to fill it or the order is for inventory not normally carried.
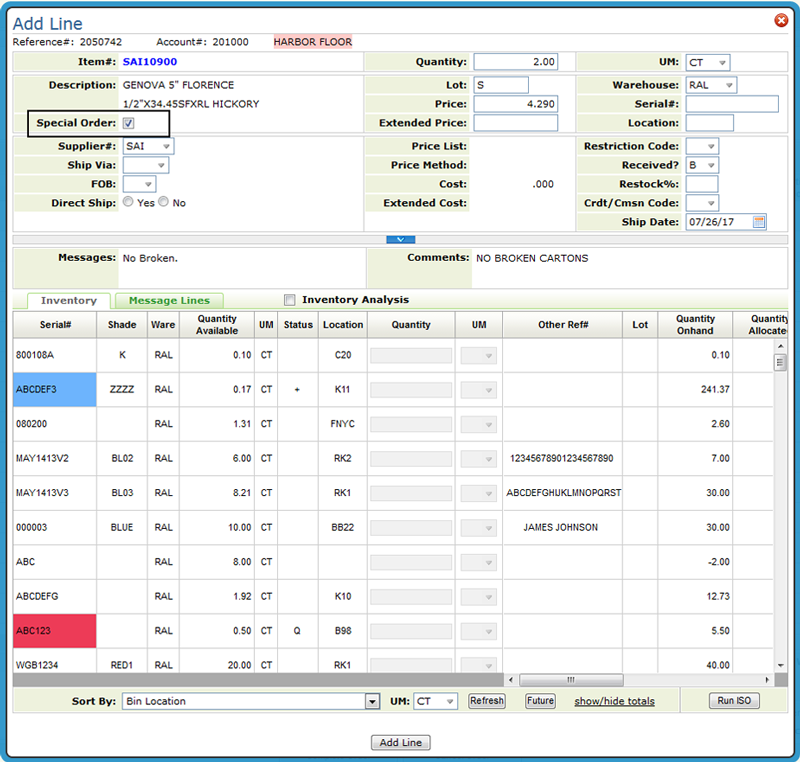
To designate an order as special, click the Special Orders box on the Add Line window (accessed when manually selecting inventory). When the Special Order check box is clicked, a couple of things happen:
- An S is inserted into the Lot field. This directs the system to issue a purchase order for the material automatically through night jobs or manually via menu option ORD 114 - Print Special Order Purchases.
- A B is entered into the Received field. Special orders are handled like back orders.
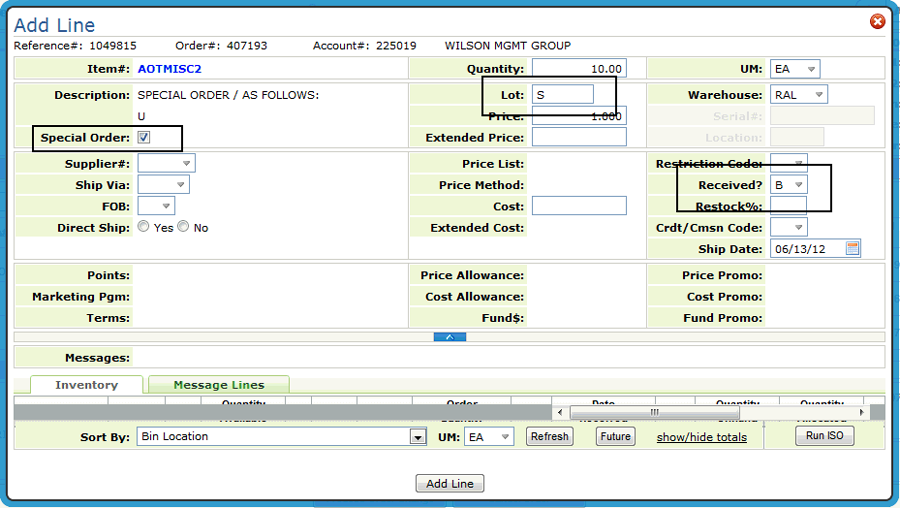
The system also checks to see if the item is in stock. If inventory is sufficient to fill the order, the message Check Stock appears. The operator can then choose to special order the item or pull it from stock. If there is some material in stock, but less than the ordered quantity, the message Not Enough Available appears. The operator can then choose to use the material in stock and special order the difference, or special order the entire quantity.
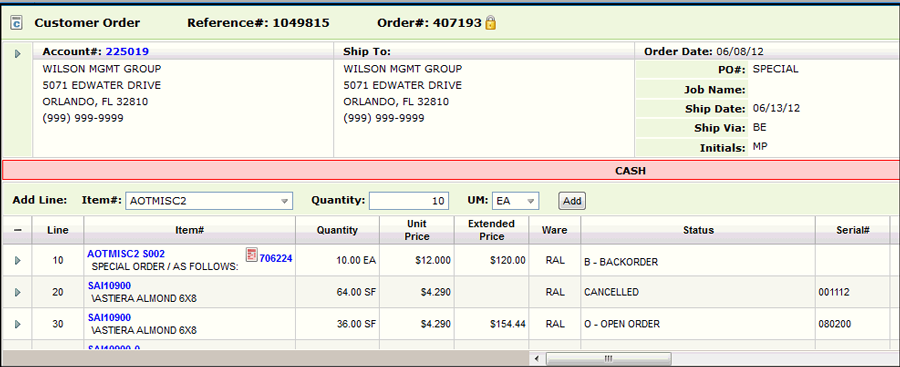
Click Add Line twice to return to the Order Detail screen which shows the item added.
Notice the S to the left of the item number and the Special Order status.

Continue through order entry. When the order gets processed (through the Complete Order button), a lot number is added. This number represents the number of times the item has been special ordered. For example, lot number S003 represents the third special order for the item. The special lot number keeps special orders separate from your regular sock. Special lot numbers appear on purchase orders, customer orders, invoices and inventory screens.
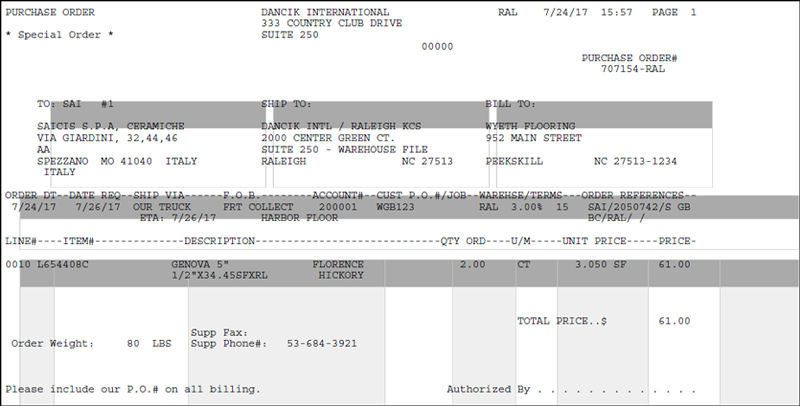
When Print Special Order Reports is run, either on demand from the Purchasing Reports menu, from menu option PUR 4, or via night jobs, a purchase order is created for the special order item and the PO number is displayed.
Click the link to view the status of the purchase order and other details.
Notice also that the status of the order changed from Special Order to Back order.
Entering a Special Order for Misc Items
You may have suppliers who supply a multitude of items for which you do not want to set up individual item file records. You can create a single MISC item number for a supplier or manufacturer, or one for each product line, and so on. You can then override prices, costs and item description each time you use it for a special order. Because the system automatically creates a separate lot number for each special order, each carries an individual price and cost. Even though you are using the same item number for many different items (for example, AOTMISC for supplier AOT miscellaneous) each order and lot number retains its unique identity. Since each lot number is consecutively assigned, you can easily track the number of special orders taken for items represented by the MISC items. For example, lot number S091 means that an order is the 91st special order for the item number.
1. Enter XXX MISC as item number (where XXX is a manufacturer code) and enter the quantity and unit of measure.
2. Click Add and then manually select inventory. You can change the price as needed.
3. Click Add Line. Price List and Cost information is added. Update the cost as needed.
Controlling where special orders print via Night Jobs
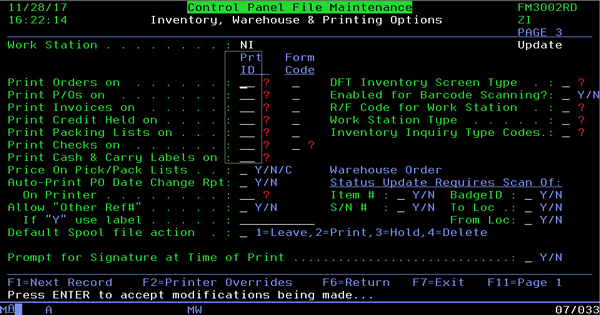
When jobs don't print to their perspective printers when Night Jobs is ran, it is most likely because Night Jobs is not locating the correct printer (for whatever reason). The system will look for a printer device based on the User control panel and/or workstation ID setup. If neither are setup with a printer device, the system will print the documents to printer P1. This is hard coded in the system.
In cases like this, you can create workstation device NI and configure where you want your documents to print. By doing this, Night Job will look for NI(based on old logic in the system) and locate workstation NI. It will review its setup and print the documents to their appropriate places.
Special Order POs: Automatic Generation and Distribution
This functionality includes the following for working with Special orders:
Automatic Generation of Purchase Orders for Special Orders
Automatic Distribution of POs for Special Orders
Automatic Generation of Purchase Orders for Special Orders
Set-up
- System Wide Setting - Options for Special Orders - If the setting Enable Auto-creation of Special Order POs during order processing is activated, Special Order POs are automatically created just like POs for regular orders. The default setting is N.
Interactions with other special order settings
- This process respects the SET 3 company setting flag Allow Special Order POs To Print If On Credit Hold. If this setting is set to N, automated special order PO creation will take place when the order is released from Credit Hold via Navigator. Releasing from Credit Hold via GS is not supported with the automatic creation of special order PO process.
- The automatic creation of special order PO process does not look at the SET 4 setting Limit Creation of Special Order POs to those added/changed today. Automatic special order PO processing occurs regardless of order date.
Navigator Menu (Automatic Generation of Special POs)
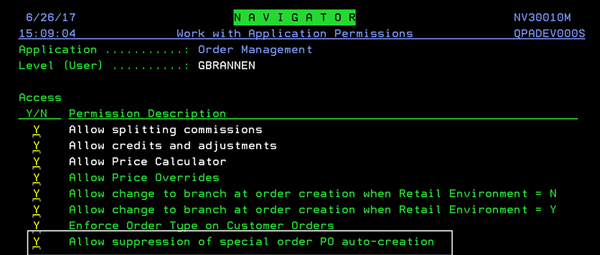
- The option Allow suppression of special order PO auto-creation has been added to all three Navigator Access/Security levels (Nav 1, 2, and 5). Enter an A for Order Management and then activate the setting.
-
For NAV 2 and NAV 5, you need to enter a W to get to the Web Apps.
-
The default is N.
-
No setting (blank) is the same an N.
-
-
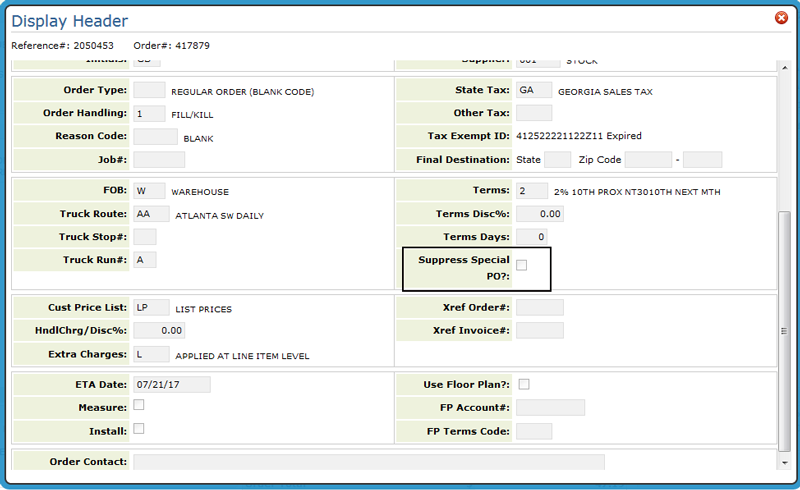
If the setting is activated, the option Suppress Special PO option gets added to:
-
and the Cash Register screen at the end of the order.
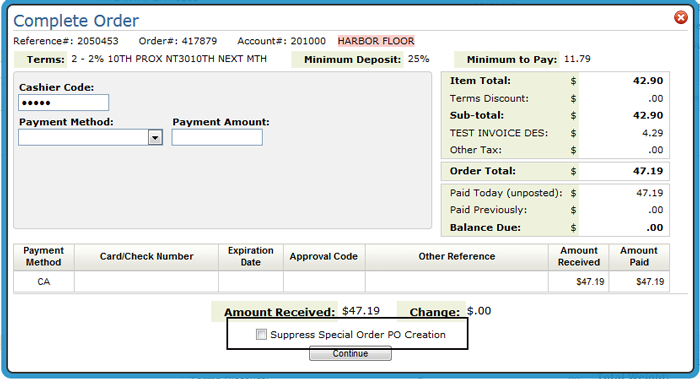
- If the Suppress Special Order PO Creation option is checked, the order gets processed, but no PO is created for the order.
- If an order has been marked with the suppression flag, in order to generate the special order PO for this order, you will have to access order change for this order, and then during the end-of-order options during processing, remove the Suppress Special Order PO Creation flag.
Automatic Distribution of POs for Special Orders
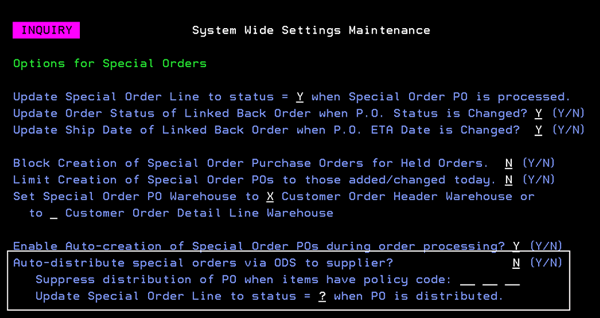
System Wide Setting - Options for Special Orders - The following options were added:
-
Auto-distribute special orders via ODS to supplier activates this functionality.
-
Use the setting Suppress distribution of PO when items have policy code to enter up to three item policy codes that disable automatic distribution. When enabled, if a special order PO is created for an item with one of these policy codes, the email distribution to the supplier will be suppressed.
-
After special orders are distributed, they are automatically assigned the status entered in the setting Update Special Order Line to status = when PO is distributed. This can help group, track and report on special orders.
Supplier File
Green Screen
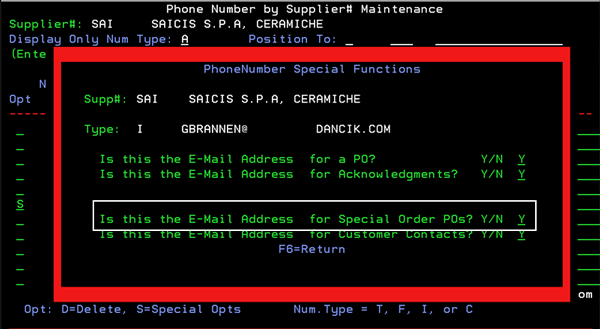
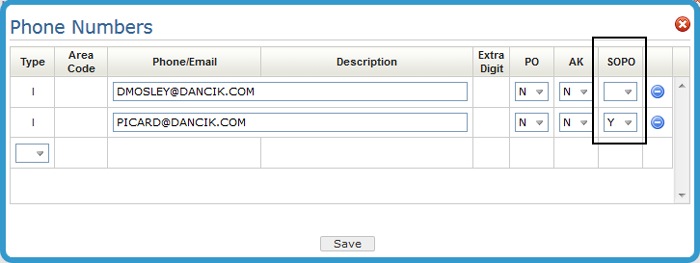
The setting Is this the Email Address for special order POs in the Supplier Phone Number file determines where the special PO is distributed.
To get to the Special Functions screen:
- Access the Supplier File
- Press F9 to access the Phone Number Maintenance window.
- Enter an S in the Opt field for the contact you want to work with.
Navigator
The setting SOPO determines where the special PO is distributed.
To get to the Special Functions screen:
- Access the Supplier File
- Update or inquire on a supplier
- Select Phone Numbers from the Options drop down menu in the upper right hand corner.
Example workflow
Example workflow to generate and distribute a special order PO.
- Access Navigator Order Management and begin a new order.
- Enter an item number from a supplier that has a contact set-up to receive an email when a special order is created.
- On the Add Line window, ensure the Special Order checkbox is activated.
- Click Add Line twice to add the item to the order.
- Click Complete Order.
- If the preview window comes up, click Continue to proceed to the Complete Order window.
- Enter the payment information and click Continue.
- On the End-of-Order Options window, click Process order but do not print.
At this point, the Special Order PO is emailed to the Supplier Contact set-up in the Supplier File.
A an entry is made in the order's notepad denoting that a special order PO was distributed.
Ordering SKU Special Items
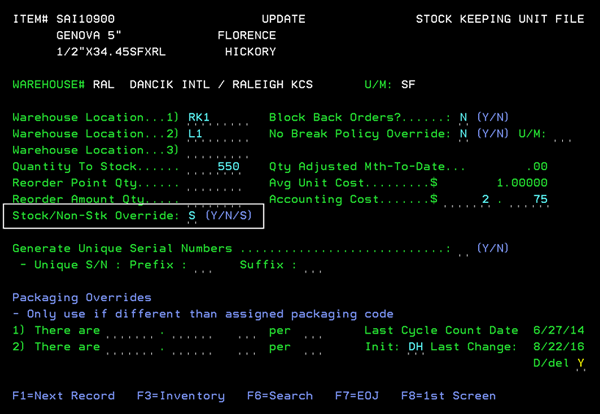
The SKU File contains a setting that allows SKU items to be ordered like Special order items on a warehouse by warehouse basis.
In the example shown below, if the SKU item SAI10900 is ordered out of the RAL warehouse it will be a special order item.
Ordering SKU Special Items
When SKU items with a warehouse and item combination (in this example RAL and SAI10900) flagged as special order, are ordered in Selection Sheet, Decor 24, CMS or Navigator (shown below), the item is noted as special.
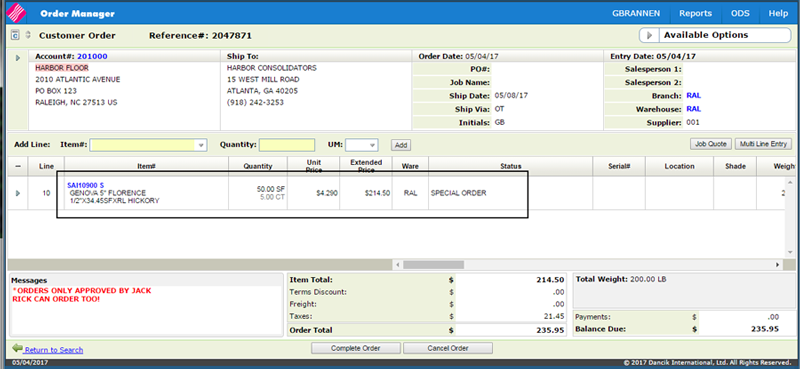
If you take a closer look at the order line, by clicking the option arrow to the left of the line and selecting Edit Line, you will see that the Special Order box is checked and a Backorder status is entered in the Received setting.

Associated Files
System Wide Setting - Options for Special Orders - This setting enables you to automatically update customer special order status and dates, when the related special purchase order has it's status and/or ETA date updated.
Print Special Order Purchases (PUR 4 or ORD 114) - These options allow you to print purchase orders on demand for special orders.
Tracking Special Orders - Special orders can be tracked using all the functions available for regular stock orders:
- They appear on Order Inquiry screen (CUS 10).
- They appear on Open Customer Order Reports (menu ROO) and on Open Purchase Order Reports (Menu RPO). All open order reports have an option for selecting special orders only.
- They are accessible via Inventory Inquiry (INV 1). Because special order items are not included with regular stock items, when you do an inventory inquiry on a special order item you have to include the lot number.
- Each special order lot number has its own Stock Card Screen showing when the customer order, purchase order, receipt, and invoice were each processed.
- Classification Code "S" within category Transaction Type displays your total special order sales and gross profit. This is accessed via the Classification Codes File (FIL 19).
Updating a Special Order's status and Ship Date - You can update the status of a special order by using:
- The Update Order Status & Shipping Data (CUS 13) - For orders that contain only regular assigned item numbers.
- The Update Direct Ship and Special Order Status (CUS 14) - Use this program for special orders that use miscellaneous item numbers or F6 lines for item information.