
ODS Distribution Options
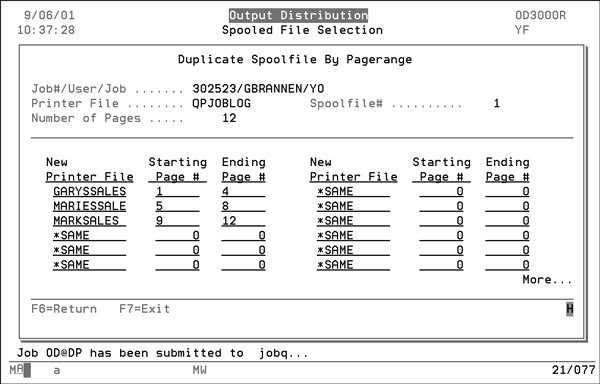
DP - Duplicate by Page Range
This option allows you to copy a page range to a new spool file and/or separate pages for distribution. In this example, the original 12 page report QPJOBLOG has been split up into three separate reports. The reports (Printer File) have been renamed and each report has been assigned a starting and ending page from the original file.
EC - E-Mail Customers
This option enables you to select customers and point-of-contacts to send information to via e-mail.
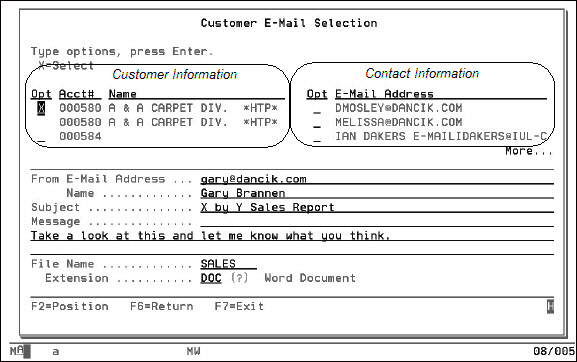
As shown above, the customer information is shown on the left side of the screen and the contact information is shown on the right. When you select a customer, the system automatically selects all the contacts set up for that company to send the information to. If you do not want to send the information to all the contacts, you can individually select those you want by placing an X in the appropriate Opt column.
Enter the From E-mail Address and if needed a subject and message. You can set the From e-mail address to automatically populate the field by using the F21=User Default Options function key on the Work with Spooled Files Screen.
Enter a new file name and decide the format you want to make the file. If you are unsure of the available formats enter a ? in the Extension field and press Enter. The PC Document Extensions selection box appears.
EM - E-Mail Select
This option allows you to manually enter e-mails that are not predefined in the system.
On this screen, you have to manually enter the To e-mail address and depending on your settings the From address.
Even if the From address is imported as your default e-mail address, you can change it as needed.
Enter the Filename and Extension. This is the same procedure as used for the EC option.
ES - E-Mail Suppliers
This option enables you to select suppliers and point-of-contacts to send information to via e-mail. It searches the supplier file phone number maintenance screen for any I entries and then automatically displays those e-mail address.
This screen is very similar to the EC Distribution Option, Customer E-Mail Selection Screen. The only difference is that this option is dealing with suppliers and not customer accounts.
FC - Fax Customers
This option searches the billto file phone number maintenance screen for any F entries and then automatically displays them when FC is selected.
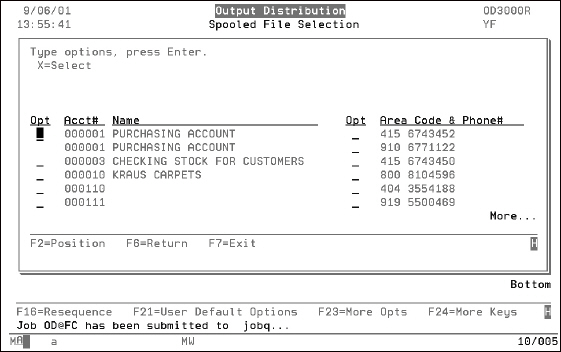
The left hand column of the screen lists account information and the right hand column displays the fax number(s) related to that account.
If there is only one fax number for an account, when you select that account the system automatically displays the related fax number. If there are multiple fax numbers for an account, you can individually select the fax numbers. If you do not individually select the fax numbers, the information is faxed to all of them.
FL - Folder
This option allows you to copy a document to an AS/400 PC folder.

Enter the folder that you want to copy the information into.
You can use Windows Explorer to access the information.
FS - Fax Suppliers
This option searches the Supplier File Phone Number Maintenance screen for any F entries and then automatically displays those supplier fax numbers for your selection.
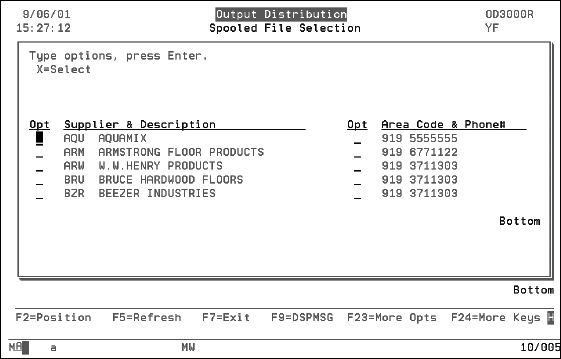
As shown above, the right hand column of the screen lists supplier codes and names and the left hand column displays the fax number(s) related to that supplier.
If there is only one fax number for a supplier, when you select that account the system automatically selects the related fax number. If there are multiple fax numbers for a supplier, you can individually select the fax numbers. If you do not individually select the fax numbers, the information is faxed to all of them.
FX - Fax Select
This option allows you manually enter and then send a fax to a number that has not been predefined in the system.
Enter the necessary fax number and name of the company you are sending the fax to. When entering the fax number, be sure to remember to add a 1 and the area code if it is a long distance number. For more information on FAX/400 control codes access field help.
If you want a cover page included with your fax enter a Y in the Create Cover Page field. You can then add a title line, up to three recipients and senders, and any necessary comments.
The only mandatory field on this screen is the Fax#.
Logging and Tracking Capabilities on Faxes
When using any of the fax commands within the Output Distribution System, FAX400 logging and tracking capabilities are automatically applied. You should keep the following in mind:
- User ID must be set up in FAX400.
- When using FX, FC, FS a status log is created.
- FX is the only option of the three that allows you to add a cover page.
OQ - Output Queue Select
This option allows you to route the file to up to nine different printers within your system. Use this feature if you want to print a report at multiple locations.

In the Output Status field, enter a 3 to hold the printing of the information, or a 6 to commence printing at the designated locations. If you enter a 3, the information is placed on the remote printers output queue in a hold status. Then it can be released by the people at that location as needed.
You can specify up to nine printers to send the information to. When you enter the output queue name the related Library appears. To access a complete list of the output queues available on your system, enter a ? and press Enter.
US - Users Select
This option allows you to send files to up to nine other users in your network. Enter a user ID that you want to send the information to. The user and the system that supports him/her appears on the selection screen.
