
IWMS Locations File - WM1 7
Use this program to add records that describe locations in the warehouse where inventory is kept. Everything in the warehouse is considered a location i.e., forklifts, staging spots, shrink wrap, dock doors, cut stations. You can group locations with similar properties and assign them to templates. You can also, set up and maintain the properties of locations individually and use a conversion program on menu WM8, option 1, to import files from the core system into the IWMS master file.
On IWMS Menu 1, select option 7 - Locations File. The Location Master File for your default warehouse appears.

Enter one of the options (i.e., U to update, C to copy, I to inquire, D to delete) and press Enter.
The system will not allow you to delete locations that still have inventory in them. If you try to delete a location that still has inventory you will receive the following message Location cannot be deleted due to inventory in the location.
Screen 1

| Field | Description |
| Warehouse | The IWMS warehouse containing the locations being maintained. |
| Long Visible Loc Code |
An 8 character description of the location. Use this field to enter the eight character location code. The 8 Char Location functionality has to be turned on by Kerridge. This functionality gives bigger warehouses more location options. The 8 character location, along with the 4 character location, gets printed out on two pick labels: RD4 and SH2. |
| 4-Character Location ID | A 4 character code for the location. This code is the visible code used by applications (i.e., order entry, inventory) outside of IWMS. |
| Location Barcode Value | An 8-character field for the value that will be embedded in the actual barcode on the location. This is done to prevent the warehouse operator from entering an invalid location. This is sometimes referred to as the check string. |
| Description | A 30-character text field for expanded description of the location ID. |
| Location Template | The Location template used for the model of this file. |
| Area |
A 2-character ID for an area that this location is assigned. The area must be in the Area file that is within the warehouse that the location is assigned to. Type ? in this field and press Enter to select from a list of the areas assigned to the current selected IWMS warehouse. |
| Sub-Area |
A 10-character ID for the sub-area that this location is assigned to. The sub-area must be in the sub-area file within the warehouse that the location is assigned to. The sub-area must be associated with the area entered in the Area field. Type a ? in this field and press Enter to see a list of sub-areas assigned to the current selected IWMS warehouse. |
| Location Display Mask |
Select an edit mask for the display of 8-character locations in the RF System. Blank space is filled in with location data from left to right.
Example Location: 12345678 + Mask: - - = Display: 123-456-78 |
| Capacity in Cubes | The capacity of the location in the unit of measure of cubes. Enter up to nine digits and two decimal places. |
| Capacity in Weight | The capacity of the location in pounds. Enter up to nine digits and two decimal places. |
| Capacity in Height | The height capacity of the location in inches. Enter up to nine digits and two decimal places. |
| Lock/Suspense Code | Enter Y to designate that this location is locked, or suspended. A location that is locked is not considered in algorithms used to pick optimal locations in putaway operations. Locked locations cannot be picked from, or have inventory moved in or out of it. |
| Replenishment % |
Use this field to override the template setting. This field is a percentage of the value in the Capacity in Units field. An entry into the Replenishment % field automatically sets the Replish this Location field on screen 2, under Operational Parameters, to Y. A value of 0, or blank, means there is no replenishment percentage set up for this location template. If the setting Replenish this Loc field on Screen 2 is not activated, the Replenishment % field will not display. |
| Capacity in Width | The width of the location in inches. Enter up to nine digits and two decimal places. |
| Capacity in Depth | The depth of the location in inches. Enter up to nine digits and two decimal places. |
| Capacity in Units | The capacity of the location in the unit of measure designated in the field Defining CapUnits U/M. Enter up to nine digits and two decimal places. |
| Defining CapUnits U/M | The unit of measure used to calculate the capacity entered in the Capacity in Units field. |
| Pick Sequence# | Enter a sequence number that links locations in an optimal path throughout the warehouse for picking. |
| Putaway Sequence# | Enter a sequence number that links locations in an optimal path throughout the warehouse for putting inventory away. |
| Roll or Slab/Bundle Type Restrictions |
Based on the following codes, only certain types of rolls or slab/bundles can be placed in this type of location.
|
| U/M Restriction |
The unit of measure that qualifies the fields Minimum Quantity per Putaway Restriction and Maximum Quantity per Putaway Restriction. |
| Minimum Quantity per Putaway Restriction | The minimum quantity allowed to be putaway in the location in the unit of measure of the field U/M Restriction. Enter up to nine digits and two decimal places. This field keeps similar units of measure, such as pallet level quantities, in a location. |
| Maximum Quantity per Putaway Restriction | The maximum quantity allowed to be putaway in the location in the unit of measure of the field U/M Restriction. Enter up to nine digits and two decimal places. This field keeps similar units of measure, such as pallet level quantities, in a location. |
Screen 2
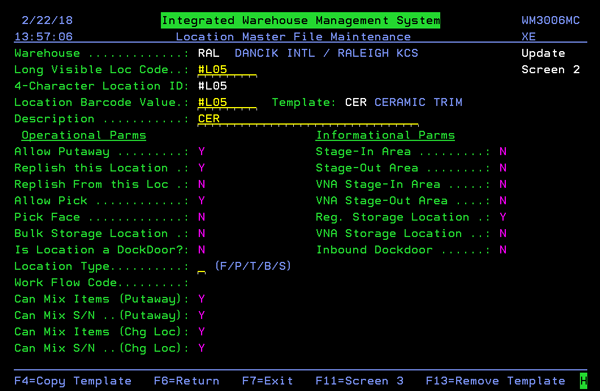
| Field | Description |
| The first six fields (Warehouse to Location Template) are a carry over from the first screen. | |
| Operational Parms | |
| Allow Putaway | Locations that can have items put into them during receiving. |
| Replenish this Location |
This location type should be replenished from other locations such as overstock, or bulk, locations. Set this to Y if this is a location that you want to replenish (i.e., a pickface). |
| Replish From this Loc | Set this to Y if this is a location where inventory is pulled from to replenish other locations (i.e., a bulk location). During the automatic replenishment process locations flagged with a Y appear as replenishment locations. |
| Allow Pick |
Locations that can have items picked during the picking/shipping process. If this setting is set to N, then ISO will not consider the location for picking. This flag is only used in the processing for ISO, if the flag is set AFTER an order is allocated to the location, then the pick will done from the location. This is useful for locations like inspection areas for returns, etc. Where you want the inventory in stock, but not available for ISO. |
| Pick Face |
This location is considered a pick face. The pick face locations are for fast moving inventory, generally close to the docks to minimize product movement. Flagging this location type as a pick face will cause the associated locations to be considered when the pick face replenishment algorithms are processed. Pick face locations can be used in conjunction with Flexible Allocation. For more information on this feature refer to Flexible Allocation. |
| Bulk Storage Location |
This setting must be activated for ISO to consider this location for full pallet picking from bulk. This setting ensures IWMS interacts with ISO to encourage that full pallets are picked from bulk storage locations. This allows you to set up ISO points for bulk locations and leave other locations, such as pick faces for smaller order quantities. |
| Is Location a Dock Door? | Signifies this location as a dock door. This comes into play when scanning inventory for shipment. |
| Location Type |
If this location represents a piece of equipment, such as a forklift, cut station, shrink wrap machine, or roll cart, put a value here that represents the type of equipment. Setting Values are:
|
| Work Flow Code |
Work flow codes can be assigned to various stages/locations of a process. For example, a cutting process can have work flow codes of rolls in normal location, forklift, cut station (with both post cut and pre-cut locations), staging area, and dock door. Workflow codes are created via option 104 - Picking Workflow Code Maintenance on Menu WM8. Use this field to identify this location in the work flow. You can then use the web based portion of IWMS to track inventory movement at each stage/location of the work flow. |
|
Can Mix Items (Putaway) Can Mix S/N (Putaway) Can Mix Items (Chg Loc) Can Mix S/N (Chg Loc) |
Enter a Y to allow mixing of items or serial numbers at this location during either the putaway or change location operations. |
| Informational Parms | |
| Stage-In Area | For inbound receiving; a holding area for inventory moving between two locations, such as the dock and the final putaway location. |
| Stage-Out Area | For outbound shipping; for inventory moving between two locations, such as the pick location and the truck. |
| VNA Stage-In Area | Location of a very narrow aisle for inbound receiving; a holding area for inventory moving between two locations, such as the dock and the final putaway location. |
| VNA Stage-Out Area | Location of a very narrow aisle for outbound shipping; a holding area for inventory moving between two locations, such as the pick location and the truck. |
| Bulk Storage Location | Used for bulk storage of inventory. Bulk storage locations are typically used to replenish pick faces and other smaller locations. |
| Reg. Storage Location | A regular storage location, which means that it is not a bulk or a VNA (very narrow aisle) location. |
| VNA Storage Location | This location is in a very narrow aisle. |
| Inbound Dockdoor | Is this location set up as a dock door location. |
Screen 3

| Field | Description |
| The first six fields (Warehouse to Location Template) are a carry over from the first screen. | |
| Suggested Sub-Area for Stage-In |
The suggested 10-character sub-area at which all material being brought into this location can be staged. The sub-area must be in the sub-area file that is within the warehouse the location is assigned to. Enter ? in this field and press Enter to select from a list of sub-areas assigned to the current selected IWMS warehouse. |
| Suggested Sub-Area for Stage-Out |
The suggested 10-character sub-area at which all material being shipped out of this location can be staged. The sub-area must be in the sub-area file that is within the warehouse the location is assigned to. Enter ? in this field and press Enter to select from a list of sub-areas assigned to the current selected IWMS warehouse. |
| Print Pick Label During Directed Picking (After or Before) |
This setting directs the system to automatically print a pick label when the location the product is being pulled from is scanned. RF users are required to scan a From location when picking inventory unless settings in the Work Station Control Panel (SET 1) or the Item Scan Override setting in the Item File (FIL 2).
|
| Enter the Printer ID for printing in Directed Picking |
This will be the default printer for this location. If a printer is entered here, the setting Prompt for Printer if this is a Forklift location should be set to N. The scanned printer is recorded in Operators File and the IWMS Browsers Operator Control panel. It is also used as the default for printing shipping labels and LPNs. |
| Is the printer location permanent (Attached to the forklift) | Activating this setting and entering a printer ID in the Enter the Printer ID for printing in Directed Picking setting directs the system to always use the used for that forklift which means a printer does not have to be scanned. |
| Prompt for Printer if this is a Forklift location |
If this setting is activated, when a user is building a pallet or confirming a pick using an RF device and menu option RF 4 they are required to enter or scan the printer they will be using for directed picking. If a printer ID is entered into the setting Enter the Printer ID for printing in Directed Picking this setting should be left blank or be set to N.
|
| The scanned printer is recorded in the Operators File and the IWMS Browsers Operator Control panel. It is also used as the default for printing shipping labels and LPNs. | |
| Does this Location trigger Directed Putaway in Change Location | When this setting is activated, and inventory is moved, the system uses directed putaway to help find an optimum location (i.e. consolidating similar inventory). |
|
Does this Location trigger Print of LPN Manifest Label? Does this Location trigger Printing of Pick/Ship Label? |
When inventory is put into the location, if these flags are set to Y, the respective label is printed. Both of these labels are for orders being shipped out, so they only apply during the picking/shipping processes. |
| This location removes order lines from LPN in Move and Status Change |
Designates that when a pallet is dropped into this location all the order lines are release from the LPN. Background information
Due to warehouse processes, there are times when the warehouse wants to dis-associate the LPN and order lines. This is typically a transfer pallet that has reached the destination warehouse. If the order lines are released, a notepad entry for the order line is be made stating that the user released the order line from the LPN. |
Screen 4

| Field | Description |
| Transfer Order Sts Code |
Use this field to automate the changing of status codes for transfers that are placed into this location. For example, if this location represents a staging area or other location related to shipping, you can enter an S here. Afterward, when inventory is located here all included material is updated to S status. To see the available status codes enter a ? in the field and press Enter. |
| Transfer Ord Sts Control |
This field controls how the RF applications are scripted when moving inventory to a location which has an automatic order status code assigned. The possible settings are:
If the Transfer Order Status code is not entered, this field is ignored. |
| Auto Order Status Code |
Use this field to automate the changing of status codes for orders that are placed into this location. For example, if this location represents a staging area or other location related to shipping, you can enter an S here. Afterward, when inventory is located here all the related material is updated to S status. It is recommended that this field be activated by entering a status code. If it is not activated, the operator determines the status codes that order lines are scanned into. To see the available status codes enter a ? in the field and press Enter. |
| Auto Order Sts Control |
This field controls how the RF applications will be scripted when moving inventory to a location which has an automatic order status code assigned. The possible settings are:
If the Automatic Order Status is not entered, this field is ignored. |
| Serial# Status to assign to inventory put in this location | Automatically assigns this status to the inventory placed in this location. The inventory stays in this status until moved or manually changed. This is used for purposes such as identifying items that are damaged and need to be inspected. |
| Does this location trigger printing of LPN labels? |
Recommended best practice is if you enter Y in the Does this location trigger printing of LPN labels setting you should choose Options 3 or 4. Options 1 or 2 do not print an LPN. Note: The Move / Status RF functionality ( RF menu option 7 ) checks the above settings to determine if an LPN label should be printed and if so how many. Associated File Automate License Plate Number on Directed Picking Build a Pallet |
| Auto generate LPN labels for Build a Pallet |
Associated File Automate License Plate Number on Directed Picking Build a Pallet |
