
Channel Management Solutions (CMS) Set-up
Starting and Stopping CMS Processes
CMS Transaction Settings (Adding Users and Partners)
Setting up IFS Directories
The IFS (integrated file system) is a part of OS/400 that supports stream input/output and storage management, similar to personal computer and UNIX operating systems, while providing an integrating structure over all information stored in the AS/400.
The key features of the integrated file system are:
- Support for storing information in stream files that can contain long continuous strings of data. These strings of data might be, for example, the text of a document or the picture elements in a picture. The stream file support is designed for efficient use in client/server applications.
- A hierarchical directory structure that lets you organize objects like fruit on the branches of a tree. Specifying the path through the directories to an object accesses the object.
- A common interface that lets users and applications access, not only the stream files, but also database files, documents, and other objects that are stored in the AS/400.
- A common view of stream files that are stored locally on the AS/400. Stream files can also be stored remotely on a Local Area Network (LAN) server, a Novell NetWare server, another remote AS/400, or a Network File System server.
You need to establish a directory structure on the AS/400 file system that the CMS application uses in transmitting and archiving transactions. Verify that your AS/400 has a CMS directory in the Dancik directory which should be located in the Home directory.
We recommend creating a generic directory for all CMS users, however it is possible to create unique directories for individual users.
To establish an archive directory for the directory shown above, you can enter the following directory: MD/Home/Dancik/CMS/CMSuser/Archive.
An additional directory must be created for outbound price catalogs. It should be similar to the following: /Home/Dancik/CMS/catalog.
Step-By-Step
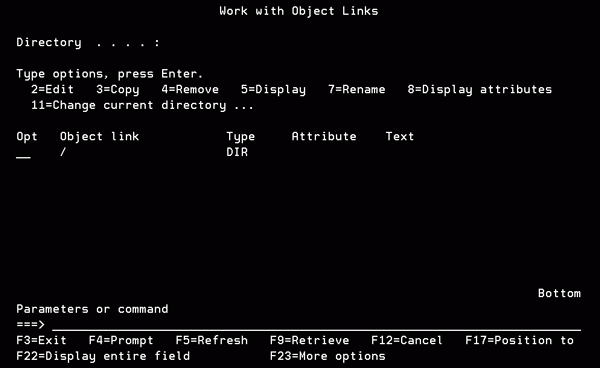
- To get to the root directory enter WRKLNK / on the command line and press Enter. The root directory is displayed.
- To drill down into the root directory to get to the CMS directory (if one already exists), use option 5 - Display to display the contents of the directory.
- Drill down through the directories until you get to HOME/Dancik/CMS.
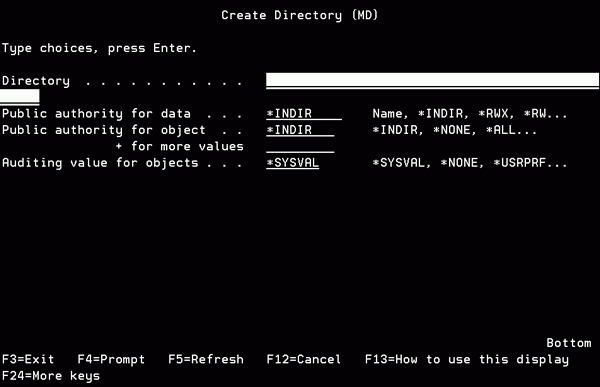
- To add a new Object Link to the CMS directory, enter MD on the command line and press Enter. The Create Directory screen appears.
- Keep in mind that you want the directory to mirror the directory entered using the GUI portion of CMS.
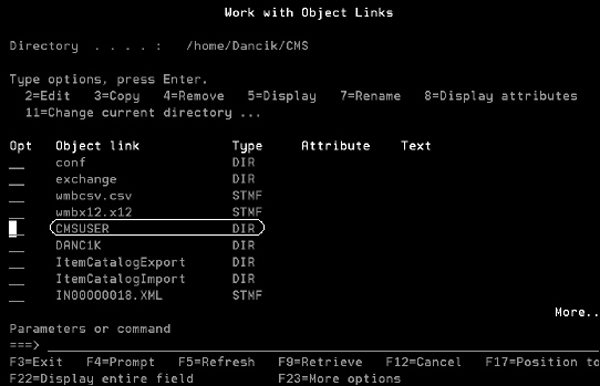
- Enter the new directory name (CMSUSER) and press Enter, then F5 to refresh the screen. The new link appears within the directory.
- You can make individual directories for all of your CMS users (home/Dancik/CMS/Gbrannen), or you can make one such as CMSUSERS.
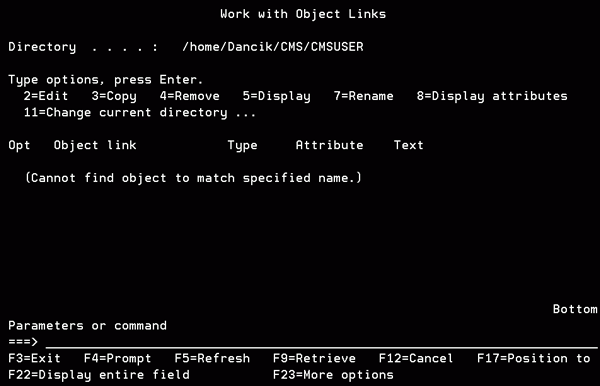
- The next step is to create an Archive directory. Enter a 5 in the new link (CMSUSER) and press Enter. If this is the first object input into this directory, you will see the following screen.
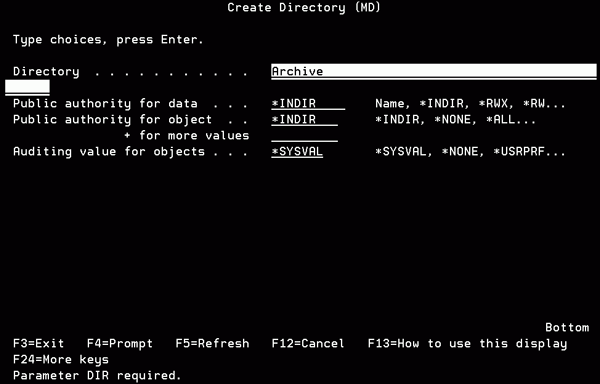
- Enter the command MD on the command line and press Enter. On the screen that appears, enter Archive as the Directory name.
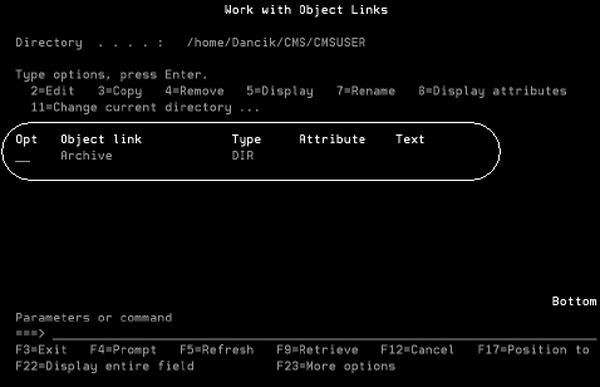
- Press F5 to refresh the screen. The new link, Archive, displays.
- This is where all CMS transactions are archived for the time limit you set (60 days, 90 days, etc.). If you set all your CMS users up to use the same directory (CMSUSERS), you only need one archive link. If you set up all your CMS users individually, you will need to establish an archive account for each of them.
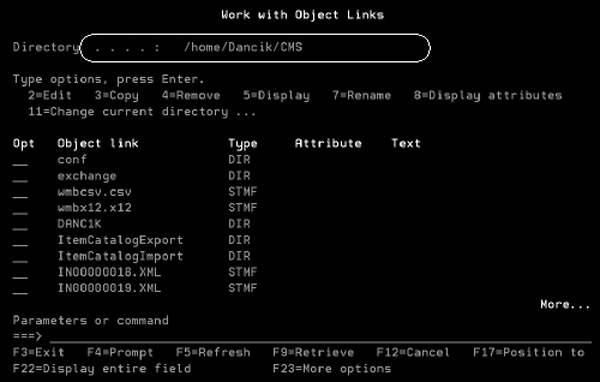
By default the CMS directory contains a conf sub-directory. This folder contains data specific to your configuration of CMS and does not require any direct access by CMS users or administrators.
CMS License Keys
In order to retrieve license keys, you need to supply support with the following:
- Host Name
- Domain Name
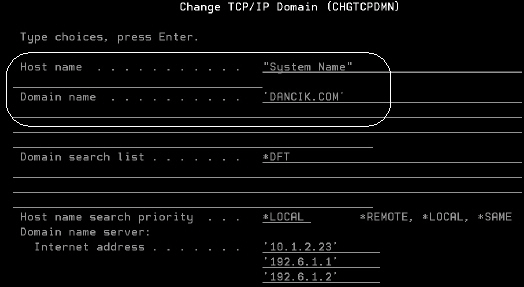
Both settings are accessed by entering CFGTCP on a command line to access the Configure TCP/IP screen.
Select option 12 - Change TCP/IP domain information. The Host name and Domain Name are displayed on this screen.
CMS Global Settings
These settings are made via the CMS Menu. This settings affect all transactions, unless overridden by specific transaction entries.
1. Access the Channel Management Support Menu (CMS) and select option 20 - Schedule Automatic Processing & Maintain Global Settings. The CMS Timer and Settings screen appears.
2. Press F10 - Global Settings.
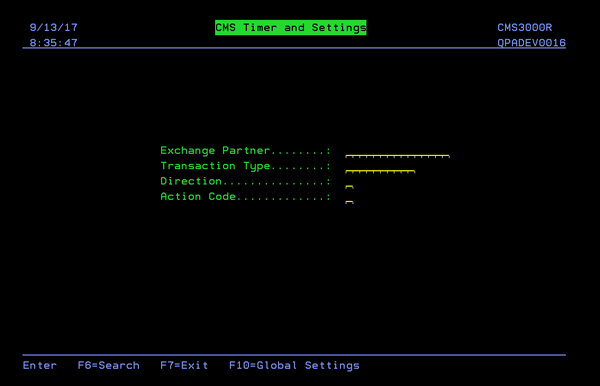
The Global Settings screen appears.
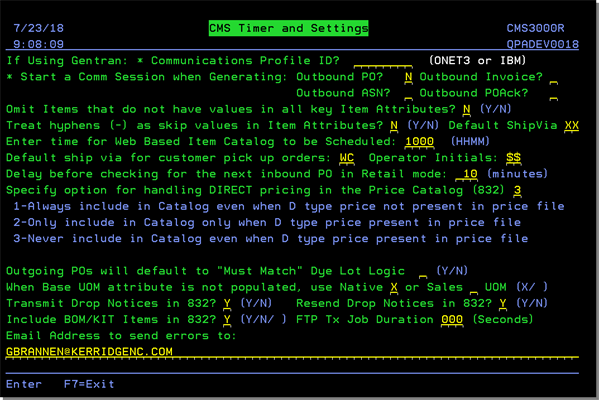
| Setting | Description |
| Communications Profile ID |
This settings defines the communication profile passed to Gentran during execution of the transaction and establishes the VAN to use. Unless special arrangements have been made to have this field hard-coded, there can only be two entries into this field: ONET3 or IBM. To check a partner's Communications profile follow this path:
|
| Omit Items that do not have values in all key Item Attributes | Entering a Y in this field, to ensure items with missing values in any of the 5 item attributes (Style Number, Product Type Description, Style Name, Color Name, Color Number) are excluded from the transmitted file. |
| Treat hyphens (-) as skip values in Item Attributes |
This global setting, when set to Y, eliminates an item from being sent if one of the attributes has a hyphen in it. It considers that attribute blank. Item attributes, and their associated settings, are created via the Master Attributes File Maintenance (SET 31). They are assigned to items through the Item Attributes screen on the Item File Profile screen. Values for the Item Attributes (i.e. sandstone is a value for the attribute Color Name) can be created through both the Master Attributes File Maintenance and Item File programs. If a value is created through the Item File, it automatically gets added to the Master Attributes File. |
| Enter time for Web Based Item Catalog to be Scheduled | The scheduler allows for daily or monthly (always executed on the first of the month) scheduling. The web interface pulls the time from the global defaults. |
| Default ship via for customer pick up orders | If there is not a ship via code identified in the partner settings the ship via code entered here acts as the default for customer pick up orders. |
| Operator Initials |
These initials are recorded and can be used later for tracking/auditing purposes. The value entered in this field is also the ID used to determine the set of parameters against which an order will be evaluated against the hold options set up via the System Wide Setting - Options for Order Hold Process. |
| Delay before checking for the next inbound PO in Retail mode | Enter the number of minutes you want to wait. |
| Specify option for handling DIRECT pricing in the Price Catalog (832) | Select one of the three options for direct pricing. Direct pricing records are identified with a D. |
| Outgoing POs will default to Must Match Dye Lot Logic | This setting allows you to automatically direct the system to ensure that items are from the same dye lot. Essentially this setting identifies in your outbound POs to your suppliers that you want the dye lots to match for the items you are ordering. |
| When Base UOM attribute is not populated, use Native or Sales UOM |
Base Unit of measures are assigned to items in the Item Attributes portion of the Item File. If the Base Unit of measure is not populated or created, the system uses the Native or Sales UOMs from the Item File profile screen. This setting works in conjunction with sending item size variables in the G39 segment of the 832 Price Catalog. This added information makes the price catalogs transmitted via CMS fcB2B compliant. |
|
Transmit Drop Notices in 832? Resend Drop Notices in 832? |
Once an item has been dropped from the distributor system this information can be transmitted in an 832. Rules for Drops:
Logic for identifying dropped items:
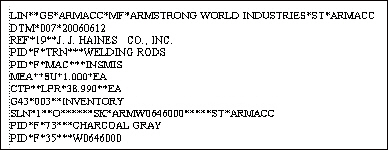
The X12 for a non-drop item appears as follows.
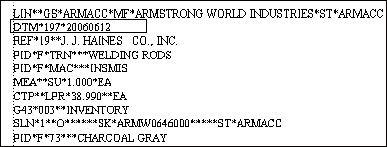
The X12 for a drop item appears as follows where the item is a drop and has met the conditions for transmission on the date indicated in REF segment. Notice the DTM *02 has a value of 197 and the DTM*03 date of transmission is in YYYYMMDD format.
|
| Include BOM/KIT Items in 832 |
If this setting is activated, the B2B catalog provides items from the bill of material file as associated items to the master item. This feature allows catalog recipients to see the recommended trim and accessory items for each product, just as when your customer service views them on the Order Entry screens. Rules for Item Inclusion on the BOM
Files Associated with BOMs:
|
| FTP Tx Job Duration |
This setting allows you to enter a time in seconds that will monitor and end CMS transfer jobs if they are no longer productive. Use of this setting can help eliminate CMS jobs getting hung up if an error occurs during the FTP transfer process. This setting applies to all CMS inbound and outbound processes initiated by scheduled CMS transactions. How it works:
|
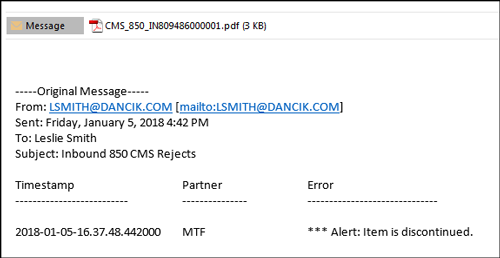
| Email Address to send errors to: |
This functionality provides an alternative to manually checking the CMS Outqueue daily to look for rejects. This trigger based automation sends an email out when a CMS order is dropped. The CMS Outqueue, based on Partner ID, is included as an attachment in the email. This is where you store the recipient's email address. The From email address is entered via menu option Initial Distribution Options (ODS 2).
Example EmailNotice the CMS Outqueue is attached.
|
Starting and Stopping CMS Processes
CMS is started using the CMSSTART (CMSSTART2 for the retail environment) command and ended with the CMSSTOP command.
Note: Refer to Start/Stop CMS (CMS 50 to CMS 53).
Starting the CMS Java Server
CMS is a Java based application. To start the server that runs and then applies the Java instructions, enter the command STCPROD (Start Tomcat Production). If this command is not issued, and the web portion of CMS is being used, then the error message Page Not Found appears.
If you are experiencing a lot of Java problems or poor performance, you can issue the command ETCPROD to stop the Tomcat server. Then re-issue the STCPROD command. This is like restarting a PC.
CMS Transaction Settings (Adding Users and Partners)
The Administration and Logging tabs on the CMS web application allow you to configure CMS Transaction Settings.
Administration
The Administration tab identifies the users, partners, and global connections for your CMS system.
This section details the steps required to establish the users, trading partners, and database connections that CMS uses. These important elements are defined below.
- Users are the individuals who access the application to establish partner and document exchange parameters. Users may also review transaction logs to audit document exchange activities. All profiles used to initiate night jobs should be added.
- Partners are added in the CMS application for suppliers and/or customers with whom documents are exchanged.
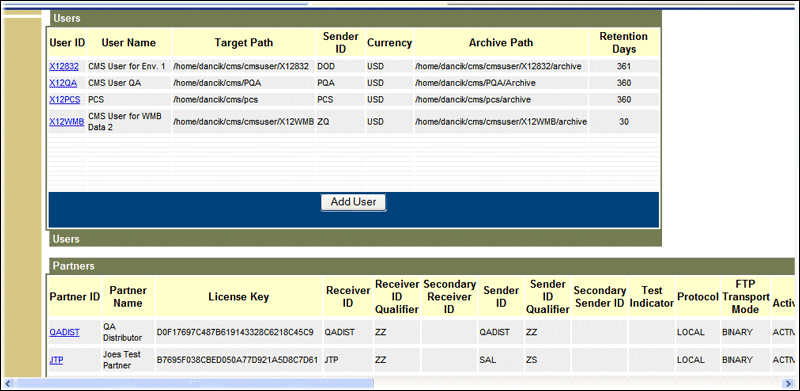
Adding Users
Enter users by clicking Add User and adding the appropriate information in each field.
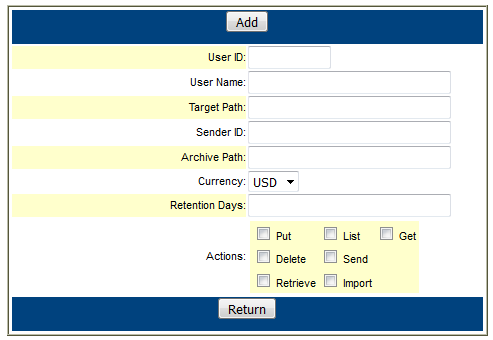
- User ID - A short identifying name for the user. Use the I-series (AS/400) user ID here.
- User Name - The complete name of the user.
- Target Path - The path to the directory where the CMS information is stored. Refer to Setting up IFS Directories for instructions on how to set up this path. The information should be stored in an area where it can be accessed by all who need to use it. For example:/Home/Dancik/CMS/CMSUSER.
- Sender ID - In most cases, this value is established for each partner. You may enter a global default value such as your corporate phone number.
- Archive Path - Every CMS transaction automatically gets archived after it is processed. Enter the path to the archive folder. Refer to Setting up IFS Directories for instructions on how to set up this path. For example: /Home/Dancik/CMSUSER/Archive.
- Currency - At the present time, there are two choices: American (US) or Canadian (CA) dollars.
- Retention Days - The number of days a file stays in the archive directory. When the time expires, the transaction is deleted from the system.
- User Action Codes - These codes determine what a user can do within CMS. For example, unless the Delete action is activated, a user cannot delete transactions. Activate all options here.
After entering all the information, click Add at the top of the box.
To edit a user information or level of access, click on the User ID. This brings up the Add User window with the users information entered.
Adding Partners
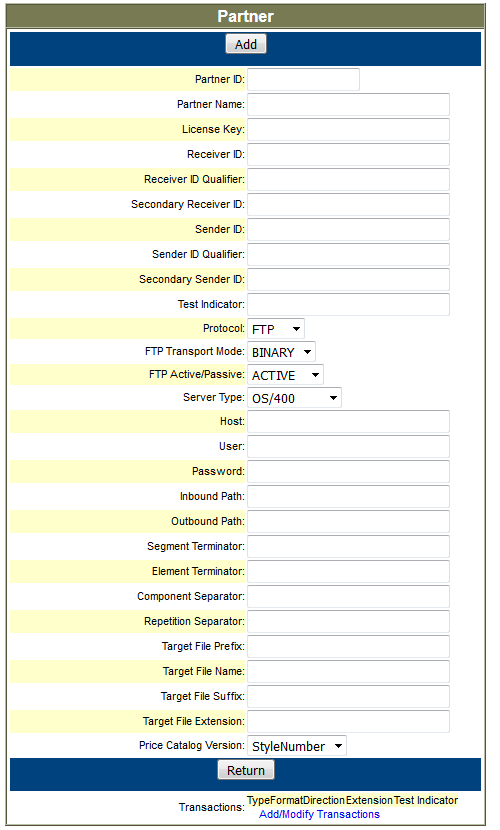
Partnerships are established for businesses who you will be exchanging documents with. Add partners by clicking Add Partner.
| Setting | Description |
| Partner ID |
The identification code or name used to identify the trading partner. This ID should be supplied by your trading partner as their identifying code. It should not be assigned by you on behalf of your partner without their approval. This value must match the partner ID entered in the CMS Settings (refer to CMS Global Settings). The Partner ID is element 6 in the ISA segment. The partner ID cannot be longer than 10 characters. |
| Partner Name |
The full name of the CMS business partner you are doing business with. Do not use apostrophes when entering the partner name. There are two reasons why, The first is that any setting containing an apostrophe is truncated. For example, Gary's Palace of Floors would end up being Gary. Secondly, the value of the field is URL-coded (which means special character values are converted before the page is submitted) so the apostrophes are converted to ' before being written to the CMSConfig.xml file. For example, if Gary's Floor Source is used for the Partner ID, the resulting value in the CMSConfig.xml file will be Gary's Floor Source. |
| License Keys | Contact customer service department at 919-379-3715 to obtain the license keys. License keys are unique to the partner. |
| Receiving ID |
The identification code or name used to identify the receiving partner. |
| Receiver ID Qualifier | Populate this field when a value is used in the Receiver ID field. It tells the partner what type of identifier has been used. Common values are 14 for telephone numbers, or ZZ for user-defined codes. |
| Secondary Receiver ID | This value may be populated with a unique code when further identification is required for a trading partner. |
| Sender ID | This is a unique code that identifies your company to the trading partner. Often times telephone numbers, Dunn and Bradstreet Numbers, or Tax ID numbers may be used. |
| Sender ID Qualifier | This value is populated when a value is used in the Receiver ID field and tells the partner what type of identifier has been used. Common values are '14' for telephone numbers, or 'ZZ' for user-defined codes. |
| Secondary Sender ID |
This value may be populated with a unique code when further, more specific identification of your company is required for the trading partner. A Secondary Sender ID is not a backup value to the Sender ID. If a Secondary Sender ID is assigned it overrides the Sender ID. |
| Test Indicator | Enter either a T for test or P for production. This value is used on all documents sent to this partner unless the Test Indicator value has been set individually for each document. |
| Protocol | This field should be populated with FTP in standard CMS implementations. When CMS is used in conjunction with 3rd party products such as AS2 Client from Sterling software it should be set to LOCAL. |
| FTP Transport Mode | Enter BINARY to ensure that the data sets generated by are transported using BINARY (representational) character set. |
| FTP Active/Passive | Depending upon the capabilities of your firewall product it may be necessary to set this value to PASSIVE. ACTIVE is the preferred setting. |
| Server Type | The operating system the CMS partner is using. There are two choices: OS/400 system and a non OS/400 system. |
| Host | The domain name or IP address of the FTP server where the partner mailboxes are located. |
| User | User ID for the FTP server. |
| Password | For User ID specified above. |
| Inbound Path | Specifies a location for depositing inbound transactions. This location acts like a mailbox for transactions coming into your system. An example path is /ftproot/2250/inbox. |
| Outbound Path |
This is where outbound transactions are deposited. Most FTP severs support locking the user to specific directory in the root. However, some FTP servers display the path in which their directory resides. This type implementation is know as an absolute path. WSFTP server is an example of this type implementation. Other FTP servers support a relative path in which the users home directory is the only directory structure ever displayed. When implementing partners on an FTP server such as WSFTP it will be necessary to configure the server to show the entire directory structure as well as include this entire directory structure in the Inbound Path and Outbound Path parameters. In order to prevent users from accessing other directories in the path, you should restrict their access to all folders in the path except their home directory and the in and out directories within it that directory. Most FTP servers support a relative directory model in which the users home directory is the only directory which is visible to them. When implementing partners on these FTP servers (UNIX type) you need only configure the inbound and outbound path parameters on the CMS partner settings with the directories visible from their home directory. For example, on a WSFTP server user KerridgeNC is locked to KerridgeNC directory which has been created in a directory called FTPACCTS. When the user signs into the FTP server they are placed in the KerridgeNC directory and can see an INBOX and OUTBOX directory. For CMS to retrieve documents from the OUT directory, the CMS Partner Settings needs the following value in the inbound path parameter:/FTPACCTS/Dancik/OUT. The inbound and outbound paths cannot be the same. |
|
Segment Terminator Element Terminator Component Separator Repetition Separator |
These settings allow CMS to use EDI and X12 settings. This enables CMS to translate EDI documents. These terminator settings are used to specify the characters used as EDI X.12 data separators, in the case where a partner specifically requires certain characters to be used when transmitting data to them. |
| The next group of settings allow you to assign detailed names and extensions. This can help in organizing the transactions. | |
| Target File Prefix | *control |
| Target File Name | . is permitted, but not required. |
| Target File Extension | *transaction |
| Price Catalog Version |
The floor covering B2B standards include an agreed product hierarchy of Style and Color. These terms are based on traditional carpet industry product category conventions.
Color level pricing allows you to override style pricing for individual items based on color/SKU#. |
Click Update to add the new partner.
The next step is to establish the documents you will be exchanging with this partner. Click Add/Modify Transactions, at the bottom of the Add Partner box. From this screen you can add, update, or delete transaction types.
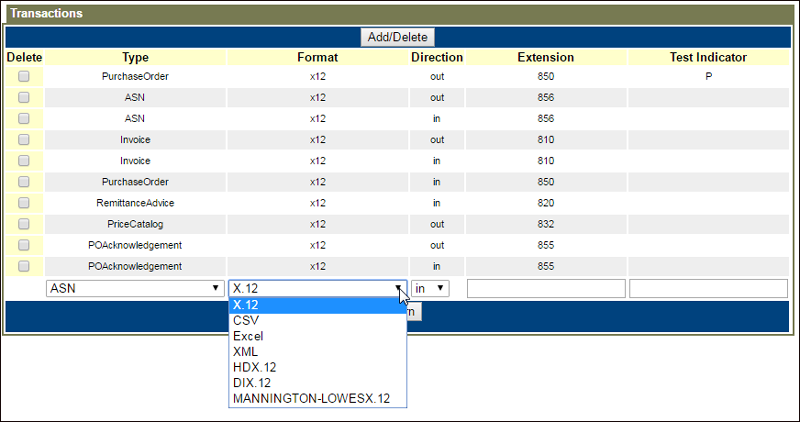
CMS transaction by Partner configuration is limited to 12 documents per partner. Please note that the user interface doesn't block you from adding more than 12 transactions however doing so results in corruption of the existing transaction configuration.
CMS gives you the following choices:
| Setting | Description |
| Type |
|
| Format |
X.12 is the default and should be used exclusively for all CMS transactions. These are special formats used for specific implementations and should not be chosen as a general format.
|
| Direction | Inbound or outbound |
| Extension | These settings help identify the transaction. The standard B2B extensions are used. |
| Test Indicator |
T or P Once testing is complete, you may be asked to switch the Test Indicator value to P (Production). |