
Accounts Receivable End of Month
Officially Begin EOM Period - EOM 2
Print Monthly AR Sales Reports - EOM 3
Print Monthly AR Cash Reports - EOM 4
Prepare Files for EOM Processing - EOM 5
Print AR Aging Reports by Company/Account Number - EOM 6
Print AR Aging Reports by Branch/Customer Name - EOM 7
Print Statements and Collection Letters - EOM 8
Print AR Detailed Aged Schedule - EOM 10
Reset Files and Officially End EOM Period - EOM 12
Close the month for accounts receivable only after all transactions for the month have been posted. If your invoicing system is linked to receivables, you must wait for Night Jobs to post receivables entered through the invoicing during the day. You can run the Abbreviated Night Jobs during the day to force invoices and A/R to be processed as part of the current month before month-end. Make sure there are no batches of sales or cash that have been edited but not posted. Batches edited, but not posted, can remain on the system, but they will be posted in the following month. Decide which month want to post each batch to and proceed accordingly.
All companies and branches are closed at the same time. However, this does not mean that Order and Invoice processing must stop. Once End-of-Month (EOM) is declared (option 2 on End-of Month Menu, the system automatically stores all invoices for posting to the next month. Order and Invoice Processing personnel can proceed as usual. However, posting of cash and other transactions directly to A/R must stop. However, the system simply issues the message, Cannot post, End-of-Month is underway, if anyone tries to post. Also, note that you can still enter and edit cash and sales. You just cannot post it until EOM is completed.
Running AR End-of-Month also closes inventory for the month. Any receiving or adjustments done before the last step of End-of-Month is considered the current month.
- EOM procedures are accessed via the EOM menu.
- Run option 1 - Update EOM Aging Dates. A Balance Report will automatically print.
- Pause, check to see that the Balance Report shows OK TO UPDATE.
- Run option 2 - Officially Begin EOM Period.
- Run options 3 - Print Monthly A/R Sales Reports and 4 - Print Monthly A/R Cash Reports. At this time, wait for reports to process and check that sales and cash totals agree with any controls you keep for these figures.
- Run option 5 - Prepare Files For EOM Processing.
- Run options 6 through 10. These reports will be loaded onto the job queue and run in sequence. Wait until they print and make sure all the month's transactions appear as they should. You may skip any report in options 6-10 if you do not want them printed. You can run these reports more than once, utilizing the many options, such as running for separate companies, branches)
- After all reports have been reviewed and approved, run option 12 - Reset Files & Officially End The EOM Period. Reset files and optionally make a diskette backup. This option updates files and takes a few hours to complete. It is advisable to run this job at night since it requires a dedicated system.
The A/R EOM menu is arranged sequentially. You must run each job in the order it appears on the menu. The breaks that appear in the menu, after option 4 and after option 10, represent a break in time, where you should wait for previously requested reports to process and be reviewed before proceeding with the next step.
Officially Begin EOM Period - EOM 2
You use this program to officially declare that the EOM processing is underway. It sets a flag on the system that prevents other users from accidentally posting additional information.
1. On the AR End-Of-Month Close Menu, enter option 2 - Officially Begin EOM Period. The Beginning End-of-Month screen appears.
2. Enter Y to begin the end-of month processing.
Users who try to post A/R transactions while the EOM flag is on will get the message, Cannot post now, end-of-month processing is underway.
When the system returns to the End-of Month menu, the flag has been set.
Print Monthly AR Sales Reports - EOM 3
You can run EOM AR Sales reports immediately after entering the previous step, Official Begin EOM Period. You do not have to wait for the sales reports to print. This step loads a series of reports onto the job queue for processing that are useful for future reference and auditing. All sales for the month are included on each report, except as otherwise noted. Each is sorted differently.
The following reports are included:
- Monthly sales by invoice date
- Monthly sales by transaction code - This report sorts and sub-totals cash receipts by the transaction codes of the sales transactions the cash was applied to. For example, you can list how much cash was applied against regular invoices, versus direct ships, versus interest charges. If you would like to track how much payment you have received against interest charge invoices, this report shows that figure as the subtotal of transaction code 0X, which is the code for interest or service charges.
- Monthly sales by customer account number
- Monthly audit report - that shows sales to other than assigned branch
Print Monthly AR Cash Reports - EOM 4
You can run EOM Cash reports immediately after entering the previous step, Print Monthly A/R Sales Reports. This step loads a series of cash reports into the job queue for processing, that are useful for future reference and auditing. All cash receipts for the month are included on each report, except as otherwise noted. Each is sorted differently.
The following reports and listings are included:
- Monthly cash by payment date
- Monthly cash by transaction code
- Monthly cash by sales transactions code
- Monthly cash by customer account number
- Monthly audit report - that shows cash to other than assigned branch
- Additional Copy of monthly A/R summaries
- Unapplied Advance Deposit Listing
- AR Cash Receipts By Sales Transaction Code
Prepare Files for EOM Processing - EOM 5
This step should only be run after steps 1 through 4 on the End-of-Month Reports & Procedures screen have been completed, and the cash and sales reports have been printed and approved. This step prepares files for the other EOM reports, recalculates aging dates, and optionally assesses interest charges for your system. A report listing the interest charge calculations is printed.
No other terminals should be using the AR system while this job is running. Also note that updating BillTo file records while this job is running can cause delays. This job pauses until the BillTo update is complete.
Before running this option, you must be familiar with the aging options set for your system. You must know how your system ages invoices before deciding which options to take. If you will be assessing interest/service charges, you must also know which method (A or B) to use.
- On the A/R End-Of-Month Close Menu, enter option 5- Prepare Files for EOM Processing.
- Enter Y to continue. The next screen presents you with four options for figuring interest.
- Enter the number of your selection and press Enter.
The next series of screens that appear depends on how you want to calculate interest.
Options 1 and 2
If you enter option 1 or 2 the following screen appears.
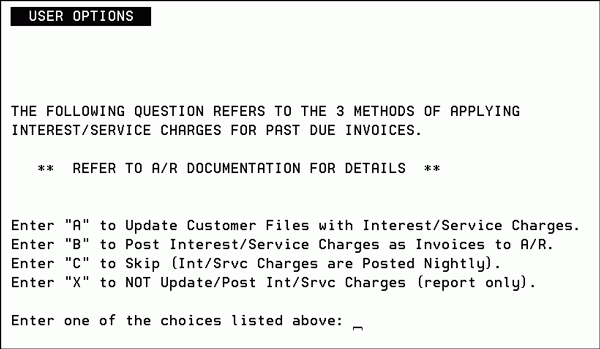
Enter A, B, or X and press Enter.
Options A and B relate to Method A and Method B Interest/Service Charges, as described in Special Functions and Concepts.
Make sure you understand these options before making your selection. If you use Method B, which creates interest charge invoices, you have the option of running interest program at any time of the month. Therefore, if you run it mid-month, do not run it again now.
The System Wide Setting - Options for Accounts Receivable includes the setting Options for service Fees Method A and Method B. This setting provides control over whether to charge additional fees on late service fees (also referred to as compounded interest fees).
Option 3
If you entered option 3 the following screen appears.

Enter a date span and press Enter.

Enter A, B, or X and press Enter.
- Options A and B relate to Method A and Method B Interest/Service Charges, as described under Special Functions and Concepts.
- Make sure you understand these options before making your selection. If you use Method B, which creates interest charge invoices, you have the option of running interest program at any time of the month. Therefore, if you run it mid-month, do not run it again now.
Option 4
This option does not post interest charges.
Reports
The following reports are produced after running option 5.
Past Due Invoices Subject to Interest/Service Charges
Interest Calculation Report
Associated Files
- Interest rates are assigned via the Monthly Interest Rate setting in the Billto (Customer) File (FIL 1).
- The System Wide Setting - Options for Accounts Receivable includes the setting Options for service Fees Method A and Method B. This setting provides control over whether to charge additional fees on late service fees (also referred to as compounded interest fees).
- AR Ledger Screen (menu option AR 16) - Allows you to check the interest charge calculations.
Print AR Aging Reports by Company/Account Number - EOM 6
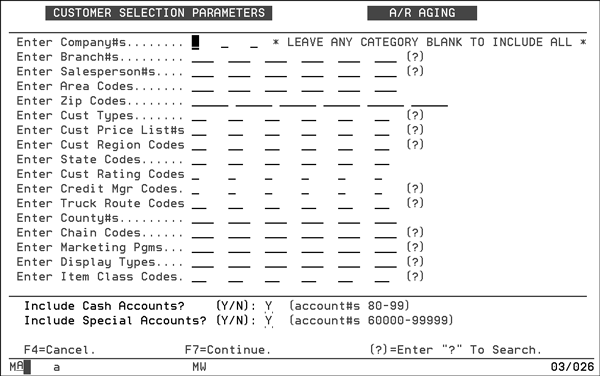
- On the End-of-Month Reports & Procedures screen, enter option 6 - Print A/R Aging Report by Company#/Account#.
- Enter Y to run the A/R Aging report by Company/Account number. The following screen shows the screen where you to select parameters to define your customer.
- Enter the necessary parameters or leave a field blank to include all the information in that field.
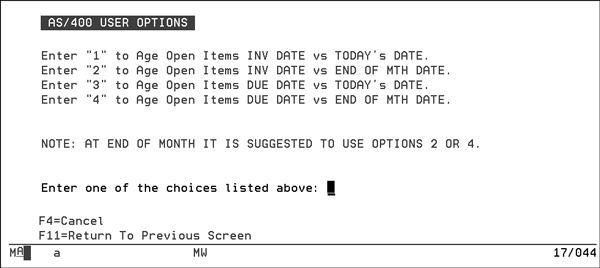
- Press Enter to enter the parameters, and then press F7 to continue the process. The next screen presents four aging options. We recommend that you use option 2 or 4 for end-of-month closing.
- Enter an option and press Enter. The aging report is generated and sent to the job queue
Print AR Aging Reports by Branch/Customer Name - EOM 7
This step loads the aging reports onto the job queue for processing. Both reports print a single line for each account number showing total due and the aging breakout (current, over 30, over 60, over 90 and over 120) The only difference in the reports is in the way they sort. The first report sorts by account number, and the second report sorts alphabetically by customer name. Both reports subtotal by company. If multiple copies are needed, you can run these reports as many times as needed.
The system offers you many aging options and you should know:
- Which default option has been chosen for each company on your system
- How you want to run the aging reports when an option is requested
Many other aging reports are available from the AR Reports Menu. You can run aging reports for specific salespeople or branches. If you want to include other aging reports and versions in your EOM run, use this option and the AR Reports menu as many times as needed, either now or right after the month-end close is complete.
Print Statements and Collection Letters - EOM 8
This option manages the printing of statements for all applicable accounts on your system. It can also print a collection letter for any account that has a balance due and no activity in the past 30 days.
- On the End-of-Month Reports & Procedures screen, enter option 8 - Print Statements & Collection Letter. The system prompts you to continue the process or quit.
- Enter Y to Continue Running Statements & Collection Letters, and press Enter. The system then prompts you to enter a company number.
- An include/omit (I/O) parameter is included in the AR EOM Statement process. This feature gives you more control over the information contained in these reports. The Include (I) option runs the report only for the entries you make. The Omit (O) option runs the report for all the branches, chains, and/or credit managers except the ones you enter. Enter the necessary information and press Enter.
- The system prompts you to enter a statement date. Type in the date that you want to appear on the statements and collection letters in MMDDYY format and press Enter.
- The next screen lets you to choose whether or not the statements and letter are not for an end-of-month run.
- If you are running this step as part of the EOM process, enter 1. If not, enter 2. Press Enter. The system prompts you to select a format for the statement.
- Enter 1, 2, or 3, and press Enter. The system prompts you to enter another choice.
- Enter option 1 or 2 and press Enter. The system prompts you to select how you want to sort the statements.
- Enter option 1, 2, or 3, and press Enter to return to the menu. The statements and collections letters, if you requested them, are now on the job queue and will soon be ready to be printed.

In Australia, statements will automatically switch printed date to DDMMYY format.
Balance forward statements show the beginning of month balance, followed by a chronological listing of only the current month's transactions.
Open item statements list each open invoice, regardless of how old.
Both formats show totals and aging breakdown.
These collection letters may only be necessary if you are using the balance forward statement option. This is because customers with no activity in the current month would not receive a balance forward statement. The collection letters are printed on the statement forms and include three different messages depending on whether the account is over 30, 60 or 90.
Print Ledgers - EOM 9
You can print a complete ledger sheet showing the current status for each account. A single page or more prints for each account showing:
- each open invoice in date order
- total payments against each invoice
- descriptions
- aging and ten-year sales analysis
We recommend that you run either the Ledgers or the Detailed Aged Schedule, but not both.
Print AR Detailed Aged Schedule - EOM 10
You can print a detailed version of the aging report that, for each account shows every open invoice aged separately into current, over 30, over 60 or over 90. If you need multiple copies of this report, can run it as many times as necessary.
Reset Files and Officially End EOM Period - EOM 12
This step actually closes the month and resets all of the A/R files, Order files, and Inventory files for the new month. It also removes old history records. Open transactions are not affected regardless of how old they are. All workstations, except for the one running EOM, must be signed off. Because this step can take a few hours to run, we recommend that you run it at night before running the Night Jobs. Because of the extensive processing and file updates that are run within this step, you should report any power failure or error message immediately. Also note, you should never cancel any EOM program.
In order to prevent mistakes and problems during the EOM process, step 12 - Reset Files & Officially End The EOM Period runs only on the job queue. This ensures there will always be a log generated to verify the process. Furthermore, the program automatically skips running step 12 if it has already been completed. The application verifies EOM has completed, and automatically generates a message on QSYSOPR if step 12 is submitted more than once.
This program officially ends the EOM period and allows processing for the next month to begin. When it is finished and lifts the restrictions set by step 2, you can proceed to enter transactions for the new month.
- On the main End-of-Month Reports & Procedures screen, enter option 12 - Reset Files & Officially End the EOM Period. The system lets you choose whether or not to run to job.
- Enter Y to continue the process. The system reminds you to sign off all other terminals.
- Prepare the system as instructed in the message. Do all preliminary EOM steps and sign off all terminals. Then type Y and press Enter.
- You can request to run both night jobs and normal backup procedures as part of the final step of your end-of-month procedures. Follow these procedures to run all of these jobs:
- Run the final step of the EOM procedures (option 12) specifying to run from the job queue and not to also run night jobs.
- After the final step of the end-of-month procedure is on the job queue or is running, run Night Jobs normally, but specify that it should run now rather than on a timer. You can also specify backup instructions. Night Jobs and Backup is placed in the job queue directly behind the EOM job.
- You should only run EOM and Night Jobs in a single night if your system can finish both jobs before the next business day.