DNAV - Online User Settings (D24 2)
Decor 24 - F13 Function Key (CMS Options)
These settings control the configuration and functionality of DECOR 24 on an individual user. User settings give you the flexibility to limit users to specific accounts and information. They have precedence over the global settings.
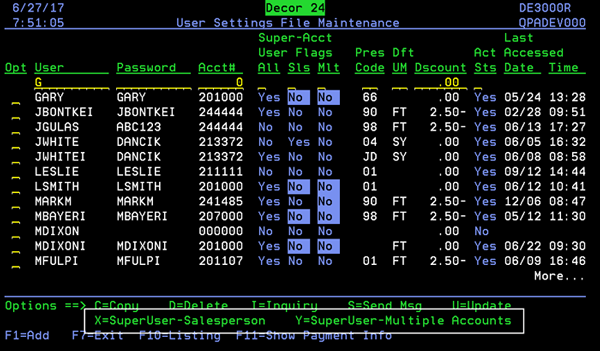
When you first access user settings, a screen appears that allows you to pick the user profile you want to work with. You can use F1 to add Decor 24 users.
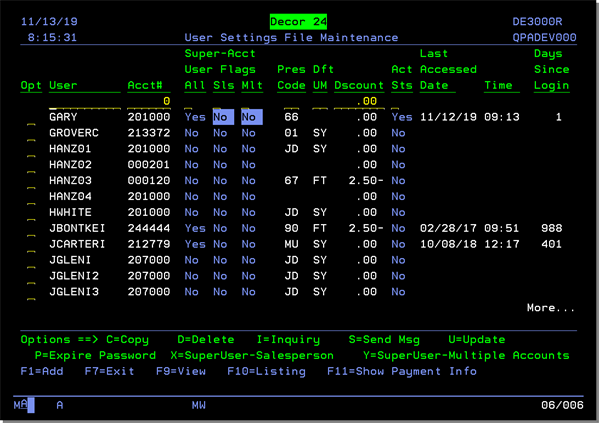
The following table provides descriptions of the functions available on the User Profile Selection screen.
|
Function |
Description |
|
C=Copy |
Lets you copy a user's settings and use them for another user. |
|
D=Delete |
Removes the selected user from the system. |
|
I=Inquiry |
Allows you to view, but not change a user's settings. |
|
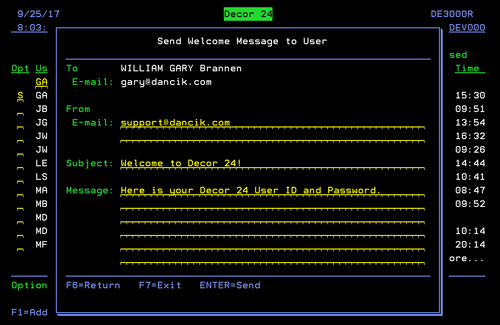
S=Send Msg |
This option is set up to send a Welcome Message to new users or a Password Reminder message. Use this option, and screen 13 of the Presentation Settings, to customize messages to each user. To see the details behind a message, select it and press Enter.
Text defaults for both the Welcome and Reminder messages are set using Screen 13 of the Presentation Settings (D24 3). |
|
U=Update |
Lets you update a user's settings (i.e., password, presentation code, default account, order entry allowed). This access should be given out sparingly. |
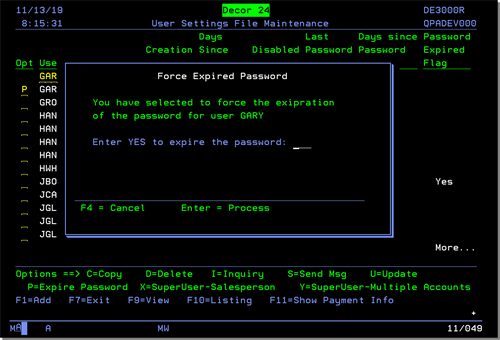
| P=Expire Password |
When P is entered into a user Opt field the following message is displayed.
If Yes is entered into the field Enter YES to expire the password, a Yes is also entered in the Password Expired Setting on the main User Settings screen.
|
|
X=SuperUser-Salesperson |
Enables you to specify multiple salesperson numbers for user access. A profile can only be set-up using either the SuperUser Salesperson or Multiple Accounts option not both. These settings are covered in detail under SuperUser Settings. |
|
Y=Superuser-Multiple Accounts |
Enables you to specify multiple accounts for a user to have access to. A profile can only be set-up using one of these settings. This setting is covered in detail under SuperUser Settings. |
| F9=View |
The following additional fields are accessed by pressing F9 - View.
|
|
F10 - Listing |
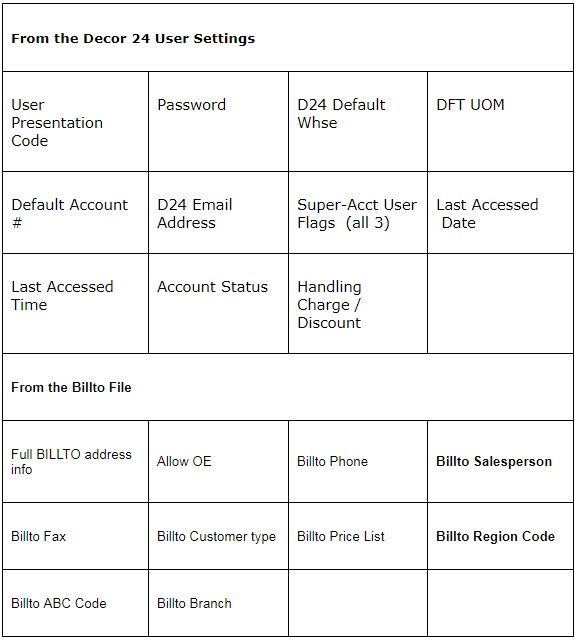
Produces a spreadsheet, that gathers user information from the Decor 24 User Settings (menu option D24 2) and the Billto File (FIL 1). This setting is covered in detail under Decor 24 User Settings Report. |
|
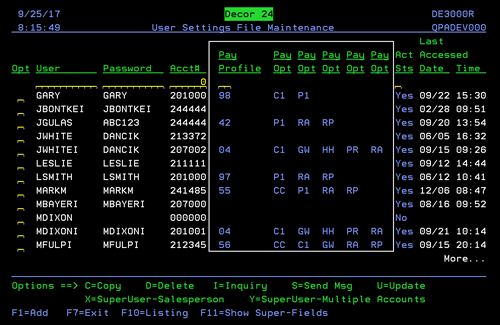
F11=Show Payment Info |
This function key allows you toggle between Showing Online Payment Information and the Super-User Fields. The default is to show the Super User
settings.
Press F11 to display payment information.
The Payment Profile comes from the Payment Profile assigned to the user via menu option D24 200. The options listed are the user defined payment code options available to the user via their payment profile. Some typical examples of payment options are: Remittance Advice and Payment Request. The payment options are added to the Payment Profile via the F9 function when adding or updating a Payment Profile. For more information on making payments in Decor 24, refer to DNAV - Online User Settings (D24 2) |
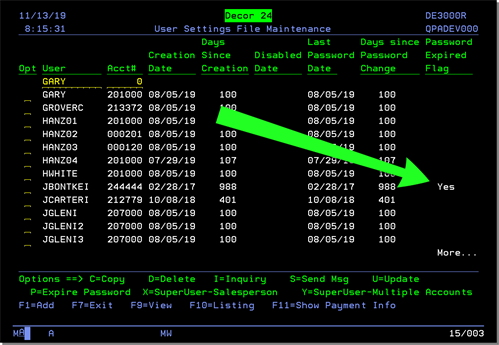
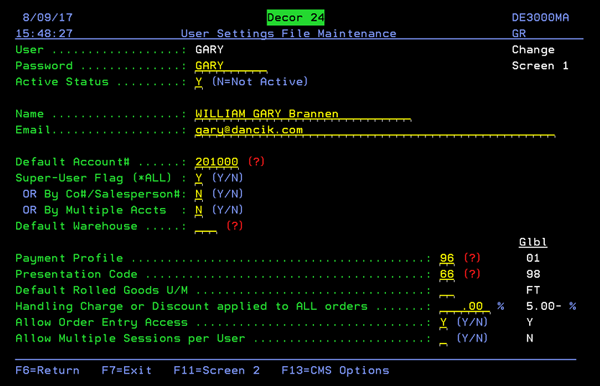
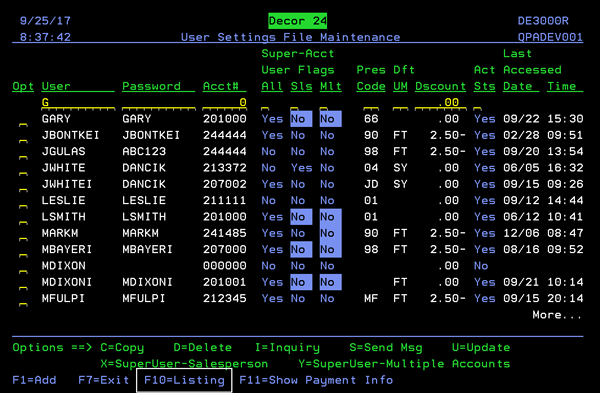
The User Profile Selection screen shows you the user profiles that have been established and the settings for each one. To change or update a user profile, enter a U in the Opt field and press Enter. The first screen of user settings appears. The global settings are displayed to the right of the fields. Global settings are used whenever no value is entered for the user settings.
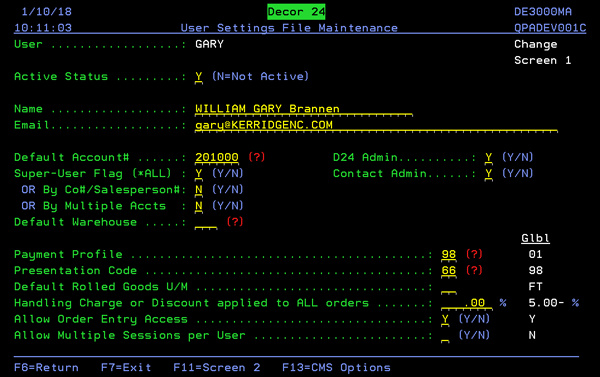
The fields in the upper portion of the screen are unique to the User Settings file and are described in the table below. The fields (starting with Presentation Code) on the bottom portion of the screen are the same as what is on screen one of the global settings.
|
Field |
Description |
|
User |
User IDs should be set up for each operator. These user IDs are used for Decor 24 only. They are not related to your IBM system user IDs. It is recommended that your Decor 24 user IDs and passwords never be the same as your IBM user IDs and passwords. |
|
Active Status |
A Y entry enables the user to use DECOR 24. An N signifies that the user profile is no longer active. This can be useful when you don't want to delete a profile but want to disable it for a limited time. |
|
|
This is the default email address for the user. It is used throughout the system in places like the Welcome and Reminder screens and in sending price lists. |
|
Default Account# |
This field contains the default account number (from your core system's Billto File) for the user. If the user is setup as a Super-User, and has access to multiple accounts, this value will change to the account the user is currently working with. You can search all the current accounts by entering a ? in the field and pressing Enter. |
|
Super-User Flag (*ALL) By Co#/Salesperson#: By Multiple Accts |
These three settings let you decide the level of account access this user will have. Only one of these settings can be flagged Y. If more than one is flagged Y an error message will display. Super-Users Super-users have access to all the accounts on your system. Co#/Salesperson# You can limit user access by company and salesperson number. Multiple Accounts Lets you choose which accounts to give a user access to. |
|
Default Warehouse |
Leave this warehouse field blank if you want Decor 24 to use the account's warehouse (from the Billto File) as the default warehouse. If this warehouse field is filled in, it is used as the default warehouse for this user throughout Decor 24, instead of the account's Billto File warehouse. |
| D24 Admin | This setting allows users to create new D24 accounts. |
| Contact Admin | Allows users to create new contacts for the Billto accounts assigned to their user record. |
| Payment Profile |
These codes are created via menu option PAY 1 and dictate the level of access that a D24 user has for making online payments via Heartland or another third party payment system. Associated Files |
|
Presentation Code |
This field contains the Presentation Code that the user is setup to use when accessing Decor24. Presentation settings control the appearance and functionality of the DECOR 24 web pages. Some of the things you can do with these settings are:
|
|
Default Rolled Goods U/M |
Use this field to determine a default U/M, for Rolled Goods. This default value will be the first entry in Decor/24's Order Entry U/M drilldown selection field. |
|
Handling Charge or Discount applied to ALL orders |
Use this field to add or subtract a percentage from all orders placed on Decor 24. To apply a discount, the percentage
value MUST be a negative value (1.50-). So, when keying in
value, use the Field-Minus key.
|
| Allow Order Entry Access | Use this flag to tell Decor 24 whether or not to allow Order Entry. If N is selected, then all Item searches will be merely for inquiries. |
|
Allow Multiple Sessions per User |
When a user logs into and starts using Decor 24, the user name and a session number are validated by Decor 24. This combination of the validated user name and session number are required to use the Decor 24 web services. Prior to the introduction of this setting in 2013, a user could only sign into one Decor 24 session. If the setting is activated:
If the setting is not activated:
|
Press F11 to proceed to the rest of the user settings. These settings are the same as the ones that comprise the respective screens of the DNAV - Online User Settings (D24 2).
Decor 24 User Settings Report
This report, which produces a spreadsheet, gathers user information from the Decor 24 User Settings (menu option D24 2) and the Billto File.
The report is accessed via the F10 - Listing function on the Decor 24 User Settings (D24 2) window.
The following information is included on the spreadsheet:
This report is accessed via the F10=Listing function on the initial screen of the User Settings File (D24 2).
The only screen in this process allows you to choose how to distribute the report.
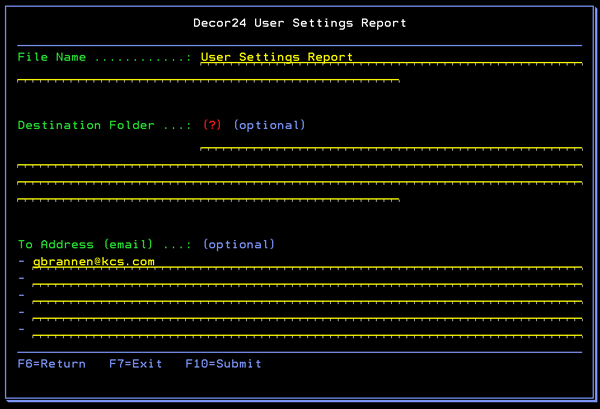
The Destination Folder is the IFS directory where you want the spreadsheet to be placed. Once the spreadsheet is generated and sent to this destination you can retrieve it via the Windows Explorer, if you are mapped to the folder.
If you do not enter a destination folder, you must enter an email address. If no destination folder is entered, a temporary one is created that is automatically deleted when the email is sent.
Enter the email addresses of the person or people you want to receive the report. To access more lines, press the Page Down key.
Decor 24 - F13 Function Key (CMS Options)
The F13=CMS Options function key, on the global/user setting screens, allows you to request E-mail price catalog data in a comma separated variable (CSV) file format.
In order to user the F13 feature, you must be licensed for both CMS and Decor 24.

When F13 is pressed, the following screen appears.
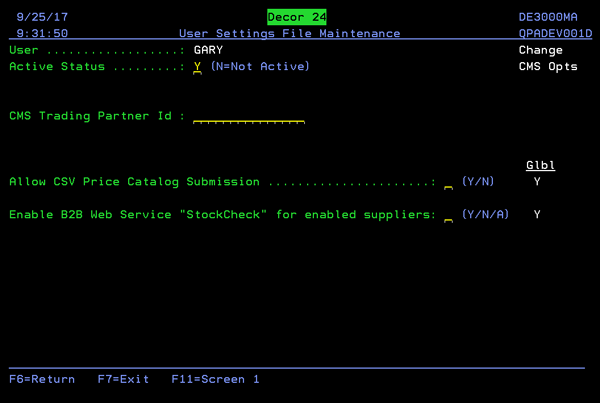
CMS Trading Partner ID - Enter the CMS Trading Partner Id for the dealer/user you want to activate item catalog privileges for. This must be the same ID established within the CMS application.
Allow CSV Price Catalog Submission - Enter a Y in the field Allow CSV Price Catalog Submission to grant access to price catalogs. If a partner ID is provided and the Allow CSV Price Catalog Submission field is set to Y, then Decor 24 allows users to request CSV (via E-mail) formatted price catalogs. To specify an E-mail address, click on the Price Catalog link on the Web Based version of Decor 24.
Enable B2B Web Service StockCheck for enabled supplier - Use this setting allows your customers to check your suppliers stock levels when performing an Item Search.
- Use the A option to always invoke the Stock Check web service for a supplier who has been set-up to use web services.
- This setting overrides the Enable insufficient inventory message setting on screen 4 of the global/user settings. What this means is that if the Enable insufficient inventory message was set to N and the Enable B2B Web Service StockCheck for enabled suppliers is set to A the stock check web service will be executed regardless of the insufficient inventory message setting.
- Suppliers are enabled for web services via the F11=B2B Config function on the Green Screen Supplier File (menu option FIL 3).
SuperUser Settings
Through the X=SuperUser-Salesperson and Y=SuperUser-Multiple Accounts settings you can grant or restrict users access to certain accounts or salesperson numbers. These settings are found on the User Profile Selection screen and work in conjunction with the Super-User Flag (*ALL), By Co#/Salesperson# and By Multiple Accts settings on the first screen of the User Settings.
- Access the User Profile Selection screen from the Decor 24 Setup Menu by entering a 2 in the Enter Desired Menu / Option# field and pressing Enter.
- Select a user profile and enter an X to enter salesperson numbers or enter a Y to enter multiple accounts. The screen below is an example of setting up multiple accounts (the X option).
- If no Payment Profile Override is entered, the default payment profile is used. Default payment profiles are established on the first screen of User Settings (D24 2).
- Enter the accounts you want this user to have access to.
- Press F6 to return to the User Profile Selection Screen. Any user profile that has multiple account access is highlighted. In the figure below, the user profile Oliver has multiple accounts established.
The User Profile Selection screen appears.
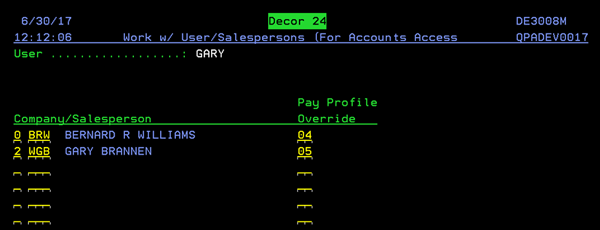
The Pay Profile Override allows the payment profile to vary based on the user and company of the selected account. This allows customers to switch accounts and make payments online for multiple companies with one user ID.
Even though a user profile is configured to be a super user in both categories, there can only be one default setting.
The default settings are controlled on screen one of the user settings.