|
Need more info or you couldn't find what you were looking for, let us know by sending an email to: support@dancik.com.
The IWMS Dashboard
Note: This application is designed to work with Internet Explorer 7. Using it within a different internet browser (i.e. Firefox) may produce unexpected results.
You can access IWMS information from virtually anywhere via the internet. From the IWMS dashboard, you can access and manipulate data concerning:
Task Queue Manager - This tab allows you to construct searches, both public and private, and then make those tasks available to be assigned by a work queue.
Dockdoor Assignments - The information in the Dock door Assignment tab can be used as a “checks and balances” system to make sure everything that is supposed to ship is on the right truck. It can also be used to check the status of the orders for each of your dock doors. The information is presented both in a detailed format and as a bar chart, for each dock door.
Inventory Inquiry - This part of the website enables you to see past and current inventory levels, outstanding customer and purchase orders, and much more. There are several tools and filters that allow you to manipulate the information.
Task History Summary and Task History - This tab allows you to track activity in the warehouse. Summaries can be set up for numerous parameters. You can set up an inquiry into areas of your warehouse or by product or customer.
Operator’s Panel - This tab provides a real-time view into the tasks that your operators are performing and the equipment that they are using.
Productivity Analysis - This feature allows you to thoroughly analyze operator activity data. When an operator starts and stops a task, the times are imported from the RF unit into the IWMS system where operator productivity can be determined. The information can also be downloaded as a Microsoft Excel spreadsheet.
Note: The IWMS Web Browser is designed for use on a LAMP server. It will still run on your main IBM server, but performance might be diminished.
|
Note: To see the latest updates and enhancements to the IWMS Dashboard, click the version number in the lower left-hand corner.
This tab allows you to construct searches, both public and private, and then make those tasks available to be assigned by a workqueue. A typical use of this tab can be:
Run either a public or private query.
When the results appear, set the production date by clicking the entries update link.
This makes the entry available for a workqueue.
Run the workqueues
Note: All the information displayed comes from the Bar Code Label pool.
You can construct public and private searches. The methodology for building both public and private searches is the same. The only difference is that a private search is only available to the person who created it.
In this example, we are going to create a search for orders that need to be picked in the pallet area of the warehouse.
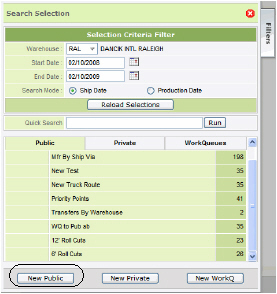
1. All
the available searches appear in the Search
Selections box. In the Selection Criteria Filter area, select
a warehouse and date range. You can also perform a non-structured (similar
to a data dump) search in this area via the Quick Search or Advanced Search
features. For example, entering a manufacturer as a quick search parameter
only displays results for that manufacturer. If you see a search in there
that is close to what you are looking for, you can edit it by clicking
its ![]() sign.
In this example, we are going to have to build one from scratch.
sign.
In this example, we are going to have to build one from scratch.
Note: Use the Quick Search box to search on order numbers and/or order reference numbers.
2. Click New Public at the bottom of the Selection box.
|
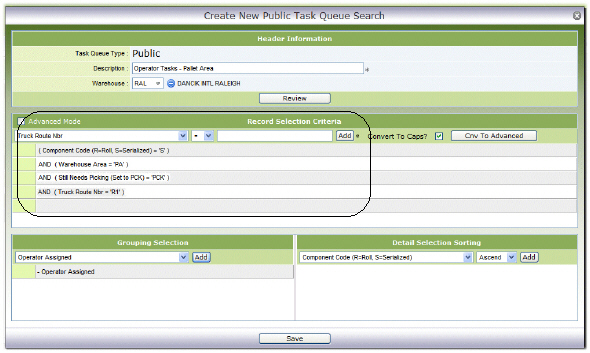
3. The screen refreshes to allow you to enter your search criteria.
|
4. If the warehouse is left blank then all warehouses can see this query and it shows on all warehouses RF devices. If the warehouse is filled out, then this workqueue is specific to only this warehouse, only that warehouse can see and it does not appear on any other warehouse’s RF devices.
5. The Record Selection Criteria area is where you actually enter the criteria that the system uses to select information. For this search, we want to add the pallet areas of the warehouse.
|
6. This search has five selection criteria as shown below:
Component Code (R=Roll, S=Serialized) = S - Searches only for serialized items. The other choice is R for rolled inventory.
(Area in Warehouse = 'PA1') - Includes the warehouse area PA1 which in our warehouse is pallet area 1.
Still Needs Picking = PCK - Ensures only orders that need to be picked are displayed.
Truck Route NBR = R1 - Only orders for this truck route are considered.
7. The Advanced mode of entering selection criteria involves using Structured Query Language (SQL). SQL gives you the ability to include an “or” type of query. For example, if you only wanted to run the query for three manufacturers you could build the following search:
(BQMFGR = 'ARM') OR (BQMFGR = 'SAI') OR (BQMFGR = 'ARB').
If you wanted to perform the same function without using SQL, you would have to build the query excluding every manufacturer except the ones you needed.
There are 105 SQL fields that range from Application Code to Wear Code. For a complete list refer tp the Appendix.
8. The Grouping Selection controls what displays on the screen. Essentially this is like adding a heading to a spreadsheet. For example if you wanted to see the operator assigned to the orders, you would add Operator Assigned.
9. The Detail Selection Sorting area provides another level of sorting. For example, you can choose to display the information by ascending order number. Another example, would be to sort the information by warehouse area which could facilitate picking.
Note: The sorting also controls how orders are assigned to a picker in directed picking.
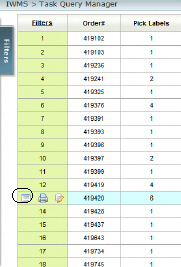
10 To actually run the search, click on the search (Operator Tasks - Pallet Area). The screen refreshes to display the search results.
|
This feature, accessed from the search results screen, allows you to apply changes to assigned operators, production dates, Build-A-Truck (BAT) points, and Order Priority points for selected records.
1. Conduct a search by clicking on a task query.
|
2. The search results display. Click the Display Details icon, to the left of the print icon.
|
3. The Search Details window appears. Select the orders you want the mass update to apply to.
|
4. Click Mass Order Update to access the Mass Order Update window.
|
5. Use the Mass Order Update window to apply changes to several selected search results, (i.e. orders) included in the details. For example, if you selected BAT Priority Points (also referred to as Manifest Priority Points), and entered a high priority number (the lower the number the higher the priority) the new BAT Priority Points are assigned to all the affected orders. Depending on your settings this could move these orders up in the truck loading sequence.
Work queues are used to assign work to operators automatically within directed picking. When an operator needs a new task, the application assigns the first order line based on priority, then the work queue scope (WM8 103) comes into play by assigning the operator to the matching records based on the work queue scope definitions.
1. On the Task Queue Manager, select WorkQueues.
|
2. In
the figure shown above, there are several WorkQueues listed. To see the
details, click a search’s respective edit symbol (![]() ).
).
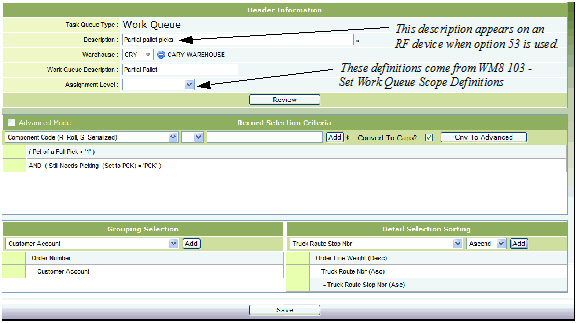
|
3. This WorkQueue is directing picking for partial pallet picking of serialized inventory.
(Component Code (R=Roll, S=Serialized) = ' S ' ) - Directs the picking of serialized items.
( Pct of a Full Pick < '1' ) - Pallet is less than full
AND ( Still Needs Picking (Set to PCK) = 'PCK' ) - The inventory is not at a Picked status.
4. The entries in the Grouping Selection direct how the results are displayed. In this example, the results will display by Order Number and Customer Account number.
5. The Detail Selection Sorting part of the screen is where you actually tell the system what to pick and in what order. In this example, picks are based on Truck Route and then by Truck route stop. This set-up can help keep material destined for the same location together and helps better organize the truck.
6. After making the edits, click Save. This returns you back to the Filters Tab where you can click on the query to run it and produce results.
|
These work tasks are transmitted to the RF gun and are accessible via option 53 - Pick Work Queue.
|
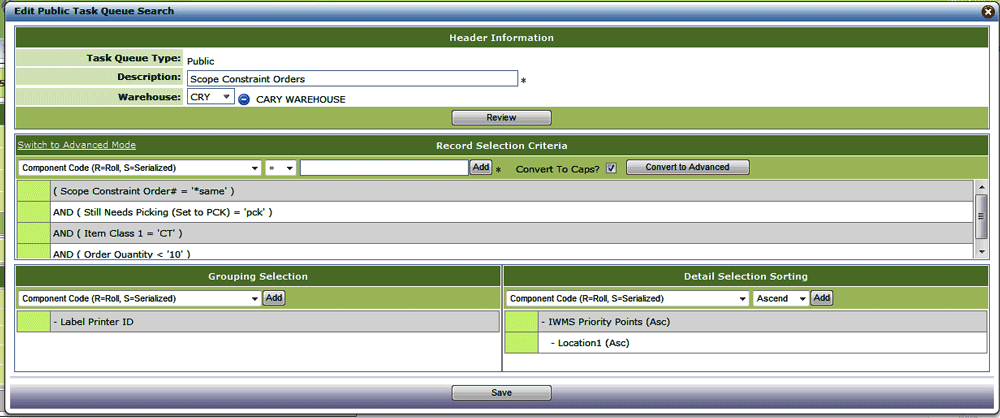
The Task Queue Manager portion of IWMS allows you to construct searches, both public and private, and then make those tasks available to be assigned by a work queue.
The “scope constraint” functionality allows all the order lines an order to be assigned to the same work queue. This prevents an order from being split up into multiple work queues.
The Task Queue shown below was created to capture the scope constraints functionality.
|
In this Task Queue, if every line on an order...
uses the same order number
still needs to be picked
has its items in cartons (CTs)
and has less than 10 cartons
...all the lines on the order will be sent to the same task queue.
If any of the lines on the order do not meet the scope constraints, the order lines can be split up into multiple task queues.
The information in the Dockdoor Assignment tab can be used as a good checks and balances system to make sure everything is on a truck. It can also be used to check the status of the orders for each of your dock doors. The information is presented both in a detailed format and as a bar chart.
|
1. Select a warehouse, enter a date range, and select a Search Mode:
Ship Dates - Show orders by their shipping date.
Production Dates - Displays orders by the date they are processed or picked.
2. Click Submit to display the information.
3. When the mouse is placed over the results, you are given two options.
![]() - Lists the details of the orders for the dock door.
- Lists the details of the orders for the dock door.
|
![]() - Displays just the graphical information.
- Displays just the graphical information.
|
Note: To get the information for the Loaded bar (4th one), the system checks the Warehouse Setting Update Dock Door Shipped Graph to Status of Dock Door Assignments to see if it is set to Y. If it is, it then checks the Order Status and/or Transfer Status fields of the Dock Door settings. If these fields are populated, that information is used to build the 4th (Load) bar.
IWMS Dashboard Inventory Inquiry
This part of the website enables you to see past and current inventory levels, outstanding customer and purchase orders, and much more. There are several tools and filters that allow you to arrange the information to better suit your needs.
The first step is to select your search filters. When this option is selected, the following screen appears.
|
You can search by either item or serial number, but not both.
Click the down arrow in the Item# box to access an item search screen.
The Settings area allows you to further define your search by unit of measure. Enter a unit of measure and when a new inquiry is initiated, the results displayed will match the unit of measure, and any other filters specified.
Note: If this setting is left blank, the default UM, as specified in the Item File, is used.
The following screen shows the results of a search by item number.
|
Note: You can rearrange the data in ascending or descending order for almost every column. Simply click on the heading; the information toggles between ascending and descending order.
To see the stock card screen for a specific item, place
the pointer over the item and click the ![]() icon
that appears.
icon
that appears.
|
Use this tab to view an operators task history. There are several fields that allow you to specify search parameters. For example, you can search by order and a single operator.
|
You can use the Selection Criteria to limit the display to a particular warehouse and time frame.
Using the Selection Criteria to narrow results by Order Number, LPN, Serial Number, From and To Locations, and Operator. Select one parameter or a combination of two or more.
The Field
Selections tell the system what information to gather
and display. To remove columns, click ![]() .
.
Use the up and down arrows to the right of the field descriptions to display those fields first. For example, using the filters shown above the Account is listed first followed by the Warehouse Header and so on.
|
IWMS Dashboard - Productivity Analysis
This section enables you to thoroughly analyze IWMS data. Operator activity data is imported from the RF unit into the IWMS system where it can be used to determine Operator Productivity. The information can also be downloaded as an Excel Spreadsheet.
Note: For information on how to set up productivity analysis, refer to Productivity Analysis.
1. The first thing to do is select the search parameters.
|
2. Press Submit to get the total standard hours and hourly breakdown for each operator. The standard hours are calculated based on your user-defined definitions of each task, which determine how long each warehouse task should take.
|
3. When the information first appears, the times are shown in hourly increments. Click Total Std Hours to toggle the display between:
Total Std Minutes
Total Scans
Total Actual Hours
Total Actual Minutes
4. Click on a number to drill down into it. You can inquire into an hourly time to see what jobs are included and how long it took to perform the jobs.
|
5. You can also drill down into an Operator’s total time per day.
|
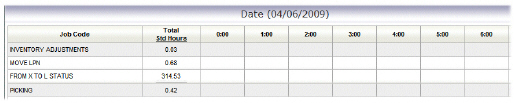
6. Click on the Total Std Hours/Minutes to access information about the jobs and times that make up the total hours. The jobs are displayed by Job Code, which are user-defined.
|
7. From here you can drill down into the time charged to each job code.