|
Need more info or you couldn't find what you were looking for, let us know by sending an email to: support@dancik.com.
Using/Printing a Serial Tag Label
1. Access option 3 - Label Styles File on the EDI and Bar Code Functions Menu. The Label Styles window appears.
2. Select option 2 - Serial Tag Label Styles. The Serial Tag Label Format Defaults screen appears.
|
The serial number tag format can be established at a global manufacturer- or product-specific level, for rolled goods and serialized items.
Key types for serial tag label format screen defaults are defined as:
# = global
M = manufacturer
P = product line
Key values (user-specified) for the serial tag label format screen defaults are defined as:
P = Manufacturer and Product line
M = Manufacturer
R/S values for the serial tag label format screen defaults are defined as:
R = roll
S = serial (non-rolled) goods
3. To update a label style, enter a U in its Opt field. The Serial Tag Label Format Defaults detail screen appears.
|
Field |
Description |
Barcoded Serial# Tag Style |
Choose a serial number type. To see all the available serial types, enter a “?” and press Enter. |
Show Manufacturer as part of Item#? |
Includes the manufacturer’s three character designator as part of the item number. |
Show Shade instead of Serial# in large print? |
Enlarges the shade number instead of the serial number. |
Which of the following should print the largest |
Enter: 1 - Item# 2 - Serial# 3 - Suppliers Item# |
Which of the following should be barcoded? |
Enter: 1 - Item# 2 - Serial# 3 - Suppliers Item# 4 - Receipt/Line# |
4. To add a label style, enter a password and then select the F1=Add option. Enter the serial tag defaults.
|
5. Per the settings in this example, whenever a serial tag label is printed for a rolled good from the manufacturer Armstrong this label is used.
6. Press Enter to accept these defaults and add a label to the listing of available serial number labels.
Using/Printing a Serial Tag Label
1. After the label defaults are assigned they are ready for use. Select option 9 - Print Warehouse Labels off the Warehouse Menu (WAR). The Print Warehouse Labels Menu appears.
2. Select option 6 - To Print a Serial Number Label. On the screen that appears, select option 2 - To Print Serial# Tags On Bar Coded Labels. The Bar Coded Serial Number Tag Selection appears.
|
3. Make the necessary entries and press Enter. The next screen is where you actually enter the items that you want to print serial tag labels for. If a rolled good item from Armstrong is entered, the new bar coded serial tag label is printed.
Note: Serial number labels can also be printed from Option 3 - Print S/N Tags on the Inventory Receipts & Back Order Fill Menu (INB).
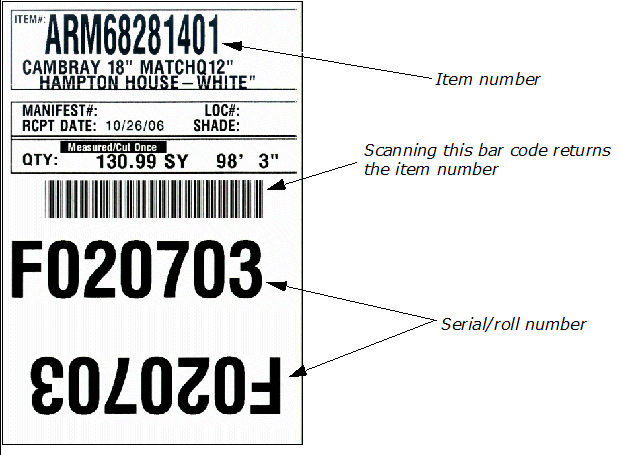
Serial Tag 1
This is a “standard” serial tag for a rolled good.
|
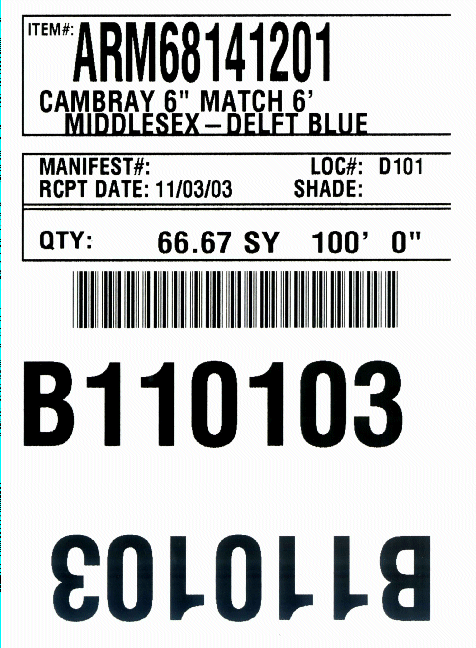
Serial Tag 2
This serial tag is for an item that has been cut once after it was measured. The difference between this label and Serial Tag 1 is the Measured/Cut Once statement in the middle of the label.
|
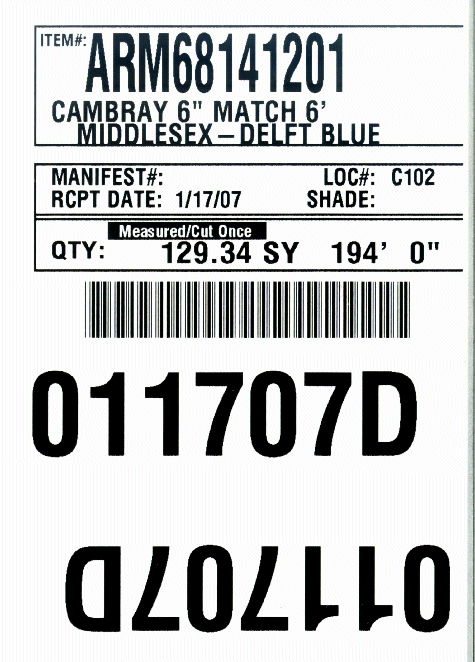
Serial Tag 3
This is a serial tag for a serial# that has been measured but has not been cut since. This is useful on balances because if the cut station operator sees this message, and they print a new serial tag after every cut, he knows this measurement is accurate and does not need to be rolled out and remeasured.
|
Serial Tag 4
This is a serial tag returns an item number when its barcode is scanned with an RF device. It is identified with an I in the Serial Tag Label Format Defaults screen.