|
Need more info or you couldn't find what you were looking for, let us know by sending an email to: support@dancik.com.
Set-up for Dock Door Assignments
Adding a Dock Door to the Location File
Creating Routing Templates for Dock Doors
Dock Door Outbound Assignment Maintenance
Much of the warehouse management is really driven from the dock door assignments. The primary goal in a warehouse is to ship the inventory to your customers and avoid errors.
The Dock Door Outbound Assignment option assigns the destination of the trucks leaving the warehouse to the respective routing information in the core system. This allows the IWMS loading process to validate that the orders loaded on a trailer, are in fact being placed on the correct trailer for their routing.
There are two methods of assigning routing to the Dock Doors. You can mix the two methods to achieve the requirements to meet your loading demands.
The first method uses templates to allow you to setup groups of routes that typically are delivered together on the same trailer. You may save these groupings and assign them on a daily basis, as needed.
The second method is to manually select the routes each day as you determine the routing assignment to the trailer.
Set-up for Dock Door Assignments
Before assigning routes to dock doors the following set-up steps should be performed:
Set the flag for ignoring or using run numbers in the Dock Door Assignments in the IWMS Warehouse Settings file (WM2 001). Refer to Warehouse Settings File for more information.
Establish staging areas in the IWMS Master File (WM1 002). Refer to Working with Area Records in the File Maintenance for more information.
Set up staging areas in the IWMS Sub-Area Master (WM1 003).
Adding a Dock Door to the Location File (WM1 007). Refer to Adding a Dock Door to the Location File.
Creating routing templates (WM1 009). Refer to Creating Routing Templates.
Barcode the dock doors, or use the barcodes in the trailer. The extended location (also known as the checkstring) is used when scanning the product into the trailer.
Maintain the Dock Door assignments (WM1 008). Refer to Dock Door Outbound Assignment Maintenance.
The Dock Door Assignment (WM1 008) reads all the locations that are flagged as being Dock Doors. This program allows you to assign the routes and statuses. The recommended method is to assign templates for the Dock Door assignments (WM1 009), and restore them daily or as needed.
Utilize the Auto Order Status feature, this forces the statuses of the orders as they are actually scanned to the physical trailer.
By assigning the routes/runs the operator cannot scan the orders to an invalid trailer.
As the picks are made and moved in the warehouse, the system looks at the routing of the orders, and suggests the staging areas and dock doors.
On a daily basis, these assignments need to be manually updated, by using the templates. This in a fairly minimal task.
Adding a Dock Door to the Location File
The dock doors need to be assigned to the IWMS Warehouse Location Files. Because the dock door assignments read the location file for locations flagged as dock doors, this step has to be done prior to maintaining and using the dock door assignments option.
1. From the Dancik menu system, take menu WM1 option 7.
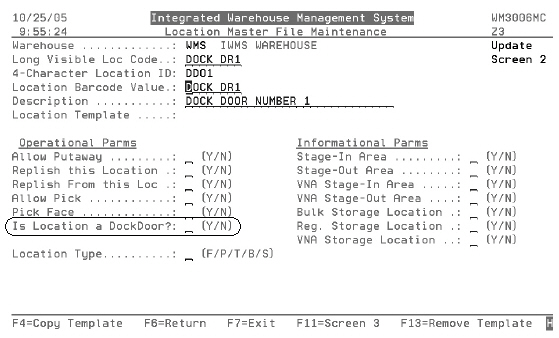
The Location Master File Maintenance screen appears.
|
2. You can scroll through the current locations to see if any dock doors are already assigned as warehouse locations. If not, press F1 to create the location record.
|
3. Enter the Long Visible Loc Code, 4-Character Location ID, and Description.
4. Enter Y to edit the new record. When you press Enter, the detail screens for the new dock door locations appear.
|
Note: For explanations of the fields on these screen, refer to Locations File.
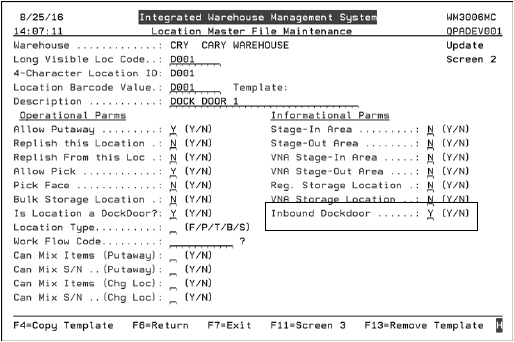
5. Press F11 to get the Screen 2 of the detail location record. Enter a Y in the field Is Location a DockDoor?.
|
Creating Routing Templates for Dock Doors
The template feature allows you to assign routing combinations that are consistent into a single reference point. You can then assign that template to the Dock Doors easily each day as the routing is associated with a trailer at a Dock Door. This eliminates having to manually enter routes every day.
Note: As the template is assigned to a Dock Door, the data is copied to the Dock Door file and may be modified to reflect what the real assignments are. The template is not updated with the modifications using Dock Door Outbound Assignment Maintenance (WM1 8). The templates are only updated using Dock Door Outbound Assignment Template Maintenance (WM1 9). This allows you to setup known modes, but change them to reflect required changes to meet each day's business activities.)
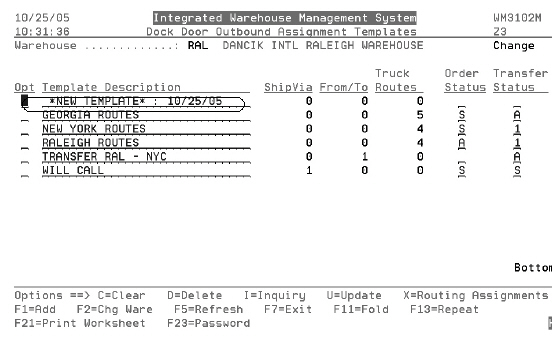
1. From the IWMS Physical Warehouse Setup Files (WM1) menu, select option 9. The following figure presents an example of a Dock Door Outbound Assignment Templates screen.
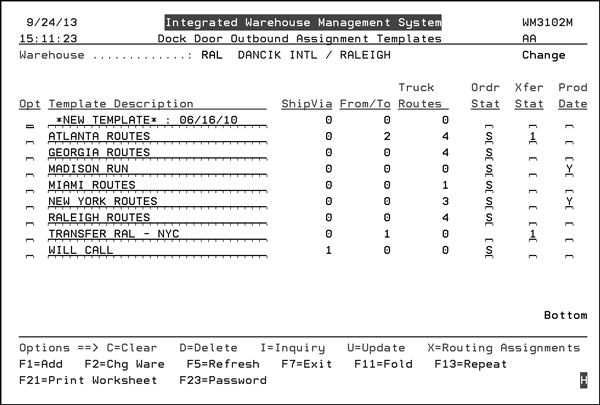
Field |
Description |
Opt |
Option to perform on the template record. C = Clear all assignments D = Delete the template record from the file X = Select the template to add/remove assignments of routing data. |
Template Description |
Enter a descriptive name for your template so you will know what it’s assignments are without requiring a drill down. |
ShipVia |
Shows the number of assignments currently assigned in the Ship Via category. |
From/To |
Shows the number of assignments currently assigned in the Transfers category. |
Trk Rts |
Shows the number of assignments currently assigned in the Truck Routes category. |
Sts |
This is the status assigned to the orders that are being placed in the trailer. Leaving this value blank forces the loader to update the status as each pallet or roll is loaded. |
Transfer Status |
This is the status of transfer orders. Leaving this value blank forces the loader to update the status as each pallet or roll is loaded. |
Prod Date |
This flag validates that all orders being loaded into a specific dock door would have that day’s production date. This can help ensure that orders are not being shipped early to the customer. This column can act as a quick reference to see which dock doors are set-up to use the production date. To set-up a dock door to use the production date, update (by entering a "U" in its Opt field) a current dock door entry by entering a "Y" in the Production Date setting. The production date matches today’s date. In order for an order to be loaded, with no error generated, the production date has to match today’s date. The event trigger WRNGPRDDAT sends out an email whenever an order is scanned at the dock door and the production date does not match today’s date. For more information on Event Triggers, click here. |
2. If you want to view the information contained in your templates on one screen, press F11. The following figure shows the maintenance screen in the unfolded mode. Pageup and pagedown will roll you through the templates.
|
3. Press F11 to return back to the summary mode.
4. The following screen is presented when an X is placed in the Opt field. It applies when the screen is in the summary or detail mode.
|
There are 3 areas of assignments:
ShipVia - Ship Via codes tell the system how the material at a particular door is going to be shipped. For example, if there is one door where only common carriers and/or delivery companies like UPS or FEDEX load or unload you can use the following screen to assign the appropriate ship via codes.
From/To Warehouse Combinations - The From/To Warehouse combination is used for your interwarehouse transfers.
Truck Routes
5. Click the category you wish to assign/edit detail assignments for. The screens for all three categories operate in a similar fashion. The screen that appears shows any values for that category already assigned.
|
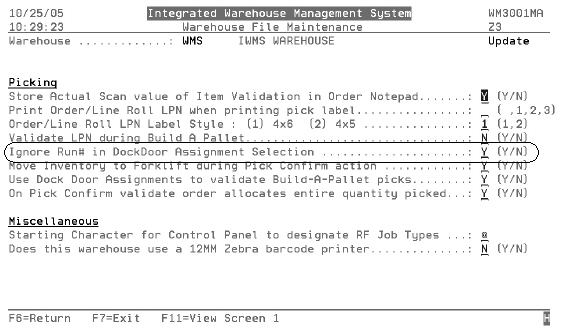
Note: If you use run numbers there could be two fields under the Truck Routes heading. The second field is for entering the run number. Not all ruck routes have run numbers assigned. Run numbers are used to further define truck routes. For example, you can have a route set up for a city and run numbers established for a specific day.
The option to include or exclude run numbers is on the Warehouse File Maintenance Screen (accessed via screen two of the Warehouse File Maintenance - IWMS menu WM2 option 1). An example is shown below.
|
6. To create a new template, press F1. The title New Template (followed by today’s date) is inserted at the top of the template list.
|
7. The steps to create a new template are essentially the same as editing an existing one.
Select it placing an X in the Opt column.
Decide if the template is going to be set-up for ShipVias, Warehouse Combinations, or Truck Routes.
Assign the values (shipvia codes, warehouses, truck routes).
Give the template a meaningful full description, so you can determine the assignments quickly when assigning the template.
Setup the status code to be assigned to the orders as they are loaded onto the trailer.
Dock Door Outbound Assignment Maintenance
After the dock doors have been assigned as locations, and templates are established, you are ready to stage material at the dock doors and put into trailers.
This feature allows to assign trailers to dock doors. Doing so can let you stage material in an area that is convenient to the trailer. Another advantage of this feature is to allow the warehouse managers to easily update the trailer numbers assigned to the dock doors.
Option 8 - Dock Door Outbound Assignment on the IMWS Physical Warehouse Setup Files (WM1) menu provides you with the tools to maintain your dock door assignments and to delete the previous days assignments.
1. When this option is selected, the Dock Door Outbound Assignment Summary Screen displays.
|
2. This screen shows all the records from the location file that are flagged as being a Dock Door.
Note: The values for fields Extended Location, Description, and Status, are actually stored in the database file of the location record.
The fields on this screen are described in the following table.
Field |
Description |
Opt |
Use this field to preform one of the following options: C - Deletes a record. The setting “Clear Trailer ID when clearing Dock Door Assignments” on the second screen of the Warehouse Settings (WM 2 1) gives you the flexibility to either remove the Ext Loc/Trailer# or keep it intact when you clear the dock door assignments. Note: For more information on this setting, refer to Warehouse Settings File. R - If you have made changes to an assignment and want to return it to it’s original (template) state, use this option. The Restore From Dock Door Templates screen appears. This screen displays all your templates and allows you to pick the one you want to use to restore the assignment. X - Selects an assignments record so it can be updated or reviewed. You can also use this option to manually assign routing and status codes. |
Dock Door |
The dock door assigned to a route. |
ExtLoc/Trailer# |
Shows the location assigned to an extended location or trailer. This can be the bar code of the trailer. When the material is moved into the trailer, and the bar code of the bar is scanned, the status code automatically updates if it is set to do so. |
Assignment Description |
These descriptions should be meaningful and easy to understand. They are established when the templates are set-up and can be updated via the F9 function key. |
ShipVia |
Shows the number of assignments currently assigned in the Ship Via category. |
From/To |
Shows the number of assignments currently assigned in the Transfers category. |
Trk Rts |
Shows the number of assignments currently assigned in the Truck Routes category. |
Sts
Transfer Sts |
These are the statuses assigned to orders and transfers that are being placed in the trailer. When the bar codes on the trailer and inventory are scanned the status code automatically updates to the value entered here. Leaving this value blank forces the loader to update the status as each pallet or roll is loaded. |
The function keys are described below.
Function Key |
Description |
F2 |
Change to another IWMS warehouse. When this key is pressed you are presented with a Warehouse Selection Window that lists all the warehouses on your system. Select one to view the assignments for that warehouse. |
F4 |
Displays all the Ship vias, warehouses, and truck routes assigned to a dock door. You can also enter a search value (i.e. a ship via code) to see if it assigned to a dock door. When F4 is pushed the DockDoor Assignment Search appears. To toggle between Ship Vias, warehouses, and truck routes press F11on the DockDoor Assignment Search screen. |
F5 |
Refreshes the display if changes are made. |
F7 |
Exits the application |
F9 |
Allows you to update the ExtLoc/Trailer#, Assignment Description, and Sts fields. Pressing F9 moves the update field between the three fields. |
F10 |
Displays the following additional fields:
|
F11 |
Toggles between the detailed (unfold) and the summary (fold) view. The detailed view displays the following additional information:
|
F13 |
Repeat an option for all the records. For example, use this option to quickly clear out all the previous days assignments by entering a C in the first Opt field and pressing F13. The C option is copied to all the other assignments and when Enter is pressed all the assignments are cleared and ready for the new day. |
F21 |
Removes any changes/updates that have been made and changes the mode over to inquiry only. To get back into update mode, press F23 and re-enter your password. |
F23 |
Displays a box that allows you to enter a password. |
IWMS Inbound Dock Door Dashboard
This functionality creates a web based dashboard for IWMS that allows for the tracking and status of the receiving process. This provides our IWMS customers an easy way to view the work performed in the receiving department and allocation of dock doors and warehouse operators.
This modification allows you to monitor the receiving of material into the warehouse for Put away and determine how resources can be most efficiently allocated.
Note: This is an IWMS only modification.
Work_with_Task_Type_Cross_Ref_(WM8_40)
IWMS_Event_Triggers_and_email_contacts_(WM_8_20)
The setting Inbound Dock Door has been added to Screen 2.
|
A “Y” entry is only valid if the Is this Location a DockDoor setting is activated.
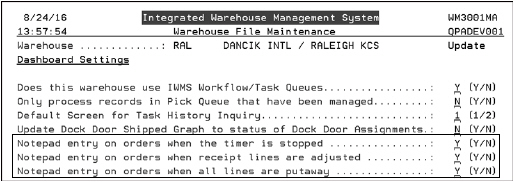
Three new settings have been added that, if activated, make an entry onto the notepad of the order when the specified action is performed.
The new settings are listed under the Dashboard settings on screen 7.
|
Work with Task Type Cross Ref (WM8 40)
IWMS records almost all functions (i.e., changing locations, changing quantities, receiving orders) onto a task history log. This provides you with a history of your warehouse activities.
Note: The task log is accessible via option 6 - Task History File Search on the IWMS menu WM3.
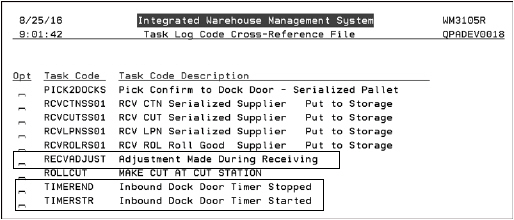
These Task Codes are found on the Task Log Code Cross-Reference File:
RECVADJUST - Adjustment Made During Receiving
TIMEREND - Inbound Dock Door Timer Stopped
TIMERSTR- Inbound Dock Door Timer Started
|
The Task Log Code Cross-Reference File cross references system generated task codes, some of which may not be obvious to understand on the Task History log, to a description that you create. If a system generated task code is cross referenced, the customer supplied description is used on the Task History Log.
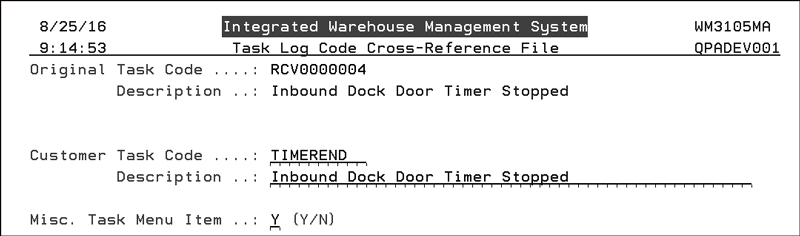
To look at the details of one of the new codes, select it by entering an “X” in its Opt field.
|
The Customer Task Code is written to the Task History Log and the Description helps to identify the code.
If the setting Misc. Task Menu Item is activated, the task appears on the RF gun when option 72 - Misc. Tasks is selected on the RF menu.
If task codes and descriptions are changed, you can use F11 to view the original task code and descriptions.
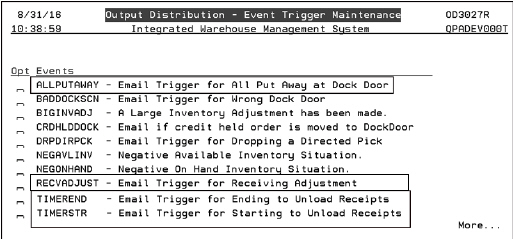
IWMS Event Triggers and email contacts (WM 8 20)
Four triggers related to inbound dock doors are found on the Event Trigger Maintenance window.
|
These event triggers work in conjunction with the RF menu options that allow you to adjust receipts (new function on PutAway option RF option 2) and start and stop the unloading timer (RF menu options 84 and 85).
These settings automatically send an email to your specified recipients when certain events associated with inbound dock doors occur.
For example, the system can be set up to alert personnel when a truck at an inbound dock door is starting to be unloaded.
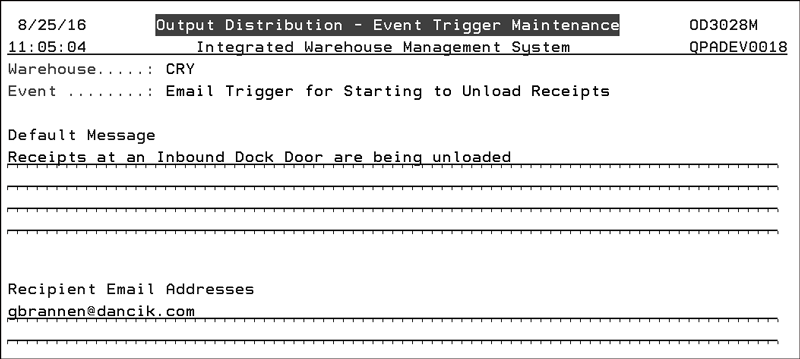
Enter an “X” to select one of the new triggers. On the screen that appears, enter a default message line and the email recipients.
|
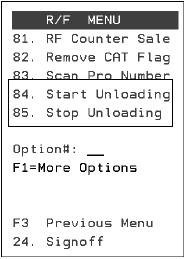
84 - Start Unloading
85 - Stop Unloading
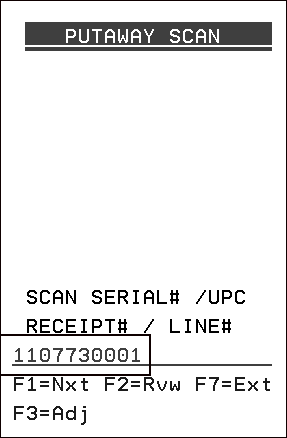
New function key on the PutAway screen (RF 2)
Starting and Stopping Receipt Unloading
Access the RF menu by using menu option WAR 21 or WM5 1.
Press F1 to navigate to the end of the options; which is where the new options are.
Options 84 and 85 start and stop the loading process. They can be used to measure how quickly a truck is unloaded.
Note: Options 84 and 85 were not designed to include the time it takes to put the inventory away in the warehouse
|
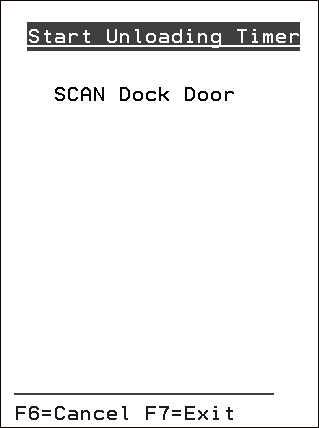
Both options only use a single screen where you enter the Dock Door.
|
If you have the TIMEREND and TIMERSTR triggers set up, an email is sent out alerting the specified email recipients of the action.
Adjusting Inventory During Receiving
The function key on the RF Putaway process allows you to adjust inventory as it is received.
A typical use of this new functionality is to account for damaged inventory.
1. Access option 2 - Putaway Screen on the RF menu.
2. Press F3 to switch the process from the Put Away to Adjustments. Notice the title of the screen changes to let you know you are in the Adjustments functionality.
3. Enter a receipt and line number.
|
4. The next series of screens prompt you to enter:
the Drop Off Location
A serial status code, an example would be “D” for damaged. Serial status codes are created and maintained in the Order and Serial Number Status Code Table; menu option SET 7.
A reason code for the adjustment. The reason codes are maintained via the ADJSTCODES tables accessed via menu option SET 29.
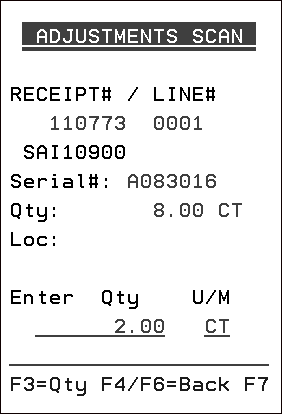
5. After entering the above information, you are then prompted to enter the adjustment quantity.
|
6. Here’s what happens when a quantity is adjusted:
Event trigger RECVADJUST is checked for email addresses. If they exist an email is sent.
Write entry RECVADJUST to task history.
If the setting Notepad entry on orders when receipt lines are adjusted is set to “Y” the date, time and line number adjusted are entered into the notepad of the PO attached to the receipt. The setting is accessed via the Warehouse Settings (WM2 1).
The open total for the dock door is checked
If the total open = 0 and the setting Warehouse setting (WM2 1) Notepad entry on orders when all lines are put away is set to “Y” a notepad entry is made into each PO assigned to the dock door.
The event trigger ALLPUTAWAY is checked for email addresses and if found an email is sent out.
IWMS Inbound Dock Door Dashboard
The Inbound Dock Door Dashboard
Assigning Trucks to Dock Doors for Unloading
Checking the Progress at a Dock Door
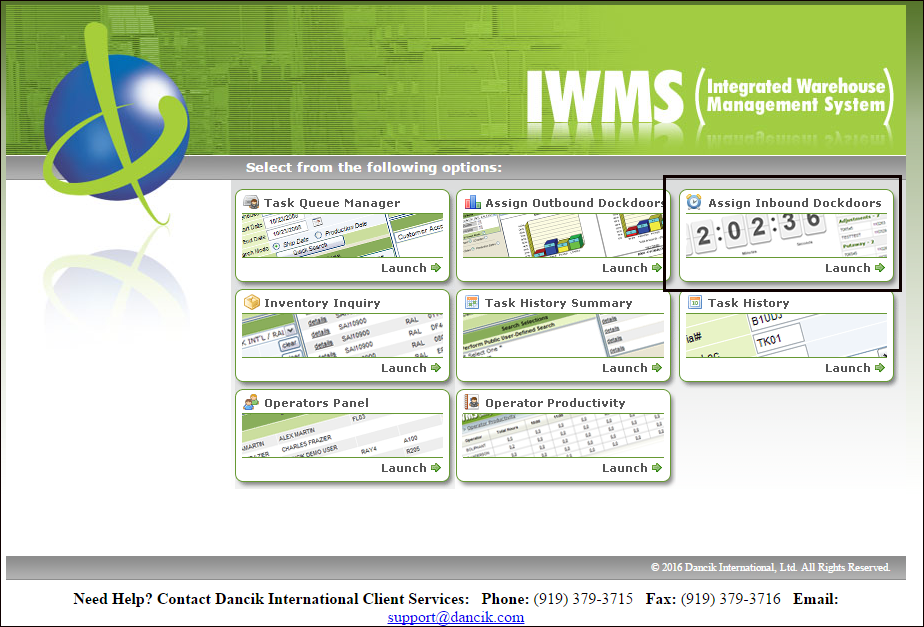
An Assign Inbound Dock Door button has been added to the IWMS main menu.
|
The Inbound Dock Door functionality provides a view of the work required in the receiving department and the allocation of dock doors and warehouse operators.
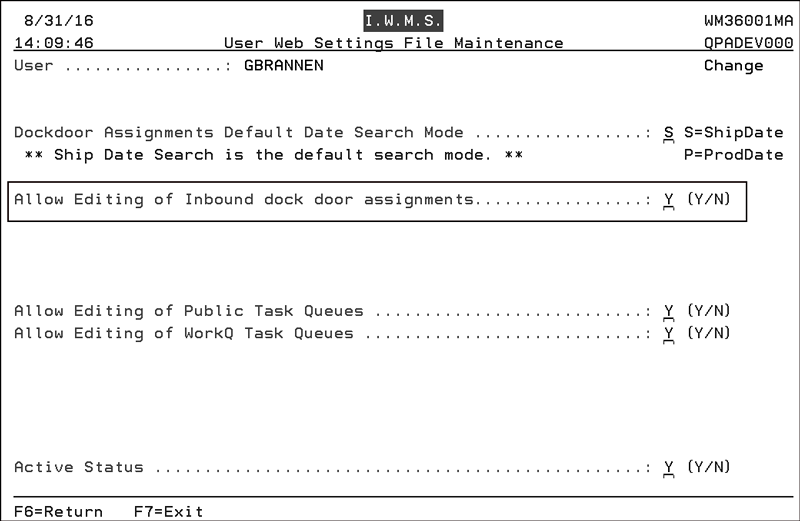
User Settings (Menu option WM8 105) - Activate the setting Allow Editing of Inbound dock door assignments.
|
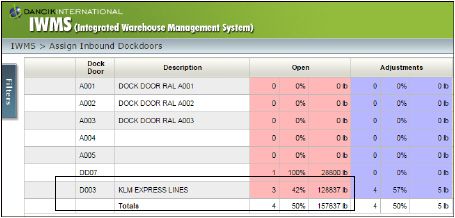
The Inbound Dock Door Dashboard
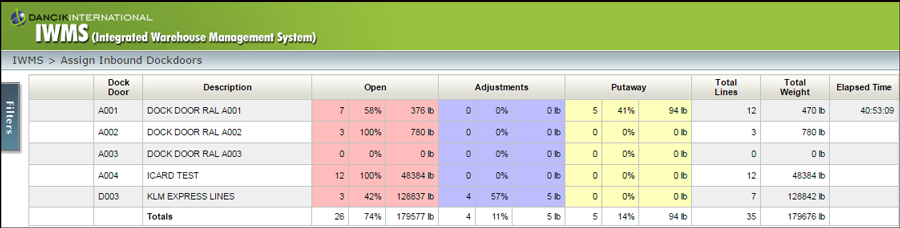
When opened, the dashboard displays the inbound dock door activity for the day.
Note: Only locations identified as dock doors are displayed.
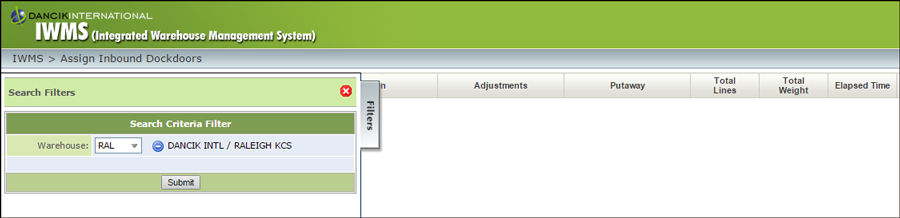
1. Select a warehouse via the Filters tab.
|
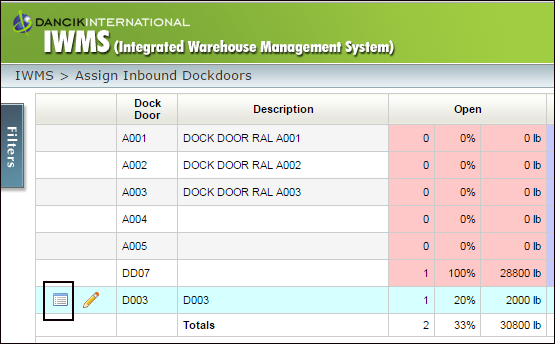
2. Click Submit to populate the table.
|
Assigning Trucks to Dock Doors for Unloading
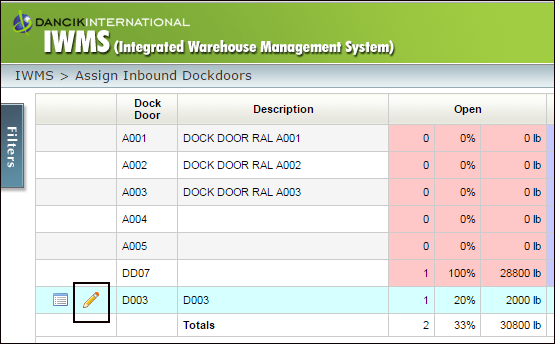
1. Click the pencil icon to assign a truck to a dock door by manifest, receipts, and/or purchase orders.
|
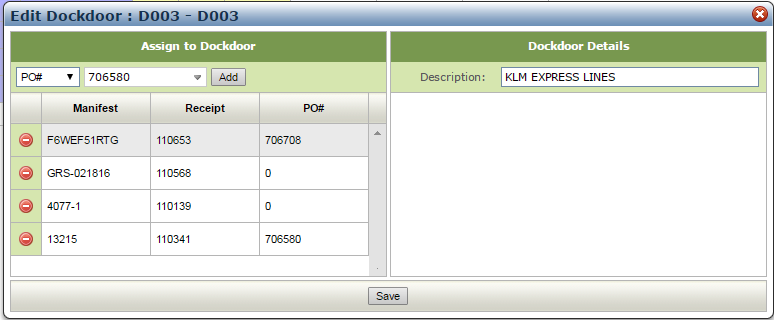
2. On the window that appears, use the drop down menu to assign a truck to a dock door by receipts, manifests or POs.
A manifest must have at least one receipt line in pre-receipts for the warehouse filtered on.
A receipt must be in pre-receipts for the filtered warehouse.
The PO must have at least one open line in pre-receipts for the filtered warehouse.
3. Use the Description field to override the dock door title. For example, the name of the trucking company can be entered.
|
4. Click Save to save your entries and return to the main Inbound Dock Doors table.
|
Checking the Progress at a Dock Door
1. Access
the Dock Door Detail window by clicking on the (![]() )
icon.
)
icon.
|
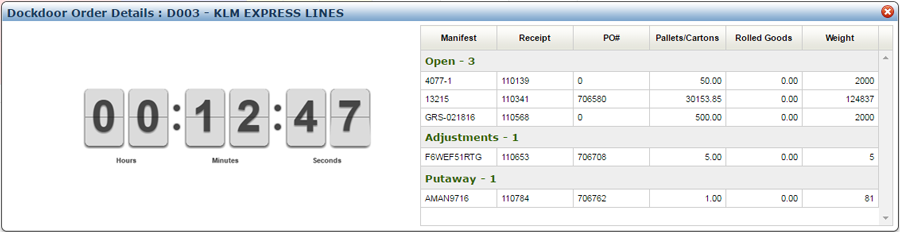
2. The Dock Door Order Details window appears.
|
Note: The timer is started and stopped via the RF menu options 84 and 85.
Open lines have not been adjusted or put away.