Need more info or you couldn't find what you were looking for, let us know by sending an email to: support@dancik.com.
ISO and Order Entry
Using ISO While in Order Entry
General View of ISO logic within Order Entry
ISO and Multi-Line Order Entry
Automatic Display of Inventory Analysis Screen Within ISO
Using ISO While in Order Entry
ISO is a powerful feature that can save you time and prevent errors when your operators select inventory. ISO can be used in Order Entry if your company has set up the ISO File.
1. To automatically use ISO during Order Entry, access your control panel as shown below.
2. Set the Auto-ISO option to one of these values:
N = Auto-ISO is off. The user needs to enter an A in the L# field of Order Entry to request that ISO selects inventory.
Y = Auto-ISO is on. If user enters a valid item number and quantity, then ISO is automatically used.
M = Mandatory ISO. If user enters a valid item number and quantity, then ISO is automatically used. If a user enters a valid item number and no quantity, then the user is prompted to enter a quantity, instead of showing the inventory screen.
General View of ISO logic within Order Entry
1. ISO determines the inventory to be selected or to back order.
2. If inventory is selected by ISO, or if a mix of inventory and a partial back order is selected, then the ISO Confirmation Window is displayed with the ISO selections.
3. If ISO determines the entire quantity should be back ordered, and the two new ISO back order parameters are not used nor satisfied, then the ISO Confirmation Window is displayed suggesting the back order.
4. If ISO determines the entire quantity should be back ordered, and any of the new ISO back order parameters are satisfied, then the Inventory Analysis Screen is displayed.
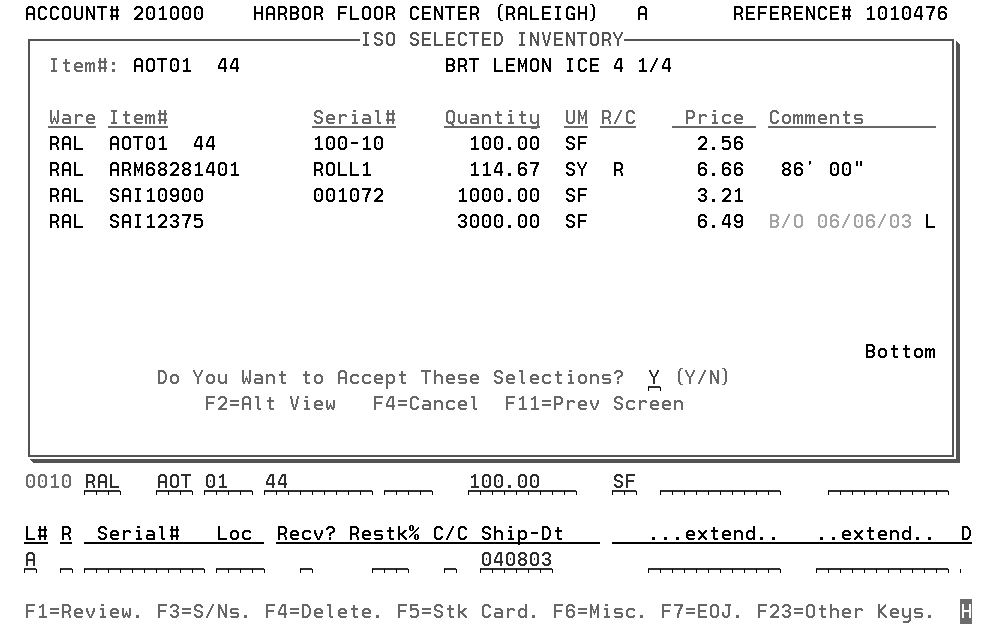
Following is an illustration of an Order Entry ISO Window. In this example, the user entered an item number and a quantity only. ISO selected the inventory as shown automatically, considering all of your company’s policies on how inventory should be selected.
5. In this example, the customer requested 100 square feet and ISO filled the order using a single serial number, but from multiple pallet/bin locations.
6. After ISO displays the inventory selected, press Enter to accept or F4 or N to not accept. While an ISO window is being displayed, all inventory shown is being held. If you accept the screen, the inventory remains held. If you press F4 or enter N, the inventory is released. This technique prevents two orders from simultaneously selecting the same inventory.
Note: When more than 24 rolls or records of inventory have been requested from ISO, the message Number of ISO Selections is Greater than can be processed will appear. At this time, you can enter F3 to display the Inventory Analysis Screen, and order from the required number of inventory records.
7. Once accepted, ISO creates order entry line items, exactly as you would enter them, and displays them on the review portion of the screen. ISO can create multiple order entry lines in one entry. For example, if you ask for a quantity that can only be filled using multiple inventory records, such as from multiple warehouses or serial numbers, ISO can automatically find and display the inventory to fill the order. If you accept the ISO screen, ISO creates as many order entry lines as needed.
8. You can still use all other functions of Order Entry along with ISO. For example, if you do not want to accept an ISO selection, you can exit the ISO screen by entering N or pressing F4 and press F2 or F3 to search inventory using the traditional methods.
ISO and Multi-Line Order Entry
Multi-Line Order Entry Window for a Kit
Multi-Line Order Entry Window for a Bill of Materials Item
Multi-Line Order Entry Window for Multiple Line Item Entry
Multi-Line Order Entry is a generic title for the three very powerful methods of Order Entry:
Kit Entry
Bill of Material Entry
Multiple Line Item Entry
Kit entry enables you to enter a single item number representing multiple items which together comprise a kit. The entry of the kit item automatically displays the Multi-Line Order Entry Window, with all of the component items included in the kit, and enables you to create all of the order entry line items at once. A single entry of a kit item creates line items for all the items within the kit. Kits are created using the Item File and the Bill of Material/Kit File. Kits can be created for displays, sample sets, accessory sets, bath products with optional parts, ceramic tile patterns (such as octagon plus dots), and other product combinations.
Bill of Material entry enables you to display all of the related items, accessories or installation materials whenever an item is entered. For example:
Enter a ceramic tile item number and the most frequently used trim pieces also display in the sequence you want.
Enter a wood item number and the recommended installation and maintenance products also display in the sequence you want your customer service personnel to suggest these items to your customer.
Enter an installation material and other optional complimentary products display in quantities proportional to the quantity of the product requested by the customer.
Bill of Material lists can be created for any item using the Bill of Material/Kit File. When you enter an item number and quantity in Order Entry, and that item number has a bill of material record in the Bill of Material/Kit File, the Multi-Line Order Entry Window is displayed with all of the items within the bill of material. You can then enter quantities for the items the customer wants and press Enter. Line items are created simultaneously for all selected items within the bill of material.
Multiple line item entry enables you to enter multiple item numbers at once, check inventory simultaneously, and create line items simultaneously. Multiple line item entry is requested by pressing F17 from the order entry detail line. F17 causes the Multi-Line Order Entry Window to display. You can enter as many item numbers and quantities as you need and press Enter. The system uses ISO to check stock, select stock, and display all items and their availability. You can then accept or reject the automatic selections. If accepted, all line items are created at once. Multiple line item entry can be used when working from faxed or written order requests or any time a customer presents a list of items, rather than checking one at a time.
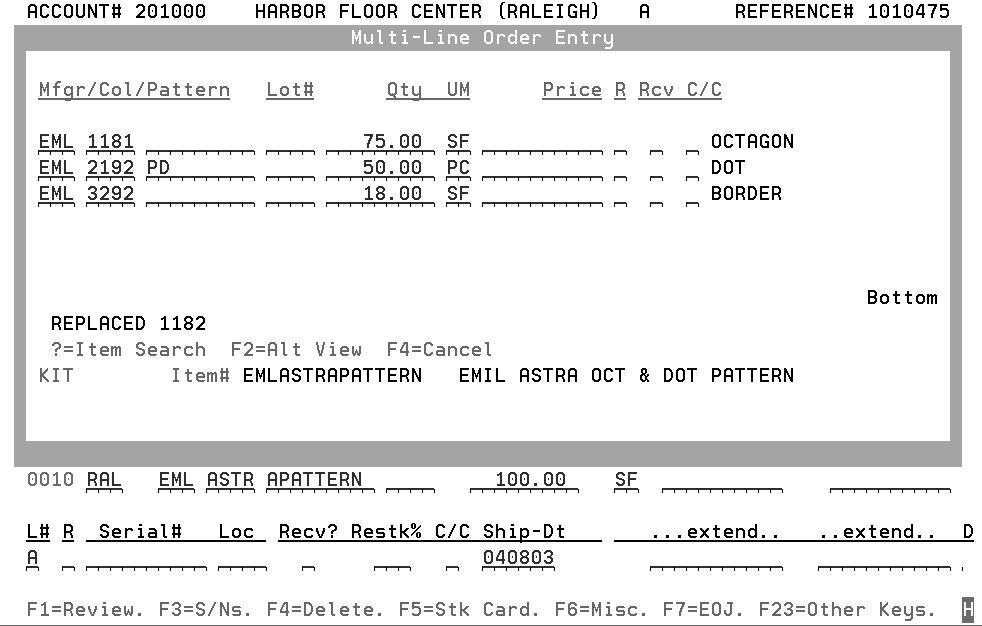
Multi-Line Order Entry Window for a Kit
In this example, the kit consists of three items that are sold in the ratio shown. The program calculated that 100 square feet of the kit (EMLASTRAPATTERN) requires 75 square feet of item EML 1181, 50 pieces of item EML2192PD, and 18 square feet of border material item EML 3292.
|
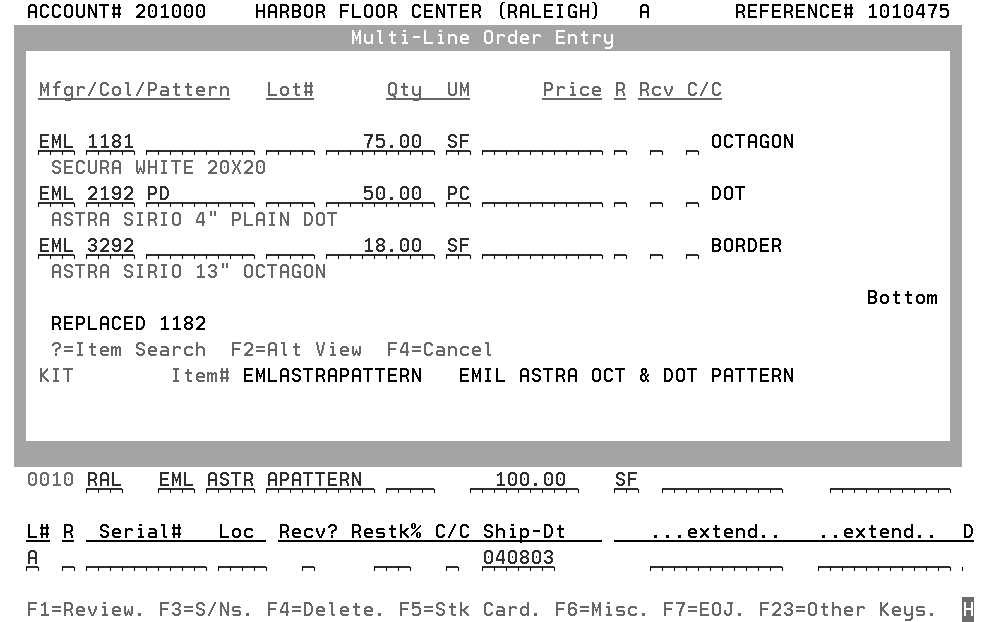
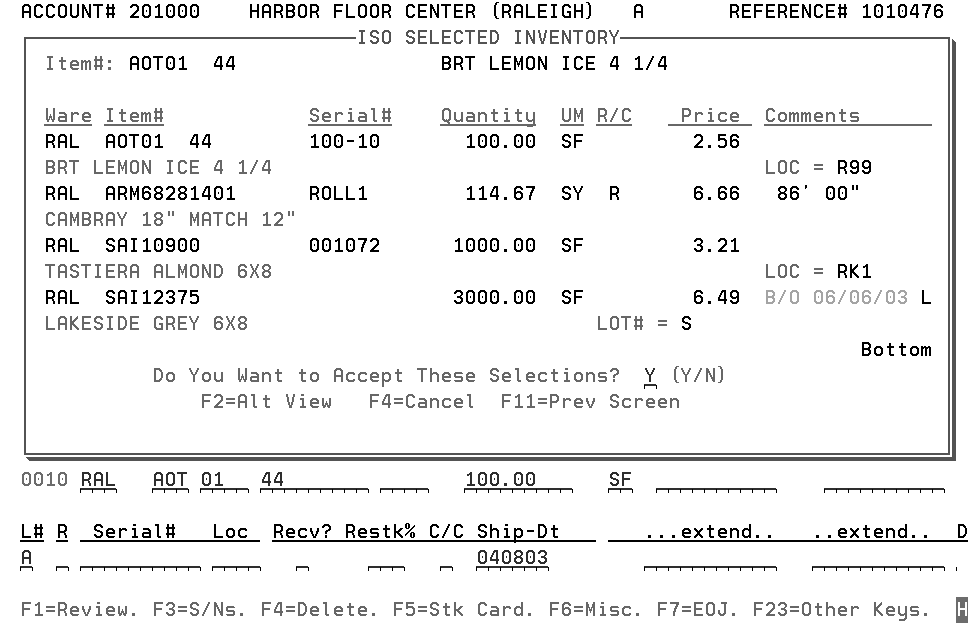
An alternative view of the same screen can be accessed via F2.
|
This window displays the components in the kit with quantities proportioned to the quantity of kits you entered on the Order Entry Detail Line Screen. Press F2 to display full item descriptions if needed, F4 to cancel the request for the kit, or Enter to order the kit. If you press Enter, ISO selects stock for each item in the kit and displays the ISO Selected Inventory Screen.
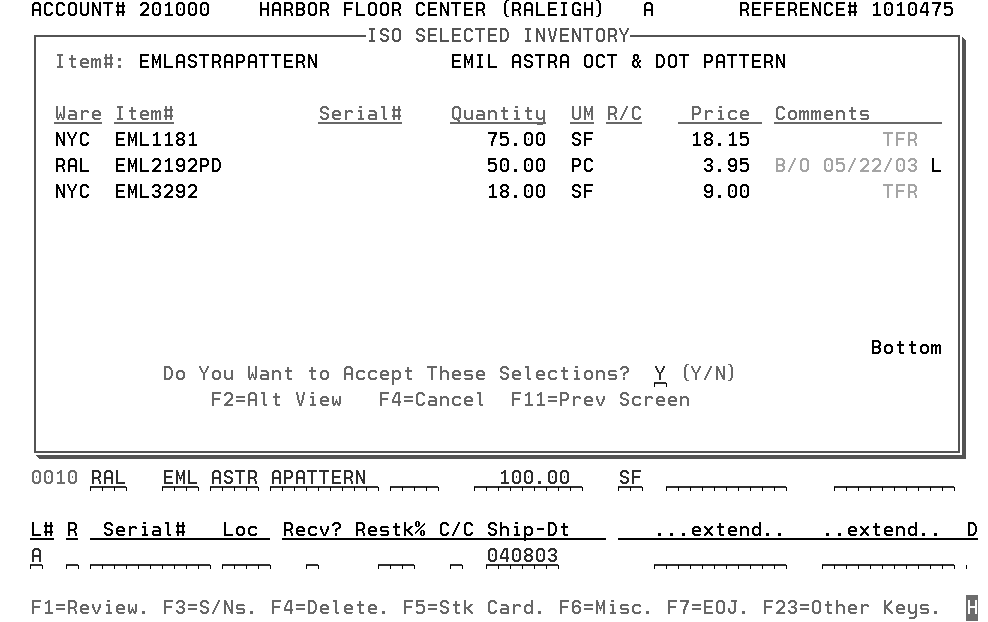
Following is an example of the ISO Selected Inventory Screen showing all of inventory or back orders selected for the items within a kit.
|
This window shows the inventory ISO selected to fill the order. If ISO could not find inventory, it displays a back order for that item, with a back order estimated date. The back order estimated date is based on your outstanding purchase orders, other back orders against these purchase orders, and lead times from your product files. Press F2 to display item descriptions, if needed, F4 to cancel the request for these items, or F11 to go back to the Multi-Line Order Entry Window. Press Enter to accept the ISO selections and automatically create the line items.
Multi-Line Order Entry Window for a Bill of Materials Item
The item is a ceramic tile product displayed with its popular related trim pieces.
|
This window displays the quantity for the item requested from the regular Order Entry Detail Line Screen. The related items from the Bill of Material/Kit File are displayed underneath. You can enter quantities next to the items the customer wants. Items with no quantities entered are ignored. Press F2 to display item descriptions, F4 to cancel the request for these items, or Enter to order all items that have quantities requested. When you press Enter, ISO selects stock for all items with a quantity requested, and the ISO Selected Inventory Screen is displayed.
Following is the ISO Selected Inventory Window with all of the inventory (or back orders) selected for the items within the bill of materials.
|
The above window displays the inventory ISO selected to fill the order. Follow the instructions as described above for the ISO Selected Inventory Window.
The next screen is the alternative view accessed via F2 on the ISO Selected Inventory Window. The alternate view displays item descriptions.
|
Press Roll Up and Roll Down to scroll to other screens if more than one screen of inventory records were selected. The Comments field as shown above indicates a transfer or back order.
Multi-Line Order Entry Window for Multiple Line Item Entry
Press F17 to display this screen from the Order Entry Detail Line Screen.
|
This window includes multiple lines for the entry of multiple items and quantities. Press Roll Up for more lines, and Roll Up or Roll Down to scroll back and forth. Simply enter the item numbers and quantities you want and press Enter. ISO selects the inventory and the ISO Selected Inventory Screen is displayed.
You can indicate that ISO should back order an item regardless of the inventory currently available. Enter a B in the Recv? field of either the regular Order Entry Screen or the Multi-Line Order Entry Screen. This entry causes ISO to skip the access of inventory, but to still go through all the ISO back order logic in finding the best estimated back order date.
This method can be used when entering a future order assuming you do not want to allocate current stock. You can also use this method when simply inquiring about the next availability date of a specific item and quantity.
A backordered item will have a date and a code. The code that follows the back order date can be:
An “L” indicating, date calculated based upon lead time
An “*” indicating, no purchase orders or lead time information available
A PO status code (K, D, T, etc) indicating that the back order date was the E.T.A date of an open purchase order that can cover the quantity ordered. The status code is the status code of that purchase order.
Example
The following text and screens explain the ISO back order process.
1. Enter an B in the Recv? field on the Order Entry Screen and an A in the L# field.
|
2. Press Enter to display the next available back order date.
|
3. The screen above shows ISO returning a back order date of 4/29/03 based on the current date of 4/11/03. ISO considers all open orders, back orders, and lead times. It eliminates the task of interpreting the future order screens that follow. Notice the backorder date is followed by the code L, this means the back order date was calculated based upon lead time, because no open purchase orders were found that could cover the ordered quantity.
4. The field to the right of the Comments field, in the example above it contains an L, is the Purchase Order Status field. In this example, a back order date of 04/29/03 is shown, followed by code L for lead time. This means that the back order date was calculated based upon lead time, because no open purchase orders were found that could cover the ordered quantity. The code that follows the back order date can be:
An “L” indicating, date calculated based upon lead time
An "*" indicating, no purchase orders or lead time information available
A PO status code (K,D,T, etc) indicating that the back order date was the E.T.A date of an open purchase order that can cover the quantity ordered. The status code is the status code of that purchase order.
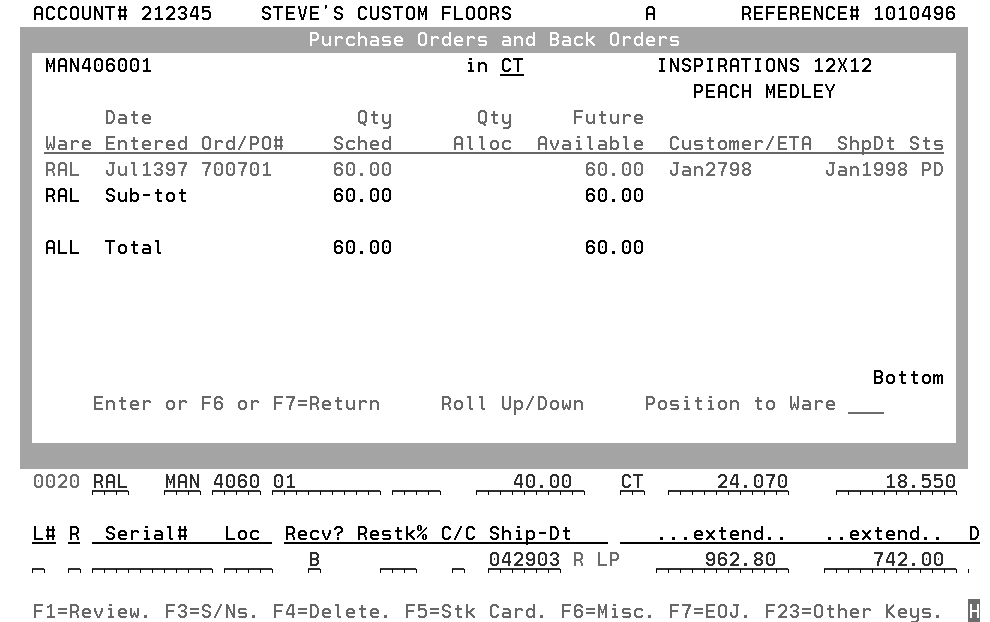
5. To see some of the information used by ISO to calculate the back order date, press F24 then F5 to access the above Purchase Order and Back Order Screen.
|
Using this method to enter back orders requires trained personnel to interpret the screen. Many products will have multiple pages of information to read and interpret. ISO examines all of the information for you, and returns the best available back order date.
ISO creates a special order line when a back order is requested by the user or determined by ISO and the item is coded as “special order only” item. A special order is automatically coded by ISO with a B in the Recv? field and an S in the Lot# field, just as if you had entered the special order line.
When ISO determines if a regular back order or a special order should be created when stock is unavailable the following logic is used:
If ISO cannot fill an order from stock, and the item is coded as Inventory = S (special order only), then ISO creates a special order.
If ISO cannot fill an order from stock, and the item is not coded as Inventory = S, then ISO creates a back order.
When ISO is forced to create a back order, such as when a B is entered in the Recv? field, the same logic as stated in the above two bullets is used, except that stock is not even checked.
When ISO automatically creates a special order it inserts the “usual supplier” from the Item File into the order entry detail line.
When ISO automatically creates a special order, it accesses the Cost File Table. This enables special orders to adhere to quantity break discounts and costs that are dependent upon specific suppliers.
Accessing the Inventory Analysis Screen with ISO
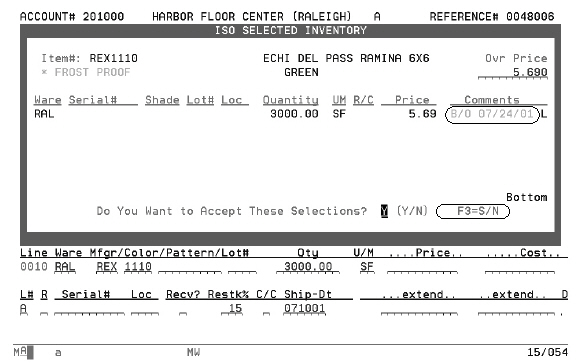
The Inventory Analysis Screen can be displayed from the ISO confirmation window. The example below displays an ISO request for 3000 SF of item number REX1110. The ISO confirmation window, is suggesting to back order the item.
|
The F3 function, displayed in the bottom right corner of the confirmation window allows you to view the available serial numbers (inventory) prior to or instead of accepting a back order.
Press F3 to display inventory.
|
Note: When ISO processes back orders, it searches through open PO ETA dates and lead times. If no data is found it inserts 2/22/22 as the ETA. This indicates that no ETA is available.
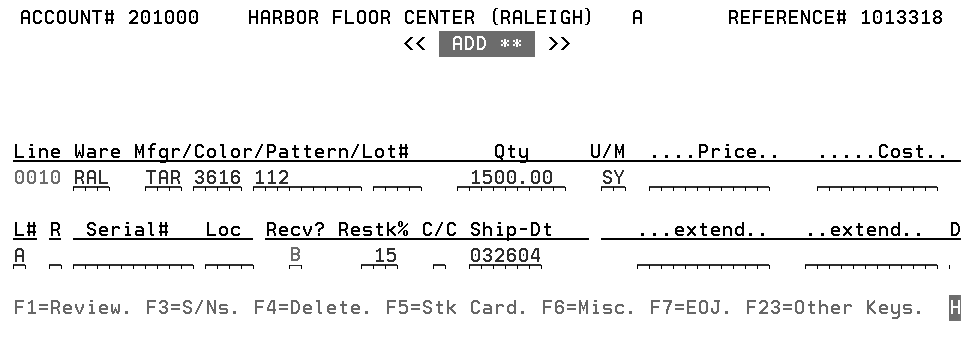
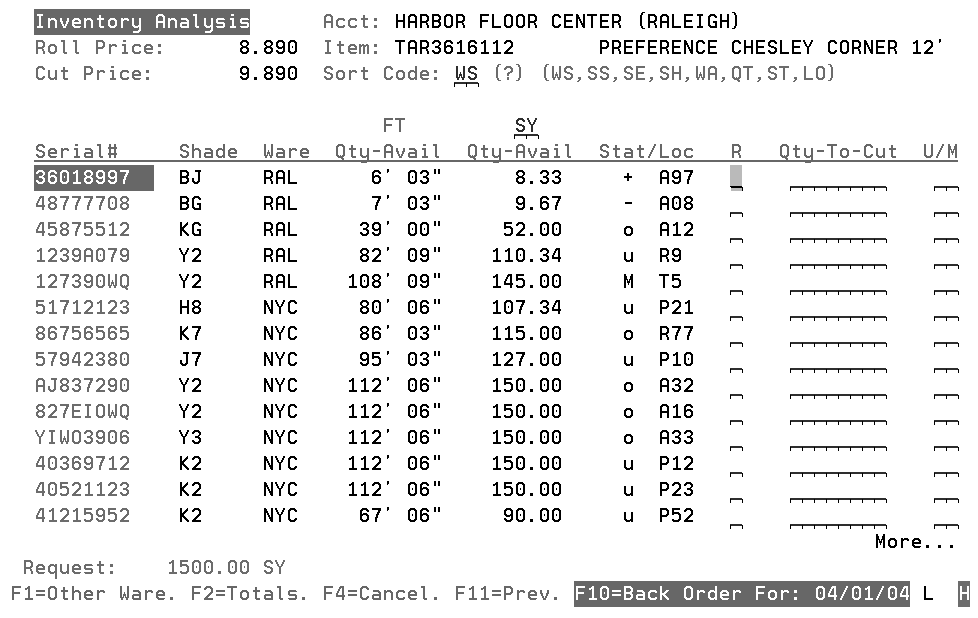
Automatic Display of Inventory Analysis Screen Within ISO
Under specified conditions, the Inventory Analysis screen can be automatically displayed within ISO.
The screen below displays a request of 1500 SY of an item defined as rolled goods.
|
ISO parameters cause the Inventory Analysis Screen to display instead of the ISO Confirmation Window when a back order is suggested. The screen below is displayed as a result of ISO suggesting a back order.
|
This screen allows the user to press F10 to accept the suggested back order, or to select from the serial numbers displayed.
Note: The automatic appearance of the ISO Inventory Analysis screen is based on the entry made in the Display inventory instead of backordering if quantity ordered is less than ___native units field on Screen 4 of the ISO table setup. For example, if 5000 is entered into the field and the order is for 1500 the ISO Inventory Analysis screen will display.
ISO can be instructed to display the above Inventory Analysis Screen when a back order is suggested. Observe the following points:
1. Enter the ISO parameters in the ISO file, which controls these functions.
2. ISO can substitute the Inventory Analysis Screen for the ISO Confirmation window based on a quantity or unit of measure entered by the user.
3. This function only takes place when ISO suggests a back order. It has no effect on ISO when ISO finds inventory to fill the requested quantity.
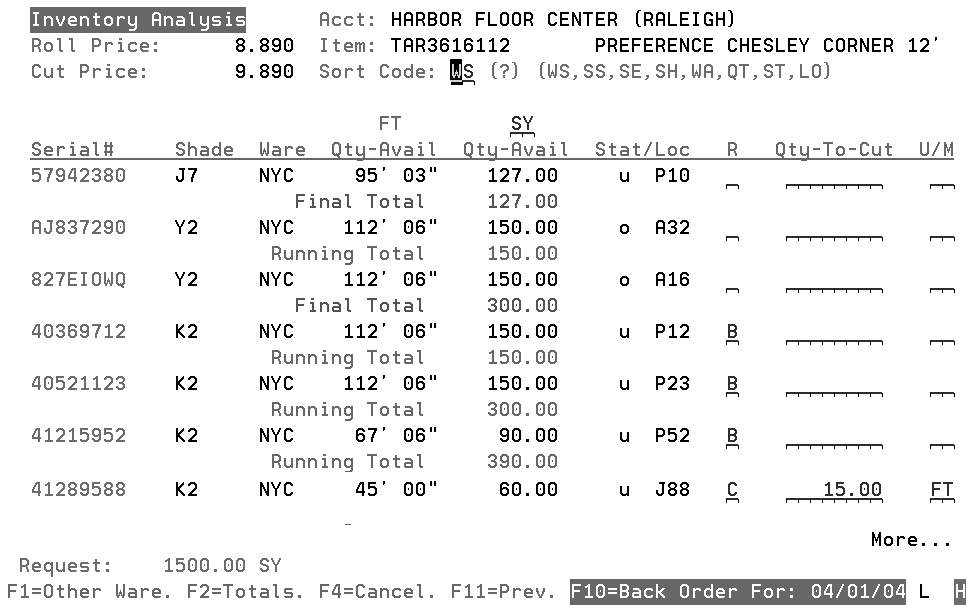
The following screen displays the Inventory Analysis Screen Default sort, F2 = Totals function and placing an order.
|
The entries on the above screen are selecting three roll balances, and a 15 foot cut from K2.
The R field is used identically to how it is used in the regular order entry screens.
The C code is for cut price and requires a quantity an unit of measure.
The R code is for roll price. If no quantity is entered, the balance of the roll is assumed.
A B code means take the roll balance and assign a roll price.
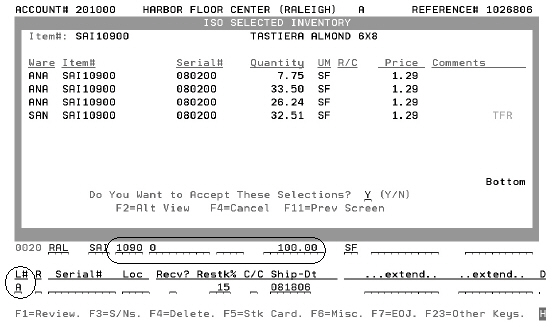
The following confirmation window is displayed whenever selections are made by pressing Enter.
|
Press Enter to accept selections or F4 to cancel and redisplay previous screen.
Laminate products have full ISO compatibility. Before using ISO in conjunction with laminates there are some system set up steps that must be performed.
1. To ensure all the laminate settings are in place, perform the following:
On the Inventory menu enter option 21 - Special Inventory Applications Menu.
Enter option 2 - Laminates Menu.
Make sure the following tables are established:
— 1 - Laminates Cut Size Optimization Table
— 2 - Standard Laminates Grid Size Table
— 3 - Laminates Purchasing Sizes Table
— 5 - Laminates Cut Pieces to be Returned (On Orders)
Access the Item File (option 2 on the File Maintenance menu). Make sure the First Item Policy field has an entry of G#.
2. Create an ISO rules table using option 20 on the System Settings menu.
3. Update all laminate product item masters with the newly created table number. This can be done via option 108 - Item Files Mass Updates on the Special System Maintenance Menus (SYS).
4. Set the control panels for workstations to appropriate options for ISO.
Type CONTROL on the command line to access the workstation control panel.
Note: To use ISO without turning it on for all order entries, use an “A” in the L# field in Order Entry.
To Use ISO Functionality with Laminate Products
1. When ISO is used in order entry, the traditional ISO confirmation window is displayed. Pressing Enter accepts the cuts and the program writes the detail lines.
|
The inventory selection is based on point valuation analysis for laminate material as it would be for any other material with an ISO table assigned in the Item Master.
2. When ISO cannot find inventory to fill a laminate order, it looks for acceptable options for cutting from a different size sheet. Only when no acceptable cuts can be made, will ISO back order a laminate. When a cut will be made, the confirmation window shows “C” in the R/C field.
Note: To review the selected inventory, turn on the ISO Audit report.
Marble slabs should still be selected using the Slab Selection Screen. If you are using ISO to select rolled goods, keep this important point in mind. ISO expects that any quantity entered in square yards or feet is looking for a single piece to fill the order. Therefore, orders for multiple pieces should be entered with a separate quantity request for each roll balance and/or cut. For rolled goods, you can request that ISO find the nearest roll balance by entering the minimum quantity required, the A (for automatic ISO) in the L# field, and a B (for balance) in the R (restrictions) field. ISO will then look for roll balances greater or equal to the size entered including the ability to find a best buy for the customer.