|
Need more info or you couldn't find what you were looking for, let us know by sending an email to: support@dancik.com.
Check Reconciliation Menu
Checks_File_Maintenance_&_Inquiry_-_CKR_1
Process File From Bank (Update Status of Checks)_-_CKR_2
Print Outstanding Check Listings_-_CKR_3
Print_Accounts_Payable_History_File_Audits_-_CKR_5
The Check Reconciliation System lets you to track the status of each check number generated or recorded by the system for computer checks, manual checks, and voided checks. You can mark checks one-by-one as cashed, or run a program that uses a file from your bank to automatically mark each cashed check. You can also generate a list of outstanding checks and conduct various historical analyses of the Check History File.
The Check Reconciliation System is automatically updated by the Accounts Payable System. As you print, void, or reverse checks, and make manual check entries, this information is recorded in the Check Reconciliation/History File. The Check Reconciliation/History File contains different information, and is separate from the AP History File. Check Reconciliation has no effect on the AP History File.
Note: The Check Reconciliation System is a special system option, which requires additional disk storage. We recommend that you install this option only if you have the available disk space. Also, if your check volume is not large enough to warrant receiving a tape or diskette file of cashed checks from your bank, you will not gain full advantage of the system.
This Check Reconciliation Menu includes all of the options necessary to reconcile checks that have been cashed and those that remain open.
Checks File Maintenance & Inquiry - CKR 1
You can update the Check History File directly, by check number. If you are receiving updates directly from your bank via tape or EDI, you only need this option when making corrections.
1. On the Check Reconciliation Menu, select option 1 - Checks File Maintenance & Inquiry. The Checks File Maintenance appears. Enter U or I and press Enter.
2. Enter a Company # and Check #, and press Enter. The screen expands to show specific check information.
|
Important: You can change any of these fields. So, be very careful when making updates. Press Tab to move the cursor past fields that you do not want to change, not the Field Exit keys. If you accidently erase or change a field, do not press Enter to save your changes. Press F7 and exit the program without saving your changes, then reselect the program. Usually, you will only be updating the Status Code, Date Cashed, and Error Code fields.
You can inquire about or update another record by entering a check number or pressing F7 to end the job. After you press F7, a DFU End of Job screen appears. Simply press Enter until the menu reappears.
The following table describes the fields on the Expanded Reconciliation Update screen.
Fields |
Description |
Format |
The format of the record. |
Company# |
The one-digit company from which the check was issued. |
Check/Cheque# |
A six-digit check number assigned by the system for a computer check, or entered by the operator for a manual check. It is the key to the file. |
Cash Acct# |
The general ledger cash account number representing the account from which the check was drawn. |
Status Code |
The user-defined code that represents the status of the check. Suggested codes: CA - Cashed SP - Stop Payment RT - Returned VD - Voided |
Dt Cashed/Voided |
The date the check was cashed, voided, or otherwise removed from being outstanding. |
Check Date |
The date that appeared on the check. |
Check Code/Type |
The code that represents the type of check. Valid codes are: CC - Computer Check MC - Manual Check VO - Voucher Only VD - Voided Check |
Delete/Error Code |
D or an error code appears in this field if the check has been deleted. Error codes are inserted by the program that updates the tape or EDI transmission from your bank, if you receive that service. Suggested error codes: A - Amount is different E - Other Error |
Process File From Bank (Update Status of Checks) - CKR 2
CSV File Format Bank Code for Check Processing
This option allows you to import a check reconciliation file from your financial institution and automatically mark checks as cleared.
Customers can choose between the default bank format and three other formats (Bank of America, or a 12 digit paid amount with either a 10 digit or 13 digit account number).
Customers using the default bank format should place the file received from their financial institution into the following folder on the IFS: home/dancik/bankrec/DFT.
Otherwise, the file needs to be placed in the one of the following IFS folders
— if using Bank of America: home/dancik/bankrec/BOA/Bankrec.dta.
Note: Each division or branch Bank of America may have a different format. The format from Bank of America must be in this order. If it is not, contact Dancik to add additional formats.
— For Wells Fargo (bank code WF): home/dancik/bankrec/WF/Bankrec.dta
— For 10 digit formats: home/dancik/bankrec/C10/Bankrec.dta
— For 13 digit formats: home/dancik/bankrec/C13/Bankrec.dta
Note: Each file must be named Bankrec.dta.
At the current time, Dancik supports five bank reconciliation formats:
Dancik default, which most banks adhere to
Checks with a 12 digit check amount that use either a 10 or 13 digit account number.
Bank of America format
Wells Fargo format
The layouts for the five bank reconciliation options are shown below.
Default (Characters) |
C10 (10 digit acct#) (Characters) |
C13 (13 digit acct# (Characters) |
Bank of America (Characters) |
Wells Fargo (Characters) |
(1-10) Account # |
(1-10) Account # |
(1-12) Account # |
(1-10) Check# |
Account# Comes from the Header (H1) record. Characters 4-13. |
(18-23) Check # |
(18-23) Check # |
(16-25) Check # |
(11-21) Amount |
From the Detail format (R12 - the first 3 characters) Check amount (4-13) |
(24-33) Check Amount |
(24-35) Check Amount |
(26-37) Check Amount |
(22-27) Issue Date |
From the Detail format (R12) Transaction Type Code(14-16) (Currently not used) |
(34-39) Date Paid |
(36-41) Date Paid |
(38-43) Date Paid |
(28-33) Date Paid |
From the Detail format (R12) Issue Date(17-22) (Currently not used) |
|
|
(34-45) Account # |
From the Detail format (R12) Check Amount (23 -32) |
|
|
|
From the Detail format (R12) Paid Date (33-38) |
Note: Contact Dancik to add additional bank formats.
1. On the Check Reconciliation menu, select option 2 - Process File From Bank (update status of checks).
2. A listing of the bank reconciliation formats that are supported appears.
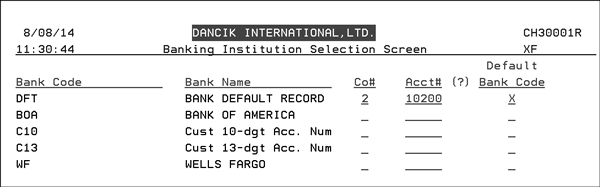
3. Select a bank code to continue using the Bank Reconciliation application. Once set, this does not have to be selected again for subsequent check reconciliation runs.
4. The Co# and Acct# fields have been added to further define the default bank for check reconciliation down to the account level. The Co# and Acct# fields also allow you to use the same check number across multiple accounts.
5. View the edit report, located under the user’s spooled files, for any exception errors.
CSV File Format Bank Code for Check Processing
The CSV bank code option allows you to import a CSV file from any bank.
To use the CSV bank code option, the information from the financial institution has to be in the following 5 column format.
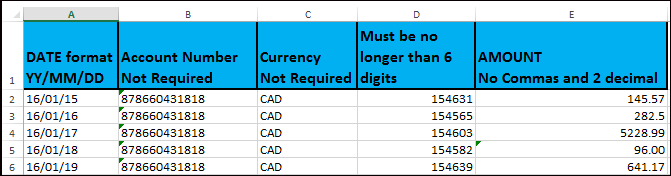
Notes about how the data should be formatted
Since this is a CSV formatted spreadsheet commas cannot be used in any of the columns such as in the Amount. If a comma is used, another column will be added to the spreadsheet. For example, if an amount comes in from the bank with a comma such as 5,228.99 two columns will be created. One with 5 and the second with 228.99.
The CSV file must contain a header record and the header entries must be in the same order as shown above.
The Date format is MM/DD/YYYY and there must be a 0 in the months and days that are single digits from 1 - 9. Example 01/08/2016.
The Amount column can contain two decimal places. If there is not a decimal in the amount the number is treated as a whole number. For example, in the example above, if the decimal would have been left out of the amount of 5228.99 the amount would show up as 522988.
The check number must be no longer than 6 digits.
If a row has an invalid date, no amount, no check number or the check number is longer than 6 digits that row is skipped.
Saving the CSV file
After the CSV file is properly formatted, save it to the following IFS directory: \home\dancik\Bankrec\CSV\Bankrec.csv
After it is processed via the Process File From Bank application (CKR 2) it is renamed to: \home\dancik\Bankrec\CSV\Bankrec.OLD
Note: The CSV file must be located in the correct IFS directory and be named Bankrec.csv. This is the directory and name the system uses to locate the CSV file.
Running the Process File From Bank Application (CKR 2)
1. Access the Check Reconciliation menu and select option 2 - Process File From Bank (update status of checks).
2. Enter a company and GL cash account number used to clear checks for the CSV.
Note: If you have more than one cash account, you will need to create a different CSV file.
3. Enter an “X” in the Default Bank Code field.
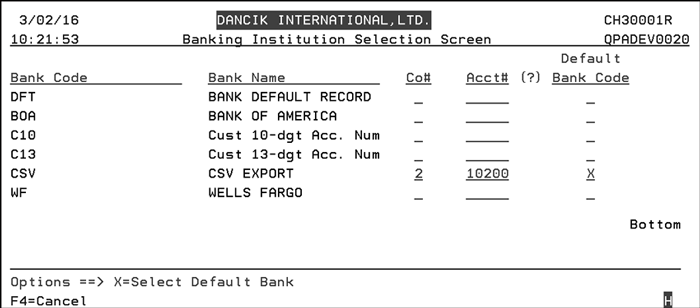
4 Press Enter and then F7. The system looks in the IFS directory \home\dancik\Bankrec\CSV\ for a file entitled Bankrec.csv.
5. If the CSV file is found, the checks in the file are updated to a status of CA and the date cashed is noted.
A spool file report is also generated that shows the following about the reconciled checks:
Check Number
Check Amount
Date Paid
GL Account
Amount Paid
Amount Paid difference

Error Message: There are no resources to process. Open bank file for data
Solution: it means there is not a file available for processing. Check the following:
File name is not labeled as Bankrec.dta
File is not loaded onto the IFS drive.
Print Outstanding Check Listings - CKR 3
This report provides you with the information you need to reconcile your bank statements. You can also use it to audit your outstanding check list by parameters such as vendor, company, cash account, or date.
On the Check Reconciliation menu, enter option 3 - Print Outstanding Check Listings, and press Enter. The Accounts Payable Report Parameter screen appears.
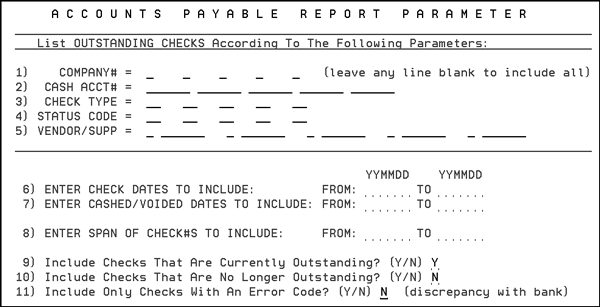
Some examples of ways you can use the Accounts Payable Reports are:
If you want all vendors and suppliers to be included on the report, leave line 5 - Vendor/Supp blank.
If you leave all categories—line 1 - Company# through line 5 - Vendor/Supp—blank, then the report lists everything outstanding in the Check History File.
If entering vendors or suppliers on line 5 - Vendor/Supp, you must enter the vendor code followed by the number, for example, S AOT for supplier AOT, V 100100 for vendor 100100, or M 001430 for miscellaneous vendor 1430.
Use line 3 - Check Type or 4 - Status Code, if you want to limit the report to specific check types or status codes.
On lines 6 and 7, enter the transaction dates that you want to include on this report in YYMMDD format.
Note: Transaction dates are the dates on the computer checks, or that were recorded for manual checks. Cashed/Voided dates are the dates that the checks were cashed, voided, or otherwise removed from outstanding.
You can use line 8 - Enter Span of Checks to Include to specify a span of check numbers. Leave it blank to include all checks, according to your other parameters.
Lines 9, 10, and 11 contain default values that would be most commonly used for an outstanding check list. You can override these values.
The following table describes the fields on the Accounts Payable Report Parameter screen.
Fields |
Description |
Company# |
Enter up to five companies for whom you want to search for outstanding checks. |
Cash Acct# |
The general ledger cash account number representing the account from which the check was drawn. |
Check Type |
Represents the type of check. Valid codes are: CC - Computer Check MC - Manual Check VO - Voucher Only VD - Voided Check |
Status Code |
User-defined code that represents the status of the check. Suggested codes: CA - Cashed SP - Stop Payment RT - Returned VD - Voided |
Vendor/Supp |
The vendor or supplier that the check(s) were issued to. |
Enter Check Dates to Include |
Lets you narrow the results of the report by including check From and To dates. |
Enter Cashed/Voided Dates to Include |
Lets you narrow the results of the report by specifying the dates that the check was cashed or voided. |
Enter Span of Checks#s to Include |
Enter a span of check numbers to include on the report. If left blank, all checks for the company are shown. |
Include Checks That Are Currently Outstanding? |
Enter a Y to include all currently outstanding checks. |
Include Checks That Are No Longer Outstanding? |
Enter a Y to include all checks that have been cashed. |
Include Only Checks With An Error Code? |
Error codes are inserted by the program that updates the tape or EDI transmission from your bank if you receive that service. Enter Y to include only checks that have been tagged with an error code. |
After you have set the parameters press Enter to accept the entries. Then press F7 to select a sorting option. The system begins the job creation process.
Print Accounts Payable History File Audits - CKR 5
You can print these reports to help you audit payables and disbursements. You can select parameters such as vendor invoices and credit memos for the payables audit, and parameters such as computer and manual checks for the disbursements audit.
1. On the Check Reconciliation menu, select option 5 - Print Accounts Payable History File Audits.

2. Enter option 1 to Audit Payables, option 2 to Audit Disbursements, or option 3 to return to the menu, then press Enter.
The next screen in the process letS you select parameters that pertain to the option selected.
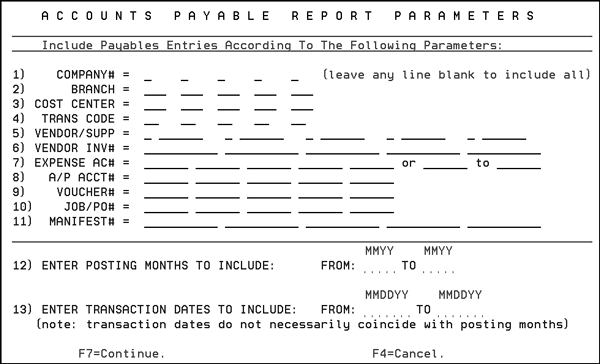
3. Complete the fields, as necessary. On the top portion of the screen, you can leave the fields empty to include all parameters applicable to that field.
4. After you have set the parameters, press Enter to accept the entries. Then press F7 to continue to a sorting screen.
5. Select a main sorting option and one sub-sorting option by placing X beside the appropriate field. Press Enter to accept them, then press F7 to continue.
Checks File Maintenance & Inquiry - CKR 1
Process File From Bank (Update Status of Checks) - CKR 2
Print Outstanding Check Listings - CKR 3
Print Accounts Payable History File Audits - CKR 4
Bank Code File Maintenance - ACT 113